


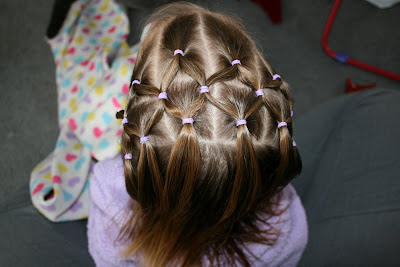
I'm playing mom this week to 4 kids while their parents are in Hawaii...and I'm finding I'm not as good at time management as I thought. Hence Mix It Up Monday become Monday the Missing. There's just not enough time to do everything! Props to you parents out there. The two little girls have asked me to help them with their hair the past few mornings and I just laugh to myself each time. I know what my mom and I did with my hair as a kid in the 90's...but I haven't seen those styles for a while. One luckily wanted curls, but the other wanted "something fun". So I did a modification of this tutorial:
 |
| http://www.girlydohairstyles.com/2008/04/hair-net.html |
Only the one I did ended up being just a net on top of the head as I didn't add new hair every time. The girl loved it though and was so excited to show her friends her cool new do. The password on their computer got changed by the lady that was watching the kids before me, so I've just been winging it on recipes and hair dos. Now that I'm back at my house for the day while the kids are at school I'm scouring Pinterest for food and hair ideas. While doing so thought I thought I'd give you a montage of some of the various hair submissions we have been sent, along with restating Emilee's awesome hair advice from an earlier post.
The Original Pin
 |
| http://www.wikihow.com/Curl-Hair-with-Bobby-Pins |
The Pinstrosity
 |
| "The night before thanksgiving I wanted to do a no heat curl thing that required you to twist then bobby pin it on top of your head and sleep on it. I had tried it before and it had fallen flat so this time I tried to pump up the volume by adding mouse before I twisted it, the result was worse than last time. This time I looked like Gene Wilder in the movie Young Frankenstein! I was so sad it looked horrible." |
The Original Pin
 |
| http://www.ohsoprettythediaries.com/2012/08/the-tutorial-brilliant-braid.html |
The Pinstrosity
 |
| "We tried to braid our hair, but it ended up knotted, and separated into two sections. This picture shows me pulling down as hard as I could trying to undo the knot..." |
The Original Pin
 |
| http://www.thesmallthingsblog.com/2012/10/not-just-ponytail.html |
The Pinstrosity
 |
| "I followed all of the directions, except teasing my hair at the top of my head. I had literally just gotten my hair cut about 30 minutes before trying the hair style and I had ample product in my hair. In short, the whole thing was a hot mess." |

The Original Pin


We've had a few entries for this one actually. I'll show you three of them.
Pinstrosity #1

"But one day - having gone too long between haircuts (again) and inspired by a pin I had seen earlier that day - I decided that maybe, just maybe, I would get a different result for once."
"SO wrong."
"That night, after getting home from my workout and showering, instead of letting it air-dry, I twisted it into the knots as the blogger suggested and pinned them into place. (I'll admit at this point that I twisted them pretty tightly - my husband even called me Gwen Stefani at one point - but hey, I was worried that they would fall out of the bobby pins during the night, because of the fine-ness and thin-ness.) The next morning, I headed downstairs and unpinned the mini-buns, eager to see my curls - and instead recoiled in horror at the Bozo-esque look I was now rocking. My husband came down the stairs shortly after and immediately burst out laughing - and he was all too happy to practically hold me down and snap the attached picture. (Just look at his gleeful grin!)"
"So, it is back to morning showers and my trusty hair dryer for me...and I'll be sticking to food-based pins from now on, thankyouverymuch. (Crockpot ones actually seem to do really well for me.)"
"And on the GCT Fail Scale? I'd rate this either a 4 or 5 - if I didn't have to get my daughter to preschool that morning, I definitely would have re-showered and started over! Instead, it ended up in a really wavy, frizzy-ended ponytail for the day. (Hmph.)"
Pinstrosity #2


Pinstrosity #3
| "So we actually saw a pinstrosity and because it was so bad, we decided we might be able to make a go of it as well. We were actually hoping it would fail like the others!" "The original pin: http://theglitterguide.com/ "Your post about it: http://pinstrosity.blogspot. "Attached is our outcome of the pin. NAILED IT! At least, the pinstrosity version of it anyhoo. It will go nicely with my daughter Emily's Mad Hatter costume for this Halloween!" |


And here's what Emilee has to say about trying new hair-dos from Pinterest:
The hard truth, like we have said before, is not everyone's hair will do everything, and it definitely won't do it perfect the first time or otherwise.
Here's some good news: it might do what you are wanting. Doing wet twisted curls with your finger and pins isn't always going to give you the same end results. Here is why. Variation. Every time you do it you may be pulling harder, pinning looser, taking smaller chunks, taking bigger chunks, inconsistency is the issue a lot of times. That is the other issue with Pinterest, did any of these pictures come with directions ON them? NO. Now if you are lucky enough to have had a link to go with your picture, and smart enough to follow that link, watch the tutorial video, and then follow those directions, you might have had a fighting chance. However if your hair is different than the tutors, then you run into more trouble. Let's be real here also, nobody's hair is exactly the same...I have had clients whose hair does not work with heat, others who do not work without heat, others who had to wash it every single day in order for it to anything, and others who washed it once a week or it looked like a wig on chicken. Everyone's hair is different.
Now that I have the hair pow wow over with I CAN give you some tips to help out.
- Some pins you need wet hair, others need dry, look at the picture, does the original pin picture have nice tight twists on top of their head or do you see "fuzzies" sticking up everywhere? If you see an abundance of "fuzzies", there is a good chance the pinners hair is DRY. If it looks slick and clean is is most likely wet.
- Using a leave in conditioner will generally help with tame the"fuzzies" for when you take your hair out, but humidity is a WHOLE 'nother ballgame.
- Leave it in over night. Most of these pins require you to sleep on them. Those of you who have thick hair, your hair will most likely NOT be dry in the morning. Like I said in a previous hair post, you MUST blow dry it. Use the blow dryer gently on low heat low speed...gently. Too vigorously and you will look like you put your hand in a socket. No bueno.
- Those of you with fine limp hair, this is tricky. You don't have a ton of hair and it generally doesn't have a lot of volume. I would put a silver dollar size of mousse in your roots before twisting it up, this should help add some volume. Also when you take it out tousle your roots with your fingertips while your head is flipped upside down, but don't shake like a dog. Too much will ruin the effect. Definitely use hairspray.
- Section sizes, it's hard to tell you what size to take because everyone's hair thickness is different, but I would say thick haired people use 1" by 1" squares all over if you want good defined smaller curls. For bigger more wave like curls take bigger sections, but I wouldn't suggest anything bigger than 3" by 3" or you will have a problem with it not drying in time.
- Another thing to think on: if you are sleeping on your do perhaps use a hair net or cap over it to add some security. Some of us aren't still sleepers. Food for thought.
- DON'T brush it out. Use your fingers to separate it. If you are desperate use a pick. Again, go GENTLY.
- In general you will almost never see a hair style like the above styles on Pinterest that hasn't been touched up with some sort of curling iron/straightener/wig. It is just the way of the game. Just like photo shop and magazines they think no will notice and that everyone will think that's just how they look. The jig is up, America knows. A great tutorial can be found here: http://www.lovemaegan.com/2011/09/revisiting-no-heat-big-curls-w-twisted.html
The moral of the story is, don't get discouraged, make sure you have directions, or someone who has done this before to maybe help you out, and figure out your hair, it's yours, own it! Everyone's is different, and with that will behave differently, so remember to take that into account...and don't be ashamed to do a two minute touch up. I'm not, and I am a hairdresser. -Emilee
I hope you enjoyed those hair Pinstrosities and that Em's tips help! Good luck with your hair adventures and as always, don't forget to send them our way if they go wrong. Keep on the lookout for a video tutorial about how to do those awesome hair bows. Em's going to show us all how it works.
Happy Tuesday everyone!

I love trying new hair-dos on my 7 year old. I just have to comment that I have done that last hair-do (the Bantu Knots) many times and they have turned out wonderful. My daughter's hair is very fine and curling iron curls fall out within an hour but the curls from the Bantu Knots are beautiful and last all day. I do have photos of it but I can't figure out how to get them to you. If you would like to see them, let me know how and I'll send them.
ReplyDeleteThanks for the warnings!!!! i am a hair tutorial addict and also love to play around with hair and is so curious about this pin curls. Have a nice day!
ReplyDeleteI have baby fine hair, but masses of it. Enough for several other people. Any additional advice for me?
ReplyDeleteWhen I was younger, I tried all the sleep-on-it curling tricks (mostly because I had bushy hair and using a curling iron or hair dryer was disasterous). I tried rag rolls and pin rolls and those weird foam and fabric things with the snaps. None of them worked. They all looked funny or I ended up less with the Shirley Temple look I was going for and more of the Bozo the Clown. Really what works best is old fashioned foam rollers. They're super-cheap and you can buy them at the pharmacy in a bag with several sizes. Use the bigger ones. The night before, when your hair is wet, add some mousse and then put your hair in the curlers. Vary the size of the curlers for a more natural look. Try smaller ones around your face and bigger ones in the back, but don't make the sizes too dramatically different. Then sleep on it. When you take your hair out in the morning DON'T BRUSH IT! If it needs it, separate gently with your fingers, or tousle it gently to separate the curls. You will probably need to also touch it up with a curling iron a bit. Then spray the heck out of it with a good quality hairspray. It's a lot of work, but it ends up looking good.
ReplyDeleteThe trick of the "brilliant braid" is to pull the hair through a hole created below and to the left or the right of the previous hole. It took me a minute to figure out, but really the thing that would help would be good diagrams rather than okay pictures. I'll admit that my "braid" doesn't look super great and it certainly takes longer than just braiding my hair to the side, but it is faster than a proper fishtail braid and I could probably get it to look really good if I were willing to give it a couple more tries.
ReplyDeleteFor the brilliant braid one - it's a fishtail braid. The best way to cheat that is to pull it to the side with one of those little clear elastics, do a normal fishtail, and then snip the elastic out and stretch it a bit for texture. Voila ;)
ReplyDeleteMy hair does headband curls really well, the ones where you wrap it around the headband? And sock bun curls work good for me too. Pin curls take way too long for me. The sock bun one works good, though, if you do it with damp hair and use a mousse.
I like the sleeping in curls technique, but I twist it french braid style in 4 or 5 seperate braid-twists, and keep twisting until it twists up on itself. It usually gets VERY big and almost afro-curly (volume wise, but with bigger curls) the next day, but I don't have to use product on it except a small amount of oil at the ends to make it more manageable and I can go 2 or 3 days without washing it, which is great because I have fine dry hair that I hate having to wash every day.
ReplyDelete#2 Looks almost identical to how my grandmother and mother would curl my hair when I was younger. There is a trick to it that shows in the original image, but the girls are doing wrong in their versions.
ReplyDeleteThe trick (from what I was taught) is to take a small amount of hair and wrap it around your finger. Slide the hair off and pin "flat" against the scalp with at least 2 bobby pins. Repeat until all hair is pinned. The bigger the rolls, the looser the curl. That's important to keep in mind. The other girls were doing a twisty mountain thing...
We did this for all special occasions, and it truly did come out with very nice spiral curls. Any brushing would instantly frizz it out though. So styling was tricky.
I wish I had a photo to share. But my cousins and I have all had this done at home with similar results. (hair of all thicknesses and types)