Wednesday, December 10, 2014

Bloomin' Baked Apples

Hello all! What a week it has been already! I finished my last week of college this week! Hoorah! Now I have more time for activities! Woohoo! I am going to a steam punk ball on Saturday and have made all my costume pieces myself, when I am all done I will have to share all the details with you guys!

Today though I have a Pinstrosity for you! Tali sent this one to us and I got a giggle out of it, and learned a few things! Check it out!
The Original


Doesn't this bloomin' apple look amazing?! Pause for the cause diet, there is a new obsession in town!


Here is what Tali had to say about her attempt:

The Pinstrosity


"Ok, so for days before Halloween, I've been seeing these great looking desserts all over for Blooming Apples.  I love apples, caramel, butter, and sugar so it's a not brainer to try. 
Some friends had a Halloween party, which is the perfect time to do this!  I grabbed the ingredients (though I did switch the Honey Crisp apples for Granny Smith).  I prepped the apples, which took far longer than I anticipated.  Then I prepped the topping.  Caramel- done.  Butter and sugar mix- microwave, seems simple.  I may have skimmed over the part about slowly melting the butter, letting it get really melted.  I also neglected the flour (pure oversight).  I mixed the sugar, added cinnamon, and topped my apples.  The topping was more runny than in the picture, but I went with it, blaming it on butter that was melted too much.  

The timer was set, then friends with a newborn stopped by.  I held that sweet baby for a while, marveling in the tininess until the timer went off.  My friend (the host) checked the apples and as I said, "They may need more time," she laughed and said they were done.  It was a bit later before I saw my creation.  Oops.  The flour would have helped, as would an aluminum foil tent, with the oven rack lowered.  The taste was great- caramel yumminess, but I will have to practice this to make it look prettier.  The rest of the night I had fun telling people there were caramel apples in the kitchen, only to listen to them laugh when they saw them!  A mess this epic is pretty rare for me, so it made it more fun. "
The only real red flags I see here is the missing flour and the runny butter. I really don't feel like those two oversights would create the end result we see above though. Perhaps the oven was too hot, or Tali put the timer for the 45 minutes (maximum time) instead of the 25 minutes as the suggested start time? I can't be sure because she didn't specify, but those apples look pretty toasty! No worries if that's the case, I do that kind of stuff all the time. That's what I get for multitasking, haha! They are also only toasty on the tips?? I'm not sure what that means in baking-land, where are all our baking experts?? Can you help us out on this one? Where else can we improve this recipe folks? I'm thinking I'm going to try this one out during Christmas festivities! I will be sure to check back in with you all and let you know how it goes!
Happy Wednesday all! Happy baking!


Monday, December 8, 2014

Pay it Forward: Tote-ally Awesome Tote Gift

Our final Pay it Forward project comes to us from Australia! I love having all you international cyber-friends, this is so much fun!

Dear Marquette, Emilee and Rachel

Firstly, thank you for the monthly Pinstrosity Challenge – in particular the November Pay It Forward Challenge.  This challenge got me off the lounge and at my crafting table to make a Thank You gift for my daughter’s ballet teacher. I had pinned a gorgeous Tote pin quite a number of months ago, and had even gone as far as ordering the tutorial online, printing it out and then binding it to keep it together.  (Here’s the link to Inking Idaho’s tutorial page http://www.inkingidaho-tutorials.blogspot.com.au/) The tutorial I am referring to is Becky’s Tote-Ally Awesome Tote, which makes this:


Pretty awesome hey – it has everything – cards, gifts, pens, post it note holder and best of all – a carry tote for it all!

And the instructions are pretty awesome too. I had a trial run using some card stock, but quickly realised that I wanted the tote to be a little stronger so I invested in some heavy craft paper. The inside of the tote also has two clear pockets to hold the cards. I made these pockets a little larger so that they would hold a regular size card and envelope – and boy, was that a challenge! I needed to increase the size of the pocket by about 1 cm but you just can’t add 1 cm to the middle measurement…..after a couple of trials, a few swear words and a piece of acetate being thrown down in disgust, I finally managed to complete the pockets and the rest of the project.  I used ballet paper from my stash, and then quite a number of pinned card ideas (thanks again Pinterest) to make my cards. I also used magnets as a latch, rather than Velcro dots on both the tote and Post-It holder.


This gift turned out pretty awesome…and I can’t wait to give it to our ballet teacher. So thanks Pinstrosity – your challenge is just what I needed to get the gift made and ready in time! 
Wishing you all a wonderful festive season.

Kind Regards

Michelle


What a neat gift! I absolutely love it. Clever, cute, and usable. Perfect! I'm sure the ballet teacher loves it!

Pay it Forward: The Giving Plate of Fudge

Our penultimate (one of my favorite words right there) Pay it Forward project comes from the kitchen of Carolyn:

Earlier this year I made a bunch of Giving Plates from this pin:
(source)
Mine turned out like this:
(source)
I had one left sitting on my refrigerator waiting for me to decide to who to give it too, and what to put on it.

Then this month I found some Crockpot Fudge and knew I HAD to try that out.  
(source)
I followed the directions exactly, and it turned out great.  Perfect consistency and flavor.  Easy to do.  It is the perfect quick fudge, minus the marshmallow fluff.  


After it was all set up I cut it into bite size pieces, and put half on the Giving Plate and delivered it to a family friend.  It was so fun to see the surprise and happiness on her face when I handed her the plate.


I'm all about quick and easy and fun, and this looks like it fits all of those with the added bonus of yum! Thanks Carolyn for the great double Pay it Forward project!

Pay it Forward: Hostess Gift

I was introduced to the custom of hostess gifts through my Mother-in-Law. I love the thought and the gratitude it shows. We've tried to integrate it into our life more to show our gratitude for the kindness of others. It is a custom that has largely gone out of practice, at least in our generation, but I'd love to see it come back!

Nicole used the idea of a hostess gift when she came up with her Pay it Forward Project:

I decided for this month's challenge I would give something to my grandmothers for hosting Thanksgiving at their houses. I wanted something inexpensive, simple, and useful. I chose to make potpourri kits. 

She got the idea for the kits here: 
(source)
 And the "recipe" here:
(source)

Then I had the brilliant idea that I could easily make more (because it's so easy), so I made some for my aunts and cousin. For the most part, everything went well except the bags I bought were too small for the oranges, so I resorted to sandwich bags. I also was too lazy to get my regular hole punch so I used my heart hole punch...which I just realized looks dirty when it's used upside down! 


What a fun and sweet hostess gift! I love that it is usable and perfect for the season. Thank you Nicole!

Pay it Forward: Train Photography

I seriously love how varied and creative each of the projects for this Pay it Forward theme are. I never expected to get a photography related Pay it Forward, but here we have one! Eilonwy sent us in this project:

Plans to sew a ragdoll for a Christmas "give a disadvantaged child gifts" program fell apart in a "never got off the ground way"... then, while I was out being self-centered, I visited a community history group and ended up volunteering for them! This led to an urgent need to figure out how to take photos of trains.

I was basically trying to do the HERE COMES THE TRAIN RIGHT AT ME urban shot, which is like this:

(source)
The best of my batch turned out like the [first one below], so not a disaster, but there's still PLENTY of room for me to improve. Also, I managed to do this in a way that did not risk getting hit by a train. (It occurred to me a week later that, since our light rail is identical at both ends, the answer is to step out onto grade level track BEHIND a train that's pulling away.)

She then gave us the link to the full blog post that chronicled her Pay it Forward train adventure. Here is what she had to say:

Sometimes, you want the light ahead of you to be an oncoming train.

O hai.

I am trying to do the monthly Pinstrosity challenges, partly because I like how the site owners put the focus on trying to fix/avoid disasters (after an archive dive here, you will never, ever forget to chill your cookie dough) and partly because it pushes me to do things that might otherwise go in the eh, maybe later pile.

The November challenge was "pay it forward": associate your Pin craft with a philanthropic activity. I started the month with Great Plans that involved sewing a doll for an underprivileged child... and fell apart on (a) a solid week of migraines; and (b) not being realistically able to meet the sponsoring charity's stringent and extensive guidelines. So in a funk of mixed guilt and relief, I went off to return library books, stopped in at a local museum, and somehow ended up offering to put together a plan for their social media.

One consequence of this new project is that it'd be helpful if I worked on my train-photographing skills, so off I went to Pin. (I've been vowing to improve my photography skills since 2007. No sign of improvement has yet been sighted, even if you squint.)


Train and trolley photos fall into three sorts:

My first thought was to try getting a shot of the moving light rail train from the comfort of the 0-Central bus, which runs parallel to the tracks for part of the route.

This went exactly nowhere and somehow developed into an obsession with moody photos of the 8-Seventh Avenue as it waited at the Ed Pastor Transit Center.

Malcontent bus lurks. 
The pink-sepia-ish tone is not a filter. That's what Arizona actually looks like. After a few years here, you subconsciously accept that dirt is a sort of washed-out coppery pink, and brown dirt looks odd.

The loneliness of the Seventh Avenue bus speaks to Sundays in Phoenix (we roll up the sidewalks and tuck them away neatly), but it wasn't really what I was after.

On Monday night, I thought I'd get a shot of the Scottsdale Downtown Trolley as it winds through the Arts District. Turns out the Downtown Trolley is a sneaky little sucker. In the narrow window between getting off work and sunset, I never got a clear shot, and the little bugger came up behind me without dinging its bell twice.

On Tuesday morning, I got up before dawn and rode the light rail down to the Roosevelt stop, where the tracks diverge to accommodate one-way streets through downtown. There's a coffeehouse that opens early, in the ground floor of the Dauntless Headquarters (I don't know if the apartment complex has a name, but it's relentlessly postmodern and spiky), so I equipped myself with a cup of coffee and went out to photograph trains.

It turns out that the paving of the tram stop is designed to look like crossing track patterns.
If you start trying to match this up with the tracks, you will go nuts. 

The platform is sort of triangular, so it's possible to go out to the narrow tip and be sort of head-on to the tracks as they come over the bridge that spans Deck Park.

When you're standing in a 45-degree brisk wind at sunrise, trains are a long way apart. But here's one now!

Zoooooommmm!
Click-click-click... and even though I'm behind a concrete barrier, I'm starting to get nervous, but here is the oncoming train in semi-close-up.

Well, hellooooo, 126-A!

It's not the greatest train photo, but it captures (a) full frontal view of tram and (b) pretty accurate view of urban Phoenix. What's behind the train is Midtown.

I got on that train and rode it down to the Tempe Transit Center, which has weirdly symmetrical palo verde trees.

We are trees. We are weirdly symmetrical. 
Attempts to get a good shot of a tram sneaking through the foliage into the station from the east went kind of meh.

It'll be coming round the palo verde when it comes. 

Lessons learned:
  • Be prepared to devote large swaths of time to capturing the passage of multiple trains or trolleys.
  • Aim once, click fast and relentlessly. No, faster than that!
  • It is possible to cheat at the angle to get a head-on shot of a train without being dangerously near the tracks.
  • It is very difficult to find a Phoenix-area background that isn't visually cluttered. Nobody thought about camera angles when they designed this place.
  • Try for sunset next time -- it seems to give better shadows. Dawn seems to wash things out.

On the whole, I wouldn't call the first stint of train photography a monster success, but it counts as progress and got me to try an angle I wouldn't have tried on my own. Thank you, Pinstrosity!


Pay it Forward: Peanut Butter Cookies

Next up in our Show and Tell Pay it Forward Day is a scrumptious project from Cathy! We cyber met Cathy and her husband Rob through their amazing Creative Kingdom website. We were so excited to get to be a part of their website launch, and we're loving keeping up with the site. You really should go check it out!

Cathy took the Pay it Forward theme to heart and used something that was given to them in their project to give to others. Check it out:

A friend from Canada sent my husband and me a box full of goodies and gifts that would be very difficult to find in Britain. It wasn't a special occasion or anything, she is just a kind person who does nice things like that. I thought it would be a good idea to use one of the things she sent us to do something nice for someone else and pay it forward (see it all fits perfectly).

One of the things she sent us was a big bag of Reeses Peanut Butter Chips, so I thought I would use them to bake some peanut butter cookies and share them out with people. There are lots of delicious peanut butter chip cookies on Pinterest such as this one:

(source)
but they were all American recipies and I wasn't very confident on making the conversions.

So I cheated and used this triple chocolate cookie recipe from the BBC Food website and substituted half the chocolate chips with peanut butter chips. 
(source)
The results were pretty great and plentiful (think the recipe made around thirty) I took them down early to church to share with our worship team during sound check then Rob and Me took a batch each to work on Monday and shared them around the office. There were none left by Monday home time!


-Cathy 


I love how she jumped into the Pay it Forward challenge! Her cookies look soooo yummy. While blog-stalking I learned that these were her first taste of Peanut Butter cookies! How fun is that?! Cathy, if you ever make it to New Mexico (you know, just a hop, skip and a jump from Great Britain), I'll make you a whole big batch of Peanut Butter cookies! They are a favorite in this house. I may have to brave the conversions and try out this BBC recipe, because it looks fantastic. 

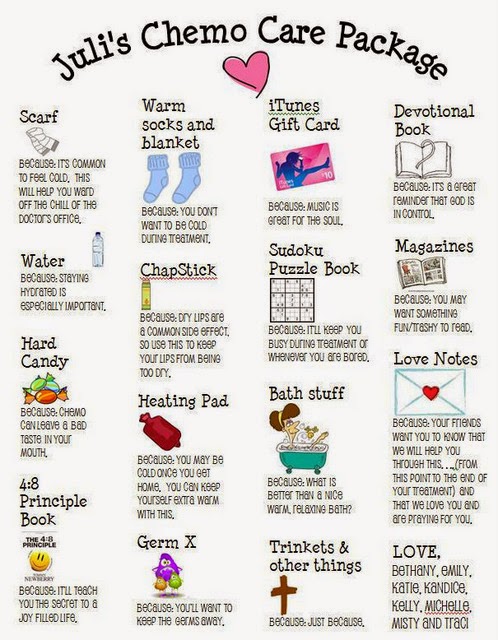
Pay it Forward: Chemo Care Package

Whew! We made it to Monday and we're all alive! This past week was Cameron's worst week of the semester with presentations, projects, 30 page papers, etc. Since we just have the one computer at home his needs for school took priority over getting the Show and Tell Saturday post up for our November Pay it Forward projects. But this morning he is finally done (hallelujah!) and I can show you the amazing Pay it Forward projects we were sent. I'm going to give each project it's own post and they will be posted up throughout the day. So check back in often! 

This first one is from Lindsey: 

My mother-in-law just started chemotherapy this month for a rare sarcoma.  She's stage 4, and was diagnosed a week before she retired.  Awesome way to start her retirement, huh?  The whole family is struggling with this and trying to find ways to send comfort across the miles.  She lives in Pittsburgh, and is now in Boston for treatment, while my family is in Maryland.  Even though we couldn't be there in person for her first round of chemo, I wanted her to find a way to comfort her.  I looked for pins to give me good ideas for things that would be a treat and a bit of comfort for a chemo patient, and found a few that really did the trick. Cancer Support & Prevention and Gift ideas and so so many more.  

(source)

(source)
They had some common themes: chap stick, fuzzy socks, reading material, and lotion most predominantly.  I went to Target and was able to round up my own collection of goodies. Some say I have a talent for this, others might call me stalker-ish, but whatever your take on how much I store away little details for future gifting reference, the end result is usually a warm fuzzy feeling for the recipient and that's all I care about.

http://lindseyedits.blogspot.com/2014/11/care-package.html

Here we have:
  • Bossypants by Tina Fey.  A great read for anyone, but especially for another woman who has been through all the nonsense Tina Fey touches on in this book.  Also, it's funny and funny is good for Lulu.
  • A silly card.  I think that's a donkey kissing a little boy's head.
  • Fragrance free lotion.  You know, as much as fancy lotions are fancy and nice, if you don't know what scents a person likes, you could be really hit or miss there.  This option is still a treat without the risk.
  • My favorite chap stick.  It actually soaks in without that waxy feeling.
  • Green tea.  She was an avid coffee drinker for as long as I known her, and then she retires and switches to tea.  Traitor!  Still, I will support her new lifestyle.
  • Nail polish.  I don't care who you are, ladies always like nail polish.
  • Cozy socks and hand warmers.  She's staying in Boston right now and that = MUCH colder than Florida where she was supposed to be.  She needs some warmth!
  • Bath soak.  I know Sheldon says to offer friends in need a hot beverage, which I did (see Green tea, above), but I one upped him with the hot bath, too.
  • Vase and colorful fake flowers.  Nothing says perky like flowers you don't have to worry about watering, amirite?
  • Monogrammed mug.  If she's going to be cozying up with a book and tea, she needs a mug for that tea!
All little things, but put together they create a bit of pampering and care.  A long distance hug, with some laughter and cheer splashed in.
  
All packed up and ready to go!
http://lindseyedits.blogspot.com/2014/11/care-package.html

It got to her for her first day of treatment, and she absolutely loved it.  Thankfully we're headed up to Boston tomorrow so we can spend Thanksgiving week with her and my sister-in-law's family.  For such an awful time we still have so much to be thankful for.  Finding ways to show our love, with a bit of Pinterest help while feeling lost in this scary landscape, is such a help.

Wednesday, December 3, 2014

Christmas Strawberries

Most of us tend to think of Strawberries as being a summer food. Strawberry Shortcake. Strawberry ice cream. Strawberry Cheesecake. Strawberry lemonade. Strawberries are just great in the summer straight off the vine. Strawberries are starting to make a stand for Christmas use now as well though, only sometimes the results aren't quite as awesome as we might hope.

Christmas Strawberry Trees: 
http://www.ericasweettooth.com/2010/12/strawberry-christmas-tree-brownie-bites.html
Cute, and the idea of strawberries and brownies makes me want to go zap a brownie in a mug and stir in some of the frozen strawberries from the freezer. But that is its own Pinstrosity waiting to happen, so I won't. Speaking of Pinstrosities...

Dayna said, "I tried hitting two pins with one hammer (hahaha, you know... two birds, one stone? I tried being clever there... :P) and the cake was actually a Dr Pepper cake pin I had found! The icing I had used was a generic butter icing. I think I may have whipped it too long because I kept adding more and more green food colouring right until my little bottle emptied out. So maybe that's why the icing flopped like that? Overall the result was delicious but the presentation failed. Everyone seemed to laugh at my results, so at least I provided some amusement."

I don't pretend to be a frosting doctor, so I went to see what the frosting experienced bakers at cakecentral had to say and found an excellent thread about what to do with buttercream frosting that goes curdled and grainy like Dayna's icing did. My first guess was that it was the food coloring, but most of their suggestions have to do with temperate and liquid content. Check it out! 


I think maybe I'm stuck on the strawberry and brownie idea, because I have another one to show you, only this time it's not a tree, it's a Santa hat! 

Strawberry Santa Hats:
http://daisysworld.net/2011/12/04/santa-hat-brownies/
Those look a little more user friendly than the awesome strawberry brownie trees, but don't let this project fool you. Here is Jamie's submission:

Okay, so strawberry trees on brownies and strawberry Santa hats on brownies are no-gos. What if we **sniff** remove the brownie from the equation? 

Strawberry Santas:
http://mylusciouslife.com/a-luscious-christmas-part-one/ (this photo is found in the 3rd slideshow in the post, photo #19)

Megan found this pin on Pinterest and uttered the fateful words, "They looked fairly simple." First Pinterest rule...never assume it is simple. There's always a hidden secret ingredient. "Go to your local grocery store and buy fresh strawberries, cream cheese, condensed soy bean stabilizing powder of petrified hen's teeth (4th pressing), and sugar." But really...you'd think more things on Pinterest would be more simple, don't you? I sure do. I guess that's why I co-author a site about Pinterest Fails; it all looks deceptively simple. However, I've sure had fun making mistakes and learning. 

But I digress. Let's get back to Megan's story. "My first issue was trying to figure out how they got the Santa heads to hold up the "hat" - I'm not sure if they used cream cheese instead of whipped cream, but whipped cream does not work. I thought about throwing in the towel, but figured I was already $30 in, too late to quit. (Did I mention this was all happening at 1 AM the night before the party?). So I decided, instead, to use bananas for a head and improvise with the whipped cream."

"At some point in my frustration with falling whipped cream, I flung some profanities at the whipped cream can and switched to vanilla icing. My biggest problem with the icing was how sticky it was. I would not recommend using icing, especially not if you're applying it with a spoon (........yeah....)."

"Then I needed eyes. I wanted my strawberry santas to look "realistic," so instead of using chocolate or whatever it is in the original pin, I decided to use blue sprinkles. But not just using sprinkles as they were, I was going to push each individual sprinkle into the banana so it looked like little circles for eyes instead of cat eyes. In about half an hour, I was able to create one Santa that I was actually pretty proud of."

"....One Santa."


"Because then the whole pushing-in-the-sprinkles thing got really old. And the bananas would fall off the bodies when I tried to put on the beard. And the hats kept falling off. and, and, and...."

"I made 5 of them, each progressively worse than the previous one, and called finally it quits around 3 AM."


"The strawberry santas I was bringing to the party ended up looking and tasting a lot like chocolate covered pretzels."

"I think my biggest problem here was a lack of patience. If someone has more patience, better tools, etc., it could probably turn out very cute."


Okay, so maybe Strawberries and Christmas are a little harder to combine than originally thought. Or at least it seems like strawberries resent being turned into trees or santas. Maybe they wouldn't mind a reindeer? I'm sure strawberries wouldn't mind that. Or snowmen. You could make a strawberry snowman...with a sunburn. cue Frozen...

https://www.youtube.com/watch?v=WvJL4vRNbkE

Or just eat them plain. Yeah, that works too. 


Monday, December 1, 2014

December Challenge

Thank you so much for your Pay it Forward projects and helping to spread goodness! We're excited to show you the projects submitted to us in this Month's Show and Tell Saturday post this coming Saturday!

So now it is time for December's Theme. Rachel came up with this idea and we LOVE it. I hope you get as excited about it as we are. 

http://allystruth.tumblr.com/image/102565899606
So there you have it. Minterize everything! 


Now, what exactly are we asking you to do again?

1. Browse through your Pinterest boards, and then your sister's Pinterest boards, and then your high school BFF's Pinterest boards, and then your cat's previous owner's Pinterest boards, and then even the Official Pinstrosity Challenge Pinterest Board (we'll be adding ideas to it all the time) and find pins that fit the theme that inspire you. They can be food, decor, costumes, aprons, painting color schemes, etc. This month's theme leaves things wide open!
2. Once you've found some pins on Pinterest that inspire you, build on that inspiration! Make some mint tea you found on Pinterest to keep you warm in the cold weather. Upcycle that trash can with a can of Mint spray paint and turn it into a side table. Make a minty dessert. You can follow the pin instructions to a T, or you can just work off your inspiration and go for a Pin Spin.
3. Take a picture of the outcome. We want to see the Pin Wins, Pin Spins, and Pinstrosities!
4. Email us your pictures, the link to the project you were inspired by, and any bit of the story you want to tell. You have until 8:00 AM (MST) on January 1st to send us your Minter project.
5. Saturday, January 3rd we will do a Round Up post and show you the projects we were sent in. If we have too many for one post, we'll do multiple Show and Tell Saturday posts!
6. All projects submitted as part of the challenge need to have been completed in December 2014. No submitting projects you did last year. The point of this challenge is to get you to actually use Pinterest to inspire your life!
7. Feel free to submit as many times as you want!

Have fun with this!

Wednesday, November 26, 2014

Post Halloween Post --Blood-Splatter Petit Fours

Hello! We got the blog up and running again and we are back on schedule! This pin that was sent to us by Kelly is really cool, I know it's way past Halloween, but I just couldn't wait till next year to share it! I hadn't seen this one before but now I wish I had because 1) I love a good creepy Halloween treat, and 2) This looks really yummy!!

The Original
 
Don't those look creepy/delicious?! You can see the sugar glaze on the pound cake and I bet it tastes amazing!!
 
Kelly tried these herself, and ran into a few problems, check it out!

 
Here is what she had to say about it,
"I tried to make something for my office Halloween treat contest. I saw this pin for "Blood-Spattered Petit Fours with Sugar Glass" and thought it sounded simple enough.
 
As you can see from the pictures, the "glaze" came out totally clear except for some small sugar lumps. I even made more glaze with extra sugar and re-dipped a few petit fours, but they still dried clear. Also, the glaze soaked into pound cake, giving it a kind of grainy texture when you ate it. 
I had high quality food coloring that I used for cake icing that was pretty thick, so I mixed it with a bit of the corn syrup for the blood. That too soaked into the cake. 
 
Finally, you can also plainly see that I burnt the sugar glass. I was monitoring the temperature very carefully every minute or so. But I turned around for a second and it had shot up and browned within seconds. It tasted ok, just a little caramelized. 
 
The petit fours (which I called "Bloody Fours") still tasted delicious and I still won Most Creative Treat, but it looked nothing like the pin. I know what I did wrong on the glass, but I don't know how I messed up the glaze. 
Also, just fyi to anyone else who makes them. I left them in an airtight container over the weekend and on Monday, most of the glass pieces were gone. Turns out, the pound cake absorbed them as well!"
 
Man it sounds like the pound cake is a sugar black hole! It absorbs everything!
A few things came to mind when reading through all this. I went through the original recipe and didn't see any red flags as far as what Kelly did that may have been different other than what she mentioned about her sugar glass.
One thing that came to mind was that her sugar glaze was ok to soak into the cake, I think the original probably had some of that too, it is somewhat inevitable seeing as cake is porous, also the food coloring soaking in too was alright I thought because the original kind of looks like they are doing that as well. One thing that may have made a difference is temperature, if the glaze and cake were next to a hot oven it may not have had a chance to "set up" and harden a little bit and that may have been one of the causes of it just soaking clear through the cake. I also think that the food coloring coagulating on top is part of the glaze being a little shell-like on top of the cake. I think a hot house will make a difference in recipes like this for sure.
As for the clumps in her sugar glaze I think the easy thing to fix this is to make sure when you put your sugar in to do so slowly, and make sure that any clumps are broken up. Sugar tends to clump up if it gets moisture in the bag/container (it can even get in there if you are using a wet spoon to spoon it out), make sure your container is air tight! Dispersing any clumps is the key to making sure that you don't have ay sugar clumps sitting in your glaze on top of the cake.
Kelly you hit the nail on the head with the sugar glass, it is very temperamental and specific. Leave it in for even a few seconds too long, or too hot and it's going to behave badly. It was a little strange to me that it soaked up into the cake over the weekend, but like I said cake is porous...any ideas as to how this happened readers?? I don't have a ton of experience with sugar glass, does it have specifics that need to be followed after it's cooked as well?
 
Over all I LOVE this pin, it looks delicious, and creepy and would be a cool treat for any Halloween get together! If any of our readers have any further advice here please share!! We love your feedback!
 
Happy Wednesday all! Have a fun and safe Thanksgiving!


Thursday, November 20, 2014

Professional Help for the Cookie Bowls

So, when we announced our new schedule, we mentioned that we'd only have posts up on Sundays and Wednesdays unless we just had something really great that we didn't want to wait to share with you. Well, today I found something way fun that I want to share!

Remember back to our first Chocolate Chip Cookie Bowl post where Tessa sent in this Pinstrosity?
http://tessatauschek.blogspot.com/2011/12/i-hate-you-pinterest-i-hate-you.html
Well today I discovered (through the nifty gadget in our sidebar that plays a slideshow of all the Instagram photos tagged with #pinstrosity) that Tessa was on the Rachael Ray show earlier this month getting help from the pros with this exact project! How fun is that?! Way to go Tessa! Watch the clip to see what Chef Ryan Scott does to get these to work right.