Showing posts with label Breakfast Food. Show all posts

Tuesday, September 13, 2016

Prickly Pear Waffles

The first food I decided to try out for Prickly Pear week was Prickly Pear Waffles! I did a quick search online for a recipe and didn't see one come up, so I decided to just go for it and see how it came out! 

I thought about going completely from scratch, but then I decided with the lazy and easy route. Krusteaz mix for the win!! We actually really like the Krusteaz mix pretty good. It's yummy on its own and easy to tweak if you want something more. 

So I did the basic recipe, just substituting Prickly Pear juice for the water. 


It mixed up nicely and looked like normal batter, only prettier because of the natural color of the prickly pear!

But we all know that something can look good and taste bad. And we still had the cooking to do. I was worried that somehow the juice would change the consistency and that it'd crumble or stick to the waffle iron bad.

It was a slightly thicker batter than normal but not by much so I left it thicker, scooped some onto the waffled iron, and crossed my fingers.

This is where I left you all off on the Instagram Story. What's your guess...fail or yummy goodness?


Did you guess? 


Okay...here were the results:


Beautiful pink waffles that held together perfectly (better than normal waffles in fact)! They were a little more dense than a normal waffle, but I like that. I served Darrow's to him with regular maple syrup and that tasted good. The waffles sucked up all the syrup faster than normal. If you've had a whole wheat pancake or waffle, think of that syrup suction action! It was the same.

The flavor of the waffle wasn't as strong as I'd hoped, but it was definitely different from a normal waffle. It had a slightly sweet after flavor, and an almost watermelony taste to it. That's the closest I can describe it. But it was good! After that bite of Darrow's I knew I needed to get me a plate made up!

But then I got to thinking. This needed a different flavor of syrup to complement it better. Something less sweet and more subtle. So I found a vanilla pudding sauce by This Grandma is Fun on Pinterest (where else!) and whipped that up. I discovered I didn't have any corn starch though, so took a risk and substituted flour. It worked! And it was the PERFECT flavor combination with the prickly pear waffle. Yummy yummy!!

Prickly Pear Recipe #1: Success!! We will be having these again! P


Tuesday, June 14, 2016

Tried it Tuesday: The Great 2016 Zucchini Bread Catastrophe

While we have expanded the scope of our blog to more than just "Pinterest Projects Gone Wrong", we definitely don't want to get rid of those all together! We still have them. We know some of you still have them! 

Most of the crazy pins have been debunked...but sometimes, despite best efforts, even these normal pins turn on one of us every now and again. 

Today, we have a Pinstrosity for you from Rachel in the Sonoran Desert!

"There are so many places where I could start this story, but I guess that I'll begin it at the point in which my friend Liz gave me like eight zucchini from a stash she bought from a local non-profit called Produce on Wheels - Without Waste (POWWOW) which sells 60 pounds of produce for $10 each Saturday in rotating locations in Central and Southern Arizona. There are many mass production farms here in Arizona and over the border in Mexico, and POWWOW "rescues" the extra produce from these farms, sells it to individuals, and then uses those funds to supply food for Borderlands Food Bank. This produce is close to expiration, so you have to use it quickly. Liz saddled me with lots of zukes, so I needed to come up with something quick.

Flash backward about a week when, at my work's end-of-year (school teacher, here!) potluck, a colleague made the most delicious zucchini bread EVER. I mean, I had to physically restrain myself from eating too much of it. It had the perfect level of spice, and sweetness, and it was moist and...I could go on.

When Liz gave me the zucchini, I had a certain level of excitement usually reserved when one finds a $10 in the pocket of a pair of paints that just went through the wash. I didn't have my colleague's recipe, so I headed to trusty Pinterest. No one's ever had a pin go bad from Pinterest, right?! ;-)

I looked through a bunch of recipes and found this one. The lady literally calls it the best - even better than her own mother's recipe. I don't know about you, but there are few people who can only come close to recipes my mother (grandmother and aunt, too!) perfected. After reading through everything - even the comments - this seemed fairly fool-proof, as I'm an adept baker (I worked in a bakery for five years in high school and college). 

I double and triple checked the ingredients and method. I tasted the batter, and it tasted delicious! I set my timer for 30 minutes, though the recipe calls for 45, because oven times vary. I wound up resetting the timer for the additional 15 in five-minute intervals. I did the toothpick test, and it came out clean. The bread looked set, there was no jiggling. I thought I had serious success. And I clearly did not anticipate failure because I took no pictures along the process.

I let the bread cool on the counter while I packed up the kiddos and went grocery shopping, daydreaming of the zucchini bread I was going to try to sneak while my kids weren't looking (because, let's be real, it should be called zucchini cake not zucchini bread).

We got home from shopping about the same time as my husband from work, and as he's helping to bring the groceries into the house, he made an off-hand comment being sorry. I thought he meant about not being able to go shopping with us.

What he really meant was the Grand Zucchini Canyon."


That is a straight-up cavern. The ENTIRE center of the bread collapsed on both loaves. It was as hollow as my zucchini-bread-desperate heart. I tasted a piece of the baked, non-deflated portion, and it did taste delicious. 

I have no clue what happened, as I followed the recipe verbatim. I will not let this deter me, though, as I'm on the hunt for a new, fool-proof recipe (please send them my way!).


I'd never had this happen to me either! So I took to Google and found a number of excellent articles about why quick breads may fall in the middle!

For a great "diagnostics" on a zucchini bread that just kept falling, check out this link!

The three main culprits I'm reading about for sinking quick breads are:

  1. Too much moisture. 
  2. Too much batter in the pan
  3. Over mixing the batter. 
1. Too much moisture

This can come from the zucchini itself, or from too much sugar in the recipe! Again, check the link above for a great conversation about this very topic. Try pressing the zucchini between paper towels to reduce water content, and reducing sugar (1 1/2 cups for 2 loves often does the trick). 

2. Too much batter in the pan. 

As the bread rises, it clings to the sides of the pan and then forms the top crust from there. If the rising bread runs out of pan to cling to too early in the baking, it won't have strong enough sides to support the middle an you'll get a bread canyon. 

3. Overmixing. 

Hand mixing or slow mixing until the ingredients are just combined is the way to go. Too much air introduced into the batter makes for uneven rising and can cause a collapse.

But, as Rachel said...even though it's not pretty...they usually still do taste great! You know what I'd do with that cavern? Fill it with a cream cheese or custard filling like that was the point all along. ;) 

Thanks Rachel for sending us your Pinstrosity! 


Tuesday, April 26, 2016

Kett Files: Strawberry Jams

Over the weekend the community has been inundated with flats of strawberries from a truck that wrecked. So many strawberries!! 


My cousin's wife and I decided to take advantage of the free fruit and had a canning day together yesterday. We figured between the two of us, and with our kids having each other to play with, we could get through 5 flats. That seemed doable. 

10 hours later....we were beat, the kids were going crazy, we'd had take and bake pizza for dinner, and every single jar both houses were used up. 


And, we only got through 3 of the 5 flats. Whew! 

But we're super excited for what we were able to get done! We did tried and true strawberry jam but decided we didn't want 5 flats worth of just plain strawberry jam and wanted to try some different variations. Some worked, some didn't. 


Batches 1 & 2: Strawberry Jam. 

These did did pretty straightforward, following the instructions out of the Sure Jell packet. They turned out great, sealed, and set up beautifully. 

Batch 3: Strawberry Blueberry Jam

For this batch we followed the directions for Mixed Berry Jam off the Sure Jell packet. These turned out, sealed, and set up! 

Batch 4: Strawberry Raspberry Jam.

Same as Batch 3. But oh boy this one smells heavenly!! I can't wait to crack into it! 


At this point I went home and grabbed my Victorio Strainer and some Prickly Pear Juice. We were done cutting the strawberries into little pieces and mashing them by hand. We thought we'd try the strainer, even though I don't have the berry filter for it. Mashing the strawberries went SO much faster! But then we realized...we didn't know whether to treat the strawberry pulp as juice or as mashed berries. So for the first few recipes we treated it as mashed berries, and now we're thinking we should have treated it more like juice. 


Batch 5: Strawberry Lemon Marmalade

We got this recipe out of the Ball Blue Book for canning. It wasn't hard to put together, but somewhere we did something wrong (maybe the strawberry pulp?) because these didn't set up at all. So we have strawberry lemon marmalade syrup! 

Batch 6: Strawberry Prickly Pear Jam

I have Prickly Pear juice that I canned on my shelves at home. I LOVE prickly pear jelly and thought it would be fun to try seeing if we could make Prickly Pear Strawberry jelly work. A quick search online didn't yield a recipe so we decided to just wing it. For this batch we decided to try doing half of the original Prickly Pear Jelly recipe and half of the Strawberry Jelly recipe. It didn't work. Well, at least it didn't turn into jelly or jam. It's syrup. But it's really yummy! 

Batch 7: Strawberry Syrup

This one was the most involved recipe of all of them! This recipe was also out of the Ball Blue Book. We were sure glad that the husbands were home by then and they could field the kids because it took both of us working to get this done in any decent time. Jackie stirred the syrup concoction trying to get it to the right temperature while I worked on squeezing the cooked strawberry pulp through a flour sack (we get the Blue Bird Flour sacks specifically for the cloth sack it comes in) to get the juice out. It took forever on both ends! Finally we got it done, but it was an ordeal! It tastes good, but not as flavorful as we hoped. 

Batch 8: Strawberry Jam

This batch was with the strawberry pulp and we treated it as mashed fruit and tried to make jam. We're thinking we should have treated it like juice again and made jelly, as none of these jars set up either. 

Batch 9: Strawberry Prickly Pear Jelly


Finally we were down to the last bit of strawberry pulp. It wasn't enough to make plain strawberry jelly or jam, and we were just done. So I decided to try one more experimental batch. And this one worked!! 

1 3/4 c. strawberry pulp (it was slightly more than 3/4 but not quite a full cup either)
2 1/4 c. prickly pear juice
1/4 c. lemon juice
1 pkg sure jell pectin
6 1/2 c. sugar
1 tsp butter

Combine the pulp, cactus juice, and lemon juice. Stir in the pectin. Heat to a rolling boil. Add sugar. Heat to a rolling boil (adding butter if the mixture becomes foamy), and boil for 3 minutes exactly. Pour into prepared jars and seal.

This one set up beautifully and is SO yummy! I love the combination of the flavors. 

So lessons learned:
  • Use pulp as juice, not mashed fruit. 
  • 1 flat of strawberries yielded about 3 batches of jam. 
  • Syrup isn't worth the time and energy, lol. 
  • Canning is WAY more fun and easy with a canning buddy. Especially if they have kids and you have kids and the kids can help keep each other company. 
  • The crockpot was perfect for keeping the seals/lids warm and ready! Jackie was a genius!! 
  • Being a domestic goddess is so totally not my thing, bahaha. But I already knew that. 
So today I'm going to slice up my remaining strawberries and put them in the dehydrator, and Jackie is working on individually freezing a flat of strawberries for smoothies. And then we think we're done. We thought we did a lot, and then I saw people who had 20-30 flats of strawberries that they are working through. Holy cow! I'm happy with our work though and can't wait to taste each variety. 


Wednesday, February 10, 2016

Lemon Week: Recipes!

We've been having all sorts of lemony goodness the past week. We've tried a few new recipes and pulled out some old favorites. They've all been super yummy! 

First off, when life gives you lemons...make lemonade! 

Fresh Squeezed Lemonade

Ingredients
  • 1 1/2 cups freshly squeezed lemon juice (5-10 lemons depending on size)
  • 1 cup granulated sugar
  • 5-6 cups water
Directions
  1. Combine all ingredients in a pitcher. 
  2. Whisk until sugar is completely dissolved. 
  3. Refrigerate until cold and enjoy!

Lemon Bars 

Crust Ingredients: 
  • 1 cup flour
  • 1/2 cup butter or margarine, softened
  • 1/4 cup powdered sugar
  • 1 1/2 TBS lemon juice
Filling Ingredients
  • 1 8 oz pkg cream cheese, softened
  • 1/3 cup granulated sugar
  • 2 TBS lemon juice
  • 1 egg
Directions
  1. Mix the crust ingredients until it forms a stiff dough. 
  2. Press the crust into a greased 8x8 pan. 
  3. Bake at 350 for 20 minutes. 
  4. Mix the filling ingredients. 
  5. Pour into cooked crust. 
  6. Bake 15-20 minutes at 350 degrees. 
  7. Let sit for 10 minutes out of oven to finish setting up while cooling. 


Lemon Poppy Seed Muffins


Lemon Cream Cheese Cookies


Prickly Pear Raspberry Lemonade


And then...two lemon recipes from the archives that just didn't work out...

The 2 ingredient lemon bars: 

And Lemon "Puddle" Cookies: 


Wednesday, January 27, 2016

Recipes from our Files: Yogurt Pancakes with Homemade Syrup

Pancakes are a favorite around here for breakfast. Or lunch. Or dinner. Often we keep Krusteaz Pancake Mix on hand for the simplicity and ease, but sometimes we just want good ol' homemade pancakes (or we run out of Krusteaz and haven't gotten more yet). 

So today I want to share with you one of our favorite pancake recipes: Yogurt Pancakes! 


I love the versatility of yogurt pancakes. You can use plain for just regular pancakes, vanilla for a slightly extra kick, or really spruce it up with blueberry, coconut cream, strawberry, chocolate, whatever!

The ingredients you will need are:

  • 1 Egg
  • 3/4 c. Yogurt
  • 1/2 c. Milk
  • 1/2 c. Vegetable Oil
  • 1 c. Flour
  • 1/2 tsp. Salt
  • 1/2 tsp. Baking Soda
Add all ingredients to a mixing bowl and mix until blended well. There will still be a few lumps. You don't want to over mix. 


From there, you just cook them up! I'm still trying to get the hang of my gas stove. On our electric stove I cooked these over medium heat and it was perfect. With this gas stove I cook them on medium. This recipe makes 6 5-inch pancakes.

For syrup we like making our own too! It's super easy, I'll give you that recipe as well!

You need:
1 c. water
2 c. sugar
maple extract/flavoring (we prefer mapleine, but can't always find it and then just go with whichever flavoring/extract the store has).


Boil your water. Add sugar and stir until dissolved. Add in 2-3 caps of flavoring. Sometimes I'll do 1 cap of maple, 1 of vanilla, and 1 of butter flavor. Sometimes 2 of maple and 1 vanilla. It's fun to mix and match flavors!

This recipe yields 2 cups of syrup.


Store leftover syrup in the fridge and reheat on the stove or in the microwave. This is a thinner syrup than you find in the store, but I love it that way! The pancakes soak it all up and it just tastes so yummy!

And here, so it's easier to copy and paste if you want to: 

Yogurt Pancakes

Ingredients: 
  • 1 Egg
  • 3/4 c. Yogurt
  • 1/2 c. Milk
  • 1/2 c. Vegetable Oil
  • 1 c. Flour
  • 1/2 tsp. Salt
  • 1/2 tsp. Baking Soda
Mix ingredients together in mixing bowl. Drop by heaping 1/4 cups onto greased skillet. Cook until golden brown. Flip. Make sure to cook until the center is no longer raw. Yields 6 5-inch pancakes. 


Pancake Syrup

Ingredients: 
  • 1 c. water
  • 2 c. sugar
  • Maple Flavoring
  • Other flavorings optional. 
Boil water. Add sugar and stir to dissolve. Pour in 2-3 caps of flavoring. Stir to mix. Store leftovers in the fridge and reheat by stovetop or microwave. 

Monday, February 16, 2015

Cinnamon Waffle Pin Tested!!

Hello all!
Chip's birthday was about two weeks ago and I asked him what he wanted to eat, he rattled off a few of his favorites that I had already written down unbeknownst to him, and then he asked for waffles! I got excited because I love waffles! I turned to my Pinterest and got to looking around at lots of different waffle variations that I thought would be a fun add on to his special day and I found this pin:
 
The Original 
 
I like this pin, it looks good, but is it too good to be true?! They look so cute and bite size and is it really that easy to make cinnamon rolls?? I decided to do a pin test!!
 
Pin Tested
Cinna-Waffles, part of a complete breakfast.
The Cinna-Waffles are the dark ones on the left, we also had original waffles and chocolate chip waffles that morning AND bacon. Amazing.
 
Let me start off by saying these were SO yummy! They were crispier than I usually like (I like mine gooey), but we had a whole roll of cinnamon rolls cooked and ready in about 6-7 minutes (that's shorter than the time it takes to heat the oven!!I feel like that was an infomercial line lol). They tasted like cinnamon rolls and were really good!
 
As you can see from my pictures my cinna-waffles came out much bigger than the original. I put mine in the middle of my iron and it took up part of all four waffle triangles (not pictured). I ended up putting two cinna-waffles in at a time diagonal to one another and cooking them that way, four DEFINITELY would not have fit on my iron. I think my iron is about the average size, and I used regular Pillsbury cinnamon rolls for this, I'm not sure why the original the cinna-waffles look so small?! But the pin was a success, delicious, easy to make and clean up and they were divine! Pin tested, Pinstrosity approved! Go forward and Cinna-Waffle my friends!!


Wednesday, October 22, 2014

Pancake Art Reality

I love art. I love think-outside-of-the-box art. I'm not very good at making think-outside-of-the-box art, but I do love seeing it. I especially love eating it. Wait, what?

How many of you have seen this video going around on Pinterest and Facebook?


Best pancakes ever! I'm seeing a whole new trend in carnival caricatures, what about you?

So, if I'm understanding the video correctly the principle of the art looks simple. Lay out the areas of the picture pancake you want darkest first, and then build up to the lightest. Seems easy enough in theory, but as you can see below, the application is a little harder to grasp.


Kelleen did say that perhaps their art would have been more artsy had they used a squeeze bottle with a smaller tip so as to be able to get more details. They used a ketchup bottle they had on hand which gave better control than pouring the batter from a measuring cup, but not quite the control they wanted.

Another idea Kelleen sent over with her video was the idea of blending the batter to make sure it is completely smooth. They had issues with chunks clogging the tip of the bottle and the blasting out onto the pan making a mess of their Pancake Louvre Masterpieces.

So, these didn't turn out as epic as the Beatles Pancake Heads, but throw some peanut butter and maple syrup on top and I'm sure they tasted just as good. Mmmm.


Saturday, March 29, 2014

Show-and-Tell Saturday- New Recipe Week!

I get in food ruts FAST.
I will love a food, cook it a million times in a month and then be done with it for 3 years. Its a serious problem. Poor Chip.
Then along comes Pinterest! This week I thought I would shake it up a bit with a few new recipes! Here's what I ended up using.
 
Recipe #1
Monday-Spinach, Mushroom & Feta Crustless Quiche
 
Monday we had Quiche that I got from this website called Budget Bytes. This website is cool because they break down the cost of each ingredient and how much each serving costs you, if you are on a budget and looking for good recipes, this gal has got it figured out!
I forgot to take a picture of ours, but it really just looked like a quiche, the ONLY change I made to the recipe was that I added Canadian bacon to the whole thing at the end before I sprinkled it with cheese. It was super easy to make, fast to put together, and delightful :)

http://www.budgetbytes.com/2011/11/spinach-mushroom-feta-crustless-quiche/


Recipe #2
Tuesday-Big Italian Hug
This one is officially called Creamy Spinach & Sausage Pasta, but someone on Pinterest pinned it as Big Italian Hug and I liked it, so it stuck.
This one is also by Budget Bytes, and it was awesome! Seriously, so good!
I didn't make any changes to this one and it turned out great and didn't take too long!

 
Here is my poorly lit version. There's cheese, it's just all mixed together here.
 
 
Wednesday we had my sisters recipe for Honey Mustard Chicken, an oldie but a goodie!
 
Recipe #3
Thursday-Chicken Curry In A Hurry
I haven't gotten too much into Rachel Ray, but she is great, this was quick and it was awesome! We love Indian food, and there is no Indian restaurant here so we have to make our own, I think we did alright :)
This can also be adapted for vegetarian curry, which I did for some friends a few weeks ago, for that change use vegetable broth and tofu instead of chicken. Everything else is the same and it was just as delicious as the non-veggie version.
P.S. This was my first venture at using fresh ginger, I was a bit apprehensive at first because well ginger looks weird, but it wasn't so bad and the taste wasn't as abrasive as I thought it would be.
Yay for trying new things!
 
Recipe #4
Pizza Hut Delivers, It's Friday Ya'll
That's right, I had something planned for Friday, which I will probably use next week since I already have all of the ingredients, but we got pizza instead.
My compliments to the chef!
 
There you have it! My week in new recipes from Pinterest! I would call it a great success!
Hope everyone is having a great Saturday!


Tuesday, March 25, 2014

Palatable Pumkin Paleo Pancakes

Paleo seems to be everywhere these days. In theory it sounds great, but for some reason I haven't gotten on the train, not a good or bad thing, it just hasn't tickled my fancy.
Yet.
I love trying new things like that, so maybe my interest will be piqued by Janny's submission today!
 
Check it out!
 
The Original


Janny thought these paleo pumpkin pancakes looked TO DIE for, so she tried them out.
 
 
The Pinstrosity
 
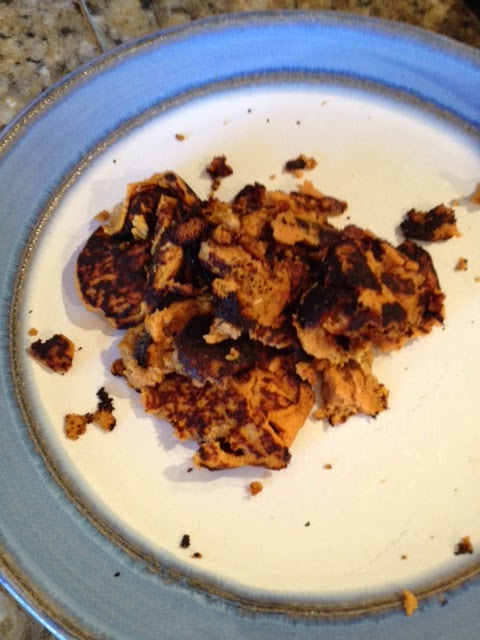
Oh no!!
These Pumpkin Paleo Pancakes went kerPlunk (someone take the keyboard away, this is getting out of hand).
Here is what Janny had to say about her pancake concoction:
 
 
"I used almond milk instead of coconut milk, I thought it would be an OK substitution since I'd seen it on other pancake recipes. I'm not sure if that's what caused the burned pile of half cooked batter or not. 
The batter did not stick together at all- so flipping the pancakes was impossible! 
It actually tasted ok once I got past the texture and burned spots! I opted for eggs and avocado instead. "
 
I would suggest sticking to the recipe, as we know it is tried and true.
One thing that might have had an affect on the burn-ed-ness is how hot your stove was. As for the batter not sticking together like it should have, it's hard to suggest something that can be used as a substitute for the whole paleo thing (the original recipe used coconut flour which I have never used so I'm not sure as to its "stickiness").
The other thing I caught in the original was that you need to "fold" at one point as opposed to stirring. I'm not saying Janny didn't do this (she didn't mention either way) but in past Pinstrosities that was a big problem if you skipped that, so there is a thought on all that.
 
I'm no paleo, or pancake, or pumpkin for that matter expert. Like I said, I haven't tried paleo, I'm a waffle kind of girl (I know the batter is pretty much the same it's just a texture thing) and I am probable THE only person on the planet earth who doesn't eat copious amounts of pumpkin in the fall, or all year round really.
Whew!
What I am saying is, "Pumpkin, Paleo, and Pancake experts of the interwebs!!! Unite!!" What can we do to help the texture on these bad boys??
 
 
Happy Tuesday all!


Sunday, March 16, 2014

Sunday Surprise: Egg Muffin Pinstrosity

Hello there pinny-peeps!

Last weekend, I finally got around to making the Egg Muffins that I have been thinking about for months. Since I like the idea of kick starting my day with protein (and, c'mon, who doesn't love eggs in the morning?), these were a natural project for me to take on.

I have to leave for work at 6:30 every morning, and as someone who likes happens to wake up at 6:00, that doesn't leave much time for making or eating of breakfast while I'm still at home. I've been taking greek yogurt and a piece of fruit for breakfast, and I have no complaints about that. Yum yum. However, I tend to get tired of food quickly, so before I end up hating off my current breakfast routine forever, I decided to take a test ride out of the following:

The Original Pin

http://didsomeonesaychocolate.com/2013/10/08/perfect-paleo-egg-muffins/

The Pinstrosity


Simple, simple error (and fix) on this one, folks: I used paper liners! Must have been baking on auto-pilot, because NOT using them didn't cross my mind at all (even though she doesn't use them in the original recipe. Whoops). Though, I would like to point out that I'm not completely crazy. The Busy Bee used paper cups and her muffins turned out beautifully: 

http://media-cache-ak0.pinimg.com/736x/48/f3/9a/48f39a7848c9c15ae2ff65a3e560cbbf.jpg
Anyway, the muffins turned out all right; they were tasty, but about a third of the egg-in was taken off with the liner. But, at the end of the day, both the boyfriend and I liked them. I'm absolutely going to give these another try.

I used jack cheese, ground turkey, green onion, and Egg Beaters. I poured them into paper liners (don't do this!) and then let the bake until I was "pretty sure" they were done (they were).

Here's what they looked like before I baked them:

See the loner in the back? That one turned out the best, since there was no liner!
Here's what I got after I baked them:

The muffin tin o'pinstrosity 
See? The liner baked right in! Peeling it off was impossible.
Liner removal attempt.
The happy little loner! Robert (the boyfriend) scarfed it down before I could get to it. He said it was delish.
Well, the good news is that the eggins only ranked a level #2 on the GCT scale. After eating them, I did feel that they could use a bit more seasoning and some sharper cheese, but I will definitely make them again.

And! What did we learn today? Forego the liners to prevent these from being a Pinstrosity.

Stay egg-sellent!
Rachel

PS: Were you wondering if I'd killed my onions yet (and if you're not sure what I'm referring to, click here)?  You won't believe this, but no! Said onions are alive and thriving! And, thanks to all of your comments (seriously, so many good pointers, thanks to you all!), I have been diligent about keeping the water clean to prevent the slime/stink.
You all were absolutely right, I should have removed all of the green on the onion, but I was worried that the whole bushel was going to go bad. So, I plopped the bulbs in water before it could. Next time, I'll be sure to hack the stalks down. But, without further adieu...

What ho'? A chum for my green onions?
 Look at them! They're ginormous! Good thing I am planning to make more egg muffins, the green onion was super tasty in them. What do you like to eat green onion on? I need suggestions, because clearly, I've gotta figure out how to use these guys up quicker!

Now, did you find yourself saying to yourself: "Rachel, what's the tiny, green fellow growing next to the onions?" If you did, let me tell you! It's romaine lettuce! And, that growth is after only two days! I'm fascinated!

Too cute, right?
I think it's fair to say, at this point, that we can downgrade my black thumb to a...hmm. What would a downgrade be, like a chocolate-y brown? I don't know, anyway, whatever color is one step closer to a green thumb from the thumb of death, that's where I'm at.

Muah!