Saturday, May 19, 2012

Gravity killed the Flowers

I had this pin on my To Test board, but Leanne got to it before I did! It looked so simple, I knew I'd mess it up somehow...that seems to be the way it goes with my projects often. It came time for Leanne to paint her chicken coop and she decided that this would look so cute out there on the wall. 

The Original Pin
As far as I can tell, this originated on the site Alpha Mom: 


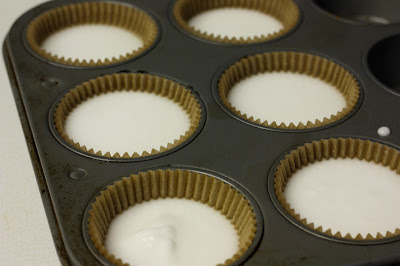
Well...gravity is not our friend when it comes to soda bottle cherry blossoms. 

The Pinstrosity


When the first one ran down the wall, Leanne tried using less paint each time, but it just doesn't quite work. She says, "The only way that this works seems to be to puddle the paint in each blossom, while working on a flat horizontal surface. With only the very bottoms of the bottle wet, there are no blossoms, just marks that need to be washed off."

To fix this Leanne suggests just using a rubber stamp...less stress, less mess, and less for gravity to run with. 

Leanne later sent us a picture of how she saved the project by turning the soda bottle flower attempts into larger cute roses. Cutest chicken coop ever. 


Thursday, May 17, 2012

Gimme a Break Kit Kat Cake

Give me a break! Give me a break! Break me off a piece of that Kit Kat Bar...Cake! The Kit Kat Cake...it melts in your mouth, not in your hand. Whoever thought to combine candy and cake was genius and I love them. I don't know who it was, but bless their soul. Check out this awesome cake:

The Original Pin
http://www.madeinmelskitchen.com/2009/09/kit-kat-cake/
Heck yes. I love it. Janelle saw this and decided that she wanted to make it for her daughter's birthday. She says, "While everyone thinks it came out great, the creator (me) sees some flaws." I hadn't seen the Pinstrosity picture yet so I scrolled down and saw this:


The Pinstrosity


Isn't that cute?! I love it. But Janelle had a little trouble getting it to this point and it didn't end up quite like the pin as she had wanted.

"I took a little bit of a different route on this cake by choosing a heart shaped cake pan rather than round. I, once again, did not follow any directions, it was a copy by picture method."

"1. The heart shaped cake pan I used was probably too big causing my double stacked hearts to be significantly shorter than the height of the standing Kit Kats. Therefore I took a knife to each one to shorten them. You can tell my how close the imprinted "Kit Kat" is to the bottom of the candy."


  • I went to the original posting on this and read how they created their Kit Kat Cake. They actually do suggest to have the cake be shorter than the standing Kit Kats. If you look at the picture of the original cake you can see how low the M&M's go if you look in the cracks between the Kit Kats. The cake is supposed to be shorter than the Kit Kats to help hold in the candy. 
"2. I have no clue how to make a cake so it's not rounded on top. So while I tried to make the Kit Kats flugh with the height of the cake, the middle of the cake sticks up taller. Again, still a nice looking cake, just my critical eye noticing the flaws."
  • Domed tops on the cakes can happen if the heat distribution is not right and the cake bakes unevenly, or if your oven temperature is too high. Here are some ways to help prevent a domed top:
    • Lower the temperature of your oven by about 15 degrees. Your cake will take a little longer to bake, but not too much longer.
    • Buy the Magic Cake strips that you wrap around the outside of your pan. These help to distribute the heat more evenly and keep the cake from cooking too fast. 
    • Buy really nice cake pans. 
    • I remember my mother wrapping a wet flour-sack dishtowel around the cake pan (and diaper pinning it on). The did kinda the same thing as the Magic Cake strips. 
"3. I didn't cover my cake with as many M&M's as the original pinner did. I thought that would be way too much candy therefore the frosting is peaking through."

  • This one's just a matter of personal preference. More candy will make it look like the original, but you'd probably have to eat them off before you cut into the cake. 
"4. I didn't have any pretty ribbons to wrap around the cake and even if I did, I'm not sure I'm crafty enough to figure out how to make a pretty ribbon fit around a heart shape."
  • To make a ribbon "stick" to the heart shape I'd probably first try pinning it in with toothpicks, wood or plastic (read the comments to learn about not using metal pins). A little hole would have to be made in the ribbon before hand, but it could work...maybe. If that didn't work, I'd dab a little bit of Karo syrup on the back of the ribbon so that it'd stick to the heart. Maybe a combination of the two? 
Janell says, "So again, not a horrible looking idea, just not what I thought was not nearly as beautiful as the originally posted cake." I think her cake still was quite cute.


Tuesday, May 15, 2012

Vicks Pucks

I saw a great pin on Pinterest, but my sister got to it before could and now I get to learn from her how to do this one right. Carolyn says, "It's that time of year again. Time for my husband's biyearly sinus infection and for my bout of the cold. Both of us have been pretty stuffed up the past few days. I decided it was the perfect time to try out this pin since we both needed it sooo badly."

The Original Pin
http://beingfrugalbychoice.blogspot.co.nz/2012/03/homemade-vicks-vapor-shower-disks.html
"All they are made of: baking soda, water, and essential oils: eucalyptus, rosemary, and lavender. I lucked out and had a bunch of baking soda that had expired (from my grocery bridal shower over three years ago) so I figured, all it is used for is to hold the oil, and then dissolve in the water to release the scents. Water... if you don't have that you are in big trouble!! The oils I have been wanting to get for awhile, now I had an excuse to start an essential oil collection."

"So I gathered everything up and started to mix. Let me tell you, if you are very stuffed up go mix this up. You will be cleared out very well! Then I poured them into my lined muffin tin."

The Pinstrosity

It seemed pretty easy, but Carolyn says that filling the cups was where she thinks she went wrong first. "I didn't fill them up as far as the original blogger filled hers up. I didn't think to look at her picture to see how far she filled hers. I figured, since she didn't say how much to fill that I just needed to evenly divide it among my 12 muffin cups. Then I let them dry. While drying the kitchen smelled of Vicks for a good long while.
After they had dried I grabbed one and went to the shower, and stuck it on the floor. It dissolved beautifully... maybe a little too quickly. But no smell came from it. It did nothing for the sinuses. So the next day I tried to place it where it would be away from the main flow of water to see if slowly dissolving would release the "Vicks" better. Nope. Shower number three I started out with two discs, and nothing. When I was done soaping I sat on the shower floor, just enjoying the water, and put a third disc in with me, in another floor location. I kinda sorta started to smell the "Vicks."


"Annoyingly this batch was a bust. Luckily on the original blog there was this at the bottom of the post (added at a later date): "for anyone who is having issues with these being "crumbly", try using 1 cup of baking soda and 1/3 cup of water (plus maybe a few tbsp more) and baking for 20 minutes at 350. THEN add a few drops of essential oils to the cooled "puck". That was a suggestion from a commenter and I tried it this morning with great success!" 


Friday, May 11, 2012

Not-so-Lucky Cookies

I think most of us Pinterest users are guilty of looking at a pin and jumping into a project without reading the original post because we know we know how to do that. Sometimes it works...sometimes it doesn't. Angela sent us in a Pinstrosity she had while trying to make these yummy Mint Chocolate Chip Cookies just from the picture.

The Original Pin
http://www.flickr.com/photos/bettycrockerrecipes/4595758178/
Angela tells us, "We host an annual St. Patrick's Day party and this year I thought I would simplify dessert (don't even ask about the year of the chunky chocolate fountain) and make green chocolate chip cookies."


I really want to ask about the year of the chunky chocolate fountain. That sounds like a great story. Anyway...she continues:


"They were green in the mixing bowl, green going on the cookie sheet, but came out brown with a sickly green tinge."

The Pinstrosity 

"What went wrong? Honestly, I did not even click through to the recipe from the original pin. Instead I used a recipe for "The best chocolate chip cookies ever" from one of my recipe books that I had been wanting to try, plus a liberal dose of food coloring - egged on by my kids to "USE MORE!." Either there was some critical step in the original recipe that I didn't know about or else they photographed them before baking!"

We checked things out in the original recipe and came across what we think went wrong for Angela. Angela used a regular chocolate chip cookie recipe, but the original recipe actually has you make chocolate chip sugar cookies. There's the issue right there. For some reason (and I don't know the chemistry of it yet) regular ol' chocolate chip cookies just don't take to food coloring (I've learned this one through past experiences), but sugar cookies do. So to get that great green color and not the sickly green tint, you should probably make sugar cookies. Either that or throw in A LOT of food coloring in your chocolate chip cookies (but then you get the weird food coloring taste). 


Tuesday, May 8, 2012

Flour Fail Frosting

Here at our house we're not huge cake fans...unless it's done really really well, and then we love it. When I happen on a recipe that looks like it'll spruce up regular old boring cake I usually stop and take a look. Had I seen this Original Pin, I would've stopped and taken a look, just like Kala did. 

The Original Pin
http://www.the-girl-who-ate-everything.com/2010/09/frosting-that-will-get-you-hugs-and.html

That looks like Whipped Cream frosting...well it's not. It's a flour frosting! Now that right there sounds a little odd to me...I've never heard of it at all (which doesn't mean it's bad, I'm just saying it surprised me). Looking through the recipe it looks like basically you are making a whipped sweet gravy. I'm incredibly curious now and want to try it out. This is now on my To Test board. The ingredients sound sketchy, but the reviews it has received say it's divine. Kala decided to give this a whirl and things did not go well. 

The Pinstrosity

Kala decided to try out this frosting recipe for some cupcakes her mother made while visiting.  "Needless to say I had high expectations after reading all of the reviews. In the end the final product was kind of a disaster. The flavor was actually quite good,the problem is that it kept 'breaking.' The frosting just kept separating even while it was in the piping bag. I experimented and iced one cupcake but after a few minutes there was some kind of liquid which had separated from the rest of the frosting and started dripping down the sides. Believe me, I waited until the milk/flour mixture had cooled completely and followed all the instructions and pictures word-for-work. But, never once did it resemble whipped cream. I even looked at the original recipe by The Pioneer Woman and hers never looked like whipped cream either. At first I counted exactly 45 seconds (that Pioneer Woman instructs) of whipping once I added the mixtures together, that didn't work. The pin link says "If it's not looking like whipped cream, keep on whipping." So when it didn't work after 45 seconds, I kept whipping and it only got worse... The picture shows that I had to refrigerate the frosting to keep it from melting away and it ended up a horrid, lumpy mess."

To be honest, I'm not exactly sure what happened. I have a few ideas now without having had time to test this (and Kala may have followed these and it was something else completely...these are just possible ideas from looking at the picture and hearing her story). 

Idea # 1: The dry ingredients didn't get mixed into the wet ingredients all the way. From the original recipe on tastykitchen.com, the instructions say "You don’t want any sugar graininess left."
Idea #2: The original instructions also say "If it looks separated, you haven’t beaten it enough!" 
Idea #3: This recipe was on three sites I looked at (www.the-girl-who-ate-everything.comtastykitchen.com/blog, and tastykitchen.com/recipes) and each of them stressed having the milk/flour mixture all the way cool before you stir in the vanilla and before you add it to the butter/sugar mixture. Now what all the way cool is, I'm not quite sure. Room temperature cool? Refrigerated cool? Perhaps it was the refrigeration that was the problem here. 

Again, since I can't test it right now, I can't give more help on how to fix it yet other than those 3 ideas above. Any knowledge on this out there for Kala? 


Friday, May 4, 2012

My House is a Pinstrosity

I have such mixed feelings over Pinterest. On one hand I love all the ideas that can be found there, and it is such an easy way to keep track of ideas. I no longer have to create word files to keep track of all my internet inspired ideas and projects. Another plus...I've learned some new techniques and have been able to do/make some new things. On the other hand, it's kinda become the Wal-Mart of creativity. And, just like WalMart, sometimes you find great deals and other times it's just a waste of time and moolah. Another frustration (and this one is 100% my fault), I have so many things pinned that I start projects all the time to get through  my pins, but many many of those projects go unfinished (or even unstarted...as if pinning the idea was starting the project).

That right there is my Pinstrosity for today. I know it's not technically what we've been doing with it, but it's my major Pinterest frustration today, so I figure it counts.

Let me show you a little bit of what I mean.

The Original Pin
http://sproutrobot.com/plans

I found this awesome site through someone else's pin that would help me plan my garden. It would tell me when and how to plant each seed/seedling. I knew my garden was going to be a success. I picked all the plants I wanted, submitted my garden plan and got my first email telling me that I needed to start cabbage indoors right away. I knew my garden was going to be a success.

The Pinstrosity
I haven't even walked in the garden gate yet this year. 


Here's another. 

The Original Pin
http://www.landscape-design-expert.com/woodlandgardens.html

We decided to start working on a patio so we'd have somewhere nice to sit outside in the summer evenings. This pin was a bit like what we wanted to do (only we're gathering the rocks off the hill behind our house). We worked hard...for a few days. 

The Pinstrosity
See the nice pile of rocks we've gathered. And we trimmed branches. What a nice patio we have. And now summer is fast approaching and it's nowhere near done. Maybe we'll have it done just in time to move. 

More?

The Original Pin 

http://www.veetje.be/
We have this great stack of magazines that we've collected from our old subscriptions, from friends, and from what we've found lying around. This cool bowl is only one of the ideas I've had for those magazines.

The Pinstrosity


Just one of our magazine stacks...not in the shape of a bowl. Not in the shape of anything except for a stack of magazines. And now it looks like there's car manuals and other books in there as well.

Wait, there's more.

The Original Pin
http://www.stitchesandscissors.com/2011/03/wonky-starburst-mug-rug-tutorial.html

I have an awesome bag full of fabric scraps, plus a little cabinet full of fat quarters and larger fabric scraps. I've been saving them for fun scrap projects, like the awesome scrappy mug rug above. I've just known that I'll create some awesome scrappy decor.

The Pinstrosity


Beautiful, isn't it? And that's not even the large bag full...that's my little cabinet. Maybe I should finally do this other pin I've had pinned for a while to help me get things organized with the scraps.
http://recycledcrafts.craftgossip.com/how-to-make-recycled-jar-fabric-scrap-organizers/2011/06/24/
Speaking of organization...

The Original Pin
http://www.marthastewart.com/308036/how-to-keep-matching-sheets-together-in?xsc=eml_org_2011_02_03

What about this awesome idea that most of us have pinned?

The Pinstrosity

I somehow can't seem to get even the simplest of pins done.

Trust me this list could go on. Unfinished paintings. Piles of fabric for sewing projects. Recipes to be made. Toilets to de-ring. Flower gardens to clean up. Naps to take (if only Pinterest could accomplish that for me).

And then there are the projects that were inspired by pins that I've given my own personal little spin on...only they sit there half finished (or barely even started). I'm not ready to reveal their final purpose yet (because someday I might actually finish them...maybe), but here's all the progress I've made.

 Woo hoo. I bought a wood person. Much accomplished with this project. : |


And my lovely thrift store painted vase (from that pin we all pinned of course) and the start of some diy ribbon and fabric flowers. The idea was great...the work ethic on the other hand, not so great. 


So...today, rather than testing a pin I am going to get working on pins I've already got started, starting with catching up on this pin:
http://madebymarquette.blogspot.com/2012/01/cleaning-schedule.html


So I apologize that today's post isn't funny or all that exciting. But it's reality. How to fix today's Pinstrosity? Getting off the computer and getting to work. Here I go. Wish me luck.

Wednesday, May 2, 2012

Strawberry Shrivels

I have loved all the strawberries this past month. The stores were loaded with them and everyone was serving them. Sliced strawberries with a dollop of whipped cream on top, mmmm. Strawberry freezer jam, mmmmm. Strawberries just plain, mmmmm. Rachael felt the same way and when she saw this pin for dried strawberries that said "Dried strawberries recipe, so chewy and delicious! They taste like candy but are healthy and natural" she couldn't resist.  

The Original Pin
http://www.theworldwidegourmet.com/recipes/dried-strawberries-ruscalleda/

Those just look like candy. Mmmmmm. These are making me hungry. Rachael says, "The directions are extremely simple, so I feel confident that I followed them correctly. I even set a timer so I didn't over cook them. I will say, it smelled FABULOUS. It smelled like cooking strawberry jam." And talk about extremely simple directions...there are 2 steps. I love 2 step projects!

The Pinstrosity

I can't think of a better pre-summer day than a house filled with sunlight and the smell of strawberries. It sounds great. Rachael says, "It was great, but the strawberries just didn't work out. It also messed up my pan and pulled some of the coating off." No bueno. Having never dried strawberries (or any fruit for that matter) before, I have no idea what might have gone wrong. This is another one that I need to test out (I'm hoping after this week and next week I can start testing pins again...end of the school year craziness has set in around here). So, until I can test it out for myself...is there anyone out there with dried fruit knowledge that could help out with this Pinstrosity?