Thursday, April 28, 2016

What College Taught Me About the Ampersand

I'd always wondered how we ended up with the ampersand sign. I wondered who decided that squigly represented "and", and how it got to be used widespread. 
Really. It's just a random squiggly. 

And then I discovered the truth. All on my own! A later Google search confirmed, but I was pretty proud that I figured it out before Google searching! 

One day while playing with fonts for my business writing class assignment I saw a font with a different ampersand sign than normal. 

 I don't know if that is the exact font I found, but it's similar.

I took 3 semesters of Latin at the University of Arizona. In latin, the word for "and" is "et". Do you see the E and the T in there?! That was it. Suddenly I realized our modern ampersand was just a morphed cursive form of "et"!

I'm a nerd, but this made me super excited and I shared it with my Latin class the next day. I think maybe only one other kid acted interested. But that didn't dampen the excitement of what I'd discovered. 

So if you need a piece of random trivia to give out at the dinner table, this will do it! 


Tuesday, April 26, 2016

Kett Files: Strawberry Jams

Over the weekend the community has been inundated with flats of strawberries from a truck that wrecked. So many strawberries!! 


My cousin's wife and I decided to take advantage of the free fruit and had a canning day together yesterday. We figured between the two of us, and with our kids having each other to play with, we could get through 5 flats. That seemed doable. 

10 hours later....we were beat, the kids were going crazy, we'd had take and bake pizza for dinner, and every single jar both houses were used up. 


And, we only got through 3 of the 5 flats. Whew! 

But we're super excited for what we were able to get done! We did tried and true strawberry jam but decided we didn't want 5 flats worth of just plain strawberry jam and wanted to try some different variations. Some worked, some didn't. 


Batches 1 & 2: Strawberry Jam. 

These did did pretty straightforward, following the instructions out of the Sure Jell packet. They turned out great, sealed, and set up beautifully. 

Batch 3: Strawberry Blueberry Jam

For this batch we followed the directions for Mixed Berry Jam off the Sure Jell packet. These turned out, sealed, and set up! 

Batch 4: Strawberry Raspberry Jam.

Same as Batch 3. But oh boy this one smells heavenly!! I can't wait to crack into it! 


At this point I went home and grabbed my Victorio Strainer and some Prickly Pear Juice. We were done cutting the strawberries into little pieces and mashing them by hand. We thought we'd try the strainer, even though I don't have the berry filter for it. Mashing the strawberries went SO much faster! But then we realized...we didn't know whether to treat the strawberry pulp as juice or as mashed berries. So for the first few recipes we treated it as mashed berries, and now we're thinking we should have treated it more like juice. 


Batch 5: Strawberry Lemon Marmalade

We got this recipe out of the Ball Blue Book for canning. It wasn't hard to put together, but somewhere we did something wrong (maybe the strawberry pulp?) because these didn't set up at all. So we have strawberry lemon marmalade syrup! 

Batch 6: Strawberry Prickly Pear Jam

I have Prickly Pear juice that I canned on my shelves at home. I LOVE prickly pear jelly and thought it would be fun to try seeing if we could make Prickly Pear Strawberry jelly work. A quick search online didn't yield a recipe so we decided to just wing it. For this batch we decided to try doing half of the original Prickly Pear Jelly recipe and half of the Strawberry Jelly recipe. It didn't work. Well, at least it didn't turn into jelly or jam. It's syrup. But it's really yummy! 

Batch 7: Strawberry Syrup

This one was the most involved recipe of all of them! This recipe was also out of the Ball Blue Book. We were sure glad that the husbands were home by then and they could field the kids because it took both of us working to get this done in any decent time. Jackie stirred the syrup concoction trying to get it to the right temperature while I worked on squeezing the cooked strawberry pulp through a flour sack (we get the Blue Bird Flour sacks specifically for the cloth sack it comes in) to get the juice out. It took forever on both ends! Finally we got it done, but it was an ordeal! It tastes good, but not as flavorful as we hoped. 

Batch 8: Strawberry Jam

This batch was with the strawberry pulp and we treated it as mashed fruit and tried to make jam. We're thinking we should have treated it like juice again and made jelly, as none of these jars set up either. 

Batch 9: Strawberry Prickly Pear Jelly


Finally we were down to the last bit of strawberry pulp. It wasn't enough to make plain strawberry jelly or jam, and we were just done. So I decided to try one more experimental batch. And this one worked!! 

1 3/4 c. strawberry pulp (it was slightly more than 3/4 but not quite a full cup either)
2 1/4 c. prickly pear juice
1/4 c. lemon juice
1 pkg sure jell pectin
6 1/2 c. sugar
1 tsp butter

Combine the pulp, cactus juice, and lemon juice. Stir in the pectin. Heat to a rolling boil. Add sugar. Heat to a rolling boil (adding butter if the mixture becomes foamy), and boil for 3 minutes exactly. Pour into prepared jars and seal.

This one set up beautifully and is SO yummy! I love the combination of the flavors. 

So lessons learned:
  • Use pulp as juice, not mashed fruit. 
  • 1 flat of strawberries yielded about 3 batches of jam. 
  • Syrup isn't worth the time and energy, lol. 
  • Canning is WAY more fun and easy with a canning buddy. Especially if they have kids and you have kids and the kids can help keep each other company. 
  • The crockpot was perfect for keeping the seals/lids warm and ready! Jackie was a genius!! 
  • Being a domestic goddess is so totally not my thing, bahaha. But I already knew that. 
So today I'm going to slice up my remaining strawberries and put them in the dehydrator, and Jackie is working on individually freezing a flat of strawberries for smoothies. And then we think we're done. We thought we did a lot, and then I saw people who had 20-30 flats of strawberries that they are working through. Holy cow! I'm happy with our work though and can't wait to taste each variety. 


Monday, April 25, 2016

The Em Life- Macaron Masacre!

I am in no way a baker. Sure I've made my fair share of my mom's chocolate chip cookie recipe, but I would never tout myself as a baker. Cooking in general isn't really my thing. Like at all.
 
When Marquette messaged me that we should try to make Macarons together (even though we live in different states) I was like, "Sure! How hard could it be?" And then I did a YouTube search of French Macarons and was in complete horror. What the heck did I sign up for?!
"These are the hardest cookie to make, by far."
"I've been a baker for 9 years and it took me 5 to get this cookie right."
"Don't be scared if you just get moosh the first few...years. That's normal."
 
What have I done?!
I was also the murderer of this cake...need I remind you. The two on the right are my Pinstrosity. If you haven't read that story, you can do so here, it's one of our earlier escapades.
 
Anyways...as we can see...baking isn't usually my thing. I love the décor part of it, but complex recipes and I just don't mix.
 
So here I am about to make some French Macarons and I realize I've never even tasted one before! This will be interesting.
 
Here goes!
I decide if I'm going to fall, I'm going to fall hard and I go with Martha Stewarts French Macaron recipe. Who would do it better than her am I right?!
I gather all my materials (two Wal-Mart trips and a Hobby Lobby stop later) and I am ready to go.
I decided the only way I am going to make this work is if I do this to the letter! So I do!
 
I have the 1/2'' piping tip, gel food coloring as opposed to liquid, I have the right flour, the parchment paper etc. I am ready.
 
 
I set out my eggs (which is a big deal apparently) Chip helps me crack them perfectly just to get the whites, we whip (with a hand mixer,  don't have a Kitchen Aide or anything, but we follow the timing with a timer and everything).  We pipe them onto the pan with exactness (she suggests 3/4" rounds and go off to the side when removing the piping from the round so as not to create a funny edge), let them set out for 10 minutes hit the pan on the counter to get rid of the air bubbles and put them in the oven.


She suggests to set the oven to 375 when you start and then when you put them in lower the temp to 325, we did that. She said to turn half way and I wasn't sure what she meant (did I mention we did this at midnight lol) so I didn't turn them, but now I know she meant turn the pan, so do that, I didn't though.
Ten minutes later I pulled them out and received perfection! I was floored! I jumped up and down yelled and had myself a kitchen dance party. Sorry neighbors, this French Macaron loveliness is too good to no be celebrated!
 
So now I had pulled off the impossible, how about the "easy" part, the filling. I didn't like any of Martha's filling recipes, so I went to the Food Network and picked out their mint white chocolate chip filling and went with that. I made the filling following the instructions and then I needed to color it, I wanted a mint green and tried my best and here was the real Pinstrosity...
 
 
Creature from the Green Lagoon.
 So so bad.
But it tasted like mint white chocolate, so I tried again and got a chartreuse, not what I wanted, but not so awful. We'll make it work. We put them all together and they were so good! Cripsy on the outside, gooey on the inside and just the right size to snack on! I was amped. I had successfully made the hardest cookie. Go team!


Now...any tips on getting my mint green with generic food coloring?? *Yeah right* lol


Friday, April 22, 2016

Kett Files: Results of the Macaron Massacre of 2016

I am a member of the Rising Tide Society, and each month, all across the nation, members get together to collaborate and support each other. I truly love the Community over Competition movement. I know not everyone does, but that's okay. We all don't have to like peanut butter either, although I don't know why you wouldn't! ;) 

But I digress. 

At this past month's meeting (the very first one I've been able to attend!) there was a mini styled shoot with the most delicious looking macarons ever by Sift Bakehouse. I was staying away from sweet treats that week and kept to my resolve not to eat them. And then I wished I had. They looked amazing. 


Even Foxy the Donkey wanted a taste! 

The more I looked at my pictures from the get together, the more I wished I'd tried one. And then I got a crazy idea. Why not try to make them?! I could do that! This coming from the girl who thought I could make a honeycomb cake and instead ended up with this: 
(via)
Yeah...I've totally got this. Pshhh. 

I read posts with tips. I watched videos. I got tips from Katie at Sift House. I was ready to rock out. 

I let my egg whites sit out, as per instructions in this post. I beat them into stiff peaks. This was going to be awesome. And the I realized I'd forgotten to pick up a kitchen scale, as suggested by the same post. Shoot. So, I found a conversion chart and tried to get everything as close as I could without weighing it. Did you know measuring out 1 and .834 cups of powdered sugar is hard?! It is. But I was still confident. 

I read in this post that over mixing and undermixing could be macaron killers. So when it came time to fold the macaron butter together I very carefully counted my strokes. 

I piped the macaron butter onto the nifty silicone macaron sheet I got at Michael's (50% off coupon! Woo!!), because the article said that silicone gave the best results.

They sat out to harden for the right amount of time, went in the oven, and I just knew it was going to work.

It didn't. They had spread rather than risen. Phooey. 

So the next tray I let them sit out and "harden" longer. Still the exact same results. And now I was out of macaron butter and time. I had to call it a day. 

Later that evening I got a Snapchat from Emilee with her GORGEOUS macarons! She'd figured it out and gotten beautiful results! High five to Emilee! No macaron massacre there. I can't wait for you to see hers!!!

She said she'd used Martha Stewarts recipe, followed it to a T, and didn't have any problems. 

I still had almond flour left, so I decided that the next day I'd try out the Martha Stewart recipe too. 

And it worked! 

At least the first pan did. The second pan I think would have worked had I not been holding a baby, fending off a two year old, and trying to turn the pan mid cooking. I think I spun the pan a little hard and bumped it, sending the fragile rising cookies toppling over to the side. 

The third pan I thought, "Hey, I want bigger cookies like Sift House had!" So I piped larger circles. That was a mistake. Apparently that batter couldn't support a larger cookie head. The cookie rose, got to heavy, and slid off the side, releasing extra batter out to spread beneath it. 

So out of my 5 pans...one turned out goodish. Oh well. One's not bad! I don't think they are quite right, but they were the closest I got before I ran out of powdered sugar to try more. 
 Top left (the golden brown one): 1st and 2nd pans. Top right: The pan that worked. Bottom right: The pan where I piped too big of cookies. Bottom left: The pan that got spun a little hard. 


So, once I had the cookies made it was time to fill them. After the first two pans I made the filling and it sat in the fridge hoping that it'd have something to go on. Guess the flavor!!
That's Prickly Pear Buttercream! I looked at a few fruit buttercream recipes and then just kinda made up my own. I took our prickly pear juice and boiled it down to try and get as much flavor and color into 1/4 cup of juice as possible. From there I added 1/4 c. butter, 2 c. powdered sugar, 1 tsp of lemon juice, and mixed! The Prickly Pear flavor isn't quite as strong as I'd like, but it's good. I think next time I'll boil the juice down even more.


The one pan of cookies that worked were small, bite sized little cookies. I want to try again and see if I can figure out how to get larger cookies that don't ooze and travel on the pan.


So there's my Macaron adventure! And, if you're wondering...I am spelling it right! I called these macaroons at first and then I saw that Sift House called them macarons, so I went to look it up. Macarons and Macaroons are totally different! Read about that here

Have any of you made macarons? What's your favorite recipe or filling?! 


Wednesday, April 20, 2016

National Park Free Days: Tuzigoot and Montezuma

Did you know that the admission fees to all National Parks are waived this week?! Get out there!

In my "Living a Life You Love" series I talked about why we feel so strongly about exploring where we live. It's such a special part of our relationship as a couple and a family! So this past Monday Cameron took his last day of leave for the school year and we went exploring some new sites in Arizona. And we had a ball! Nothing fancy, but it was fabulous! 


We started our trip by heading down through Oak Creek Canyon and Sedona. We didn't get out to play in the water, but we still loved the green and the gorgeous canyon.

Our first main stop was Tuzigoot National Monument. After spending 2 summers working for the National Park Service at Fort Bowie National Historic Site, we have a special spot in our hearts for the National Parks. We just bought our 2nd America the Beautiful Pass and plan on using it fiercely this summer. It's great! We don't feel like we have to spend hours and hours at the park dragging around cranky kids to get our admission fee worth. We can just go and spend 30 minutes to and hour and be done because we're not trying to get $20-$40 worth of an adventure out of the experience. Pretty much we just have to hit up 4 parks with a fee entrance and we've make our pass pay off. We plan on hitting way over that number this summer!

But I digress.

Tuzigoot!

This was a great park! We LOVED it! Darrow could run the trail easily, which meant that he loved it too. 


 Of course he's picking his nose. Thanks child. 


 It was soo cool to get to go up on top of the ruins! The view was so pretty! They sure picked a great spot to live!


Darrow is into jumping now and spent a good chunk of the day jumping along the trails. Man he was worn out by the end!

From Tuzigoot we made a detour up to see Jerome. It's a cute town up on the hill!  


From Jerome we went over to Montezuma's Castle. I remember seeing the sign for this as a child and the images I came up with in my head were spectacular! The ruins didn't end up being as cool as my little kid mind made up, but it was still neat to go see them and, again, a perfect place for Darrow.


It's been too long since we were somewhere with trees! Darrow couldn't get enough of watching the shadows go across his arm. I'd almost forgotten that he did that!


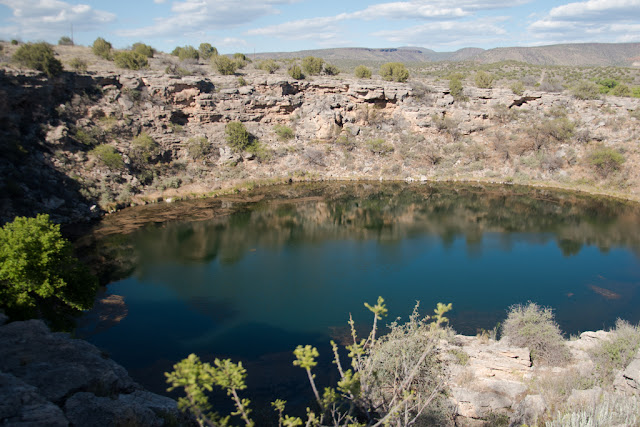
Our last stop for the day was Montezuma's Well. We almost skipped this, and we would have regretted it. I think it was our favorite stop of the day! It's amazing to see this bowl in the desert. The water pours into the bowl from the bottom, and then there is a small natural tunnel off on one side that the water spills out of, traveling through the hill and out the side, keeping the water fresh instead of getting stagnant! It's really something!


Here's where the water comes out of the hill on the other side. It's really amazing! 


We thoroughly enjoyed our family day together exploring the state! Winslow is perfectly situated with all the National Parks around. We have so many day trips to choose from! This gave us a taste of summer, and now we can't wait for school to get over so that we can get to all the upcoming weddings and hit as many National Parks possible!