Showing posts with label Valentines Day. Show all posts

Friday, March 13, 2015

Cherry Pie Cookie Cups

Julie, aka The Pinning Pirate, sent us a fun email not too long ago. I loved her opening line. "It has been a very long time since I've submitted anything because quite frankly, my skills in the kitchen just keep getting better but as life proves, we all fall down. We fall down hard." Isn't that the truth. I know it happens here at our house, although mine usually involves burning things (right now it smells like burned pig from the bacon I charred beyond recognition the other day...poor bacon. And it was good bacon from the butcher too!). The more you practice, the better you get...but that doesn't make you immune from mishaps. 

I was on a roll one day pinning stuff for the official day of love. I saw these cookie cups and thought that this would be an easy weekend recipe. They look SO good!


(via)
The gist of it is to roll sugar cookie dough into balls and put it into a mini muffin pan. I bought pre-cut sugar cookie dough in a 24 pack so it was really easy to get proportions right because it was already done for me. All I had to do was roll.

While I was doing this, my 31 year old husband was running around the kitchen poking me in the belly, back, butt, anywhere he could poke me that I couldn't immediately slap him. Being 8 months pregnant, he knows my reflexes are no longer cat like so as I'm yelling at him to go somewhere else, leave me alone, get a life, he's just standing out of my reach pretending like he's in the wild west with guns that he's spinning on his fingers and blowing out. OMG.

Small interruption here: I was laughing pretty good by this point. This sounds like it could have happened at my house. I had Cameron come read this and he laughed and then stood here and poked me. Okay, back to Julie. 

When done, I was supposed to "gently" press down the center of each cookie. I had no idea how much pressure was too much pressure and I was stressing out over what to press down with. There was a bottle of sprinkles on the counter so I just turned that over and started mashing. On to the next step...

Fill each cookie cup with 1 tablespoon of cherry filling. I pop the can and just like expected, here comes the 3 year old. I swear his sense of smell is shark like. Put cookies and cherry filling in front of a 3 year old and tell him he can't have any yet and oh...my...GOSH!! I tried to run in the pantry and pull out a snickerdoodle but no. NO! That won't do! The fits my kid can throw are  amazing. We settled on him scooping leftover cherry filling into a cup that went into the fridge for no reason. He doesn't know that though so we both survived without incident.

I put the cookies back into the oven for 5 more minutes and made the icing. After the 5 minutes were up, I let them cool for a bit before removing them from the muffin tin.

Let's just say that I wasn't going to let the icing go to waste...


Yeah. I guess I pressed too hard?

Julie finished her email like this: "If anything, my husband's giggles at seeing the final product was worth the disaster. I am currently working on another recipe that is waiting to cool in the fridge and I have a strong feeling that you will be getting another, much worse, submission."

If someone didn't know I run a blog for Wayward Pinterest Projects (oh man...the Prodigal Pinterest Project...that's got some potential there...) they'd think I am horrible for getting excited when I hear that someone's project might not have worked out. Maybe Pinstrosity has warped me.


Friday, February 20, 2015

Gingerbread Love SHACK

For date night the week before Valentines Day, Cameron came home and declared that we were making Love Shack Gingerbread houses. I'd never heard of the idea, but it sounded like a lot of fun. There are a number of different examples online, but this was the one I liked most: 

It is supposed to have come from this site, but I can't find it. I did find it on this site, but it linked to the first site. 
He'd bought the candy, looked up how to make the royal icing, and we had rolls of gingerbread dough in the freezer (hey, they were on sale after Christmas!), so we were ready to roll. We'd never tried baking our own gingerbread house parts, but how hard could it be? hehehe. Since we didn't have a kit or ready made gingerbread house parts, we got to design our own. Cameron designed his house and I designed my house. He had the genius idea to cut out the shapes we needed on cardstock and use those as a template to cut out the gingerbread. He's a smart cookie! We were going to have the most awesome gingerbread love shacks ever! This was easy peasy. ;) 

We got the gingerbread rolled out (adding quite a bit of flour so that it didn't stick to everything, and then got our house pieces cut out. Here is where we hit our first trouble. We couldn't lift them off the counter and onto the pan without warping the shapes. As much as we tried we couldn't get it. So we had to reshape the pieces on the pan once we got the dough over there. But, we made it work and we were still confident that they'd turn out perfect. 

Well, out of the oven they came and we realized this would be more difficult than we thought. First, the pieces puffed up funny. Some had rounded edges now, the cute little heart window I'd cut in one of my walls just looked like a really bad framing job, and some sizes were distorted. To top is off we realized we were out of dough and Cameron had forgotten about roof pieces. But...we would make this work! 

Cameron got to cutting his pieces into smaller pieces to try and reshape his house and make a roof. I got to trying to cut of edges of my house trying to make straight lines that might sort of match up. In the end Cameron scrapped his house and we worked turned my house into our house. 

We couldn't get the walls to stay up, so one of us would hold everything together while the other slathered icing on the joints, trying to keep the house from collapsing. Eventually we got a semi-stable house. That is until we started adding the candy decor. The roof tried to slide off a few times, the joints shifted, and the house leaned. But finally we got it all together, the candy on, and it was upright. It was done...and we just kinda sat back and laughed. Our love shack is a little dilapidated. 


All in all, it's not bad...but it's not the cute little house we imagined. It's definitely a shack. Oh well. We had fun and that was the point of it, right? Right.

Next time I think we'll buy one of the gingerbread house kits in the after-Christmas sale and then just save it until Valentines Day.

Tuesday, February 10, 2015

Easy Chocolate Covered Strawberries Revisited

Valentine's Day is right around the corner, so we've been seeing a familiar pin pop up all over Pinterest again:
(source)
The caption usually found attached to this picture on Pinterest is something along the lines of "Genius! Put cut strawberries in an ice cube tray, pour melted chocolate over the top!" 

As we showed you last year though, following those instructions doesn't give you quite the same results. 


We did however give you some tips as to how we thought you could recreate the original picture at home fairly easily. The only catch was, we'd never tried our tips. We thought they would work, but we didn't know 100% for sure. So this year I decided to revisit the old Pinstrosity by testing out the tips we gave you. Lucky for us, it worked!


Mine didn't turn out as beautiful as the original, but as he is a professional and I'm definitely an amateur, I'd say this isn't too bad!

Here's what you'll need to make this at home:


  • 1 Chocolate Bar. 
    • I opted for Lindt because I wanted a candy bar with large squares rather than the small rectangles of a Hershey's bar. I'm not a huge fan of dark chocolate so I asked Cameron to pick up a milk chocolate bar for me. Apparently it's just a thing with milk chocolate to form it in the small rectangles. If I do this again I'll get dark chocolate (ooh! or maybe the raspberry or strawberry filled chocolate) so that it's in the large squares that will be easy to break off. Oh well. 
  • Melting Chocolate
    • I'm partial to Almond Bark, but some are partial to Wilton's candy melts. 
  • Fresh Strawberries. 
    • I tried to pick ones that were all close in size and which had the prettiest shapes. 


To start, cut the tops off of your strawberries.

I laid out parchment paper on the counter to make clean up easier. You can use regular paper, wax paper, or even tin foil if you want. Unwrap your bar and place it bottom's up on the paper.

Melt your chocolate according to the package directions. I used 2 squares of the almond bark and it was more than plenty. Drop in your strawberries one at a time and roll them around gently with a fork until coated evenly.

Tip the strawberry point up and scoop it up by sliding the fork underneath. By using a fork the excess chocolate can run off easier.

If I do this again, I think at this point I'd place the chocolates on the parchment paper to let the chocolate set and then dip them at least one more time to get more of a smooth finish. Whether you dip it once or multiple times, once you are done dipping a strawberry, place it on the chocolate bar to set up. Repeat until you've filled your chocolate bar and/or used all your strawberries.


See how you can still see the strawberry texture in the photo above? That's why I would go back and redip them a 2nd time if I were doing this again. My creation didn't turn out as beautiful, but my strawberries were pretty pointed and definitely not uniform. More dippings could help minimize the pointed tops.

All in all though, this really wasn't too bad. It came together in about 6 minutes. The strawberries adhere to the chocolate bar really well, but not so much that they are tough to pull off and eat. I was hoping to be able to break off  one square at a time, each with its own strawberry on it, but that didn't quite work out this time around. It's still fun though!

Wednesday, February 26, 2014

Pinstrosity Personal Pizzas

Whewy, Monday was a rough day. Mondays are usually just another day for me, but this past one was a Monday Deluxe. Dead car battery. Angry readers. Changes of doctor appointments. Unhappy baby. Tired Moody Momma. Etc. Etc. Etc. Makes for a rough day. It was a day that called for pizza...lots of pizza. Pizza cheers me up. And Doughnuts. Sadly...I didn't have either, and the dead car battery made getting pizza (or even pizza ingredients to make it at home) a 40 mile round trip hike that I wasn't willing to take. I'd have even gone for a tiny little palm sized pizza, but alas...it was not to be. What do tiny pizzas look like you ask? I'll show you. 

http://www.rhodesbread.com/recipes/view/2094
Don't those look yummy?! Mmm, I want one. And how cute?! You could use heart cookie cutters for valentines day, shamrocks for St. Patrick's Day, pumpkins for Halloween, etc. Perfect! I seriously want to try these out, but since I can't at this exact moment I'll show you a submission we received from Miriam and her adventure. 

"I was having a little Christmas get together and thought these mini cookie cutter pizzas would be a great treat for the kids. Simple, just use Christmas cookie cutters to cut out shapes from pizza dough, add sauce, cheese, whatever. So I bought refrigerated pizza dough and rolled it out, cut shapes, then tried to lift the extra dough off, leaving the tree, candy canes, etc to be decorated. Only the cutters didn't cut through all the way. So it started stretching and tearing. And pizza dough is a little sticky. Yeah.  I tried to lay it all down back where it was and re cut the shapes with a little more force. Come to find out, it only takes one little area to stick and things go wonky. So new plan, I will just redo it by smushing up the dough, flattening it back out, and recutting. Hmm, this worked better in my head!  It was not universally flat, and I was struggling. So my husband stepped in to save the day. They didn't look THAT bad before going into the oven. However, the end result speaks for itself."

The Pinstrosity:


Not the pretty shapes from the original pin, but it's pizza. It doesn't have to be pretty to taste good (have you caught our theme on food yet? We'll pick good tasting and not so pretty over beautiful and inedible any day). 

But what if you want beautiful and tasty? The key here lies in the original directions. The Pinterest caption wasn't wrong, it just wasn't complete. You do roll out the dough, cut it with cookie cutters, top it, and bake it...but there are a few steps in-between. The "pizza dough" in the original pin is actually Rhodes Roll dough. 

http://www.rhodesbread.com/recipes/view/2094
Now really quick let me make sure you know we're not getting compensated by anyone to link to Rhodes or to tell you about them (we don't ever do those kind of posts). They are the authors of the recipe and the creators of the original pin image, so we link to them and use their directions.

So, in case you didn't just read the recipe I'll summarize. They have you take a thawed, but still cold, ball of dough, flatten it out to a 4 1/2" circle, and cut it with a cookie cutter which was dipped in flour. This is where Miriam first ran into some trouble. The cookie cutter didn't quite cut the dough all the way through. Rhodes' fix? Have a small knife handy to cut away the extra connected dough. You can see that here in their tutorial video:


Not too shabby!

If you watched the video and/or read the recipe, you also probably caught the fix to the problem of the dough puffing up during baking and pushing the toppings and sauce off. What is the fix? Pre-baking. Before you add sauce or toppings, you want to bake your dough shapes for 8-10 inches minutes (inches..bhahaha, let's just skip this week). In the video we're told that if the dough starts curling up on the edges (or puffing up too I'm sure), then pull the pan out, flip the dough over, and return the pan to the oven. After you pre-bake, you top the crusts and then bake again. The pre-bake is the key to keeping the cute little shapes for your pizza crusts.

Lessons learned today? Pre-bake, and caption your Pinterest pins well!

Happy pizza creating!
Ooh! Now I want a Pinstrosity cookie cutter to make Pinstrosity Pizzas!

Friday, February 21, 2014

Valentines Goldfishies Pin Spin

I know it's a week past Valentines, but there are so many fun ideas that come from Valentines that can be used for other things, why not share them??
 
Hope was making treats for her little ones day care class and decided to get her cutie involved. Check it out!
 
The Original


The Pin Spin
 
 
Super cute huh?? So how did she get her kiddo involved?? Read on!
 
 
" Lilian’s class at daycare had a Valentines Day party yesterday. They sent home a note asking us to send in some treats, and they included a list of everyone’s names in case we wanted to make Valentines for them. My thought process went something like this:
Yay! Valentines! I love making valentines!
… Wait a minute, Lilian can’t even sign her name yet.
… And none of the kids can read.
Isn’t this basically just going to be me making Valentines for the other parents?
“Dear Joey, Happy Valentines Day, Love Lilian’s Mom.”
I wrote something semi-snarky about it on the Book of Faces, and my sister  (an elementary school teacher) called me up to tell me to stop being such a grinch. Seeing as how we sometimes (lovingly, oh so lovingly ) call her the Troll of No Fun, I figured her telling me to lighten up should probably carry some extra weight.
So… I went to Pinterest (as you do), and looked up “toddler valentines.” I’m sure that you are all shocked (shocked!) to find out that Pinterest is simply swarming with pictures of overly complicated valentines aimed at small people who can’t read yet. So, what did I do?
I made overly complicated valentines for small people who can’t read yet.
 
I felt like Lilian needed to contribute something to this endeavor, so I gave her some blue finger paints and some paper, and let her go wild.  Kristian suggested that we strip her down to her diaper, but I like to learn my lessons the hard way.
I was too busy trying to contain the damage to take any pictures, but let’s just say that it looked like a smurf had been violently murdered in our kitchen.
They finger paint every single freaking day at daycare, and yet she never seems to come home covered from head to toe in paint. I need to find out what sort of witchcraft they’re using over there. I’m assuming that they don’t strip the kids down and then hose them off afterwards. But maybe that’s how they do it. Or maybe all of her “artwork” that they’ve sent home has been comprised of elaborate forgeries.
(Thank the heavens for washable finger paint, btw. It would appear that nothing has been permanently stained by my little experiment.)
Kristian put Lilian to bed, and then it was my chance to nerd out in my craft room. I busted out my Cricut machine (because what over-achieving-Pinterest-loving-mommy doesn’t have one?) and I cut out some fishbowls using the Create a Critter cartridge (sticking this tidbit in for the edification of anyone who might have clicked over to this post from Pinterest). After Lilian’s paintings had mostly dried, I cut out a template for the “water” using the same cartridge (even I’m smart enough to avoid running fresh finger paint through a Cricut machine). Then I traced the “water” out on a couple of the finger paintings and cut everything out by hand.
I had some extra treat bags left over from a previous project, so I was able to use those. I happened to have some pre-cut cards that were about the same width, so that was pretty lucky. I did have to cut the tops of the bags off, but that was pretty easy. Then I printed out my cheesy pun on regular printer paper, filled the bags up with goldfish, and stapled everything together.
I had to make 18 valentines (they did a combined party for both toddler rooms), but I think the whole shebang only took an hour and a half or so. I’m not counting the time spent finger painting (or cleaning up the finger painting!), because I think that was more of a fun pre-bedtime activity. It was probably more time than most people would have spent on a bunch of valentines for toddlers, but I don’t get much time to be crafty, so I enjoyed the whole experience."
 
So there you have it! I love that she had her wee one get involved, plus who doesn't love cleaning up a great big giant sticky painty mess?! ;)
 
This would be cute for any number of little one parties, or treats and could be used for far more than just Valentines. Thanks for you fun post Hope!
 
Happy Friday Everyone!


Thursday, February 13, 2014

Throwback Thursday: Finger Burning Valentines

This is a Throwback Thursday that  was originally posted last year written by Marquette and submitted by Aileen! Hope you all enjoy these and now you have something to do with all those leftover Christmas Candy Canes (guilty!).
 
Valentines Day is coming up. Are you ready? I know, so many people don't like Valentines Day. "It's Single Awareness Day." "So-and-so thinks that's the only day they have to be lovey-dovey." "I don't like pink or hearts." I for one love Valentines Day. I always have. I loved handing out Valentines at the school party. I love seeing the pretty flowers around. I loved helping roommates (or boyfriends of roommates) plan fun surprises for their beaus. I loved getting a big group together of single college kids to play croquet, or do a bonfire, or to watch a movie out on the trampoline. I love coming up with surprises for Cameron. I just love it. Cameron and I switch off each year who is "in charge" of Valentines Day. This makes it so that we don't both plan something and end up with the plans conflicting with each other, and it makes it so that we don't both not plan anything because we think the other's planning something and we don't want to get in the way. And it just makes it fun. This year is my year and I'm excited for the day to get here (that's assuming I can get everything done and that I don't have too major of a Pinstrosity in the mean time). 

Anyway...all that to say, Valentines Day is coming up! We received a submission, which is actually a repeat to a project we already posted, but we thought it'd be great for the upcoming "day of love". 

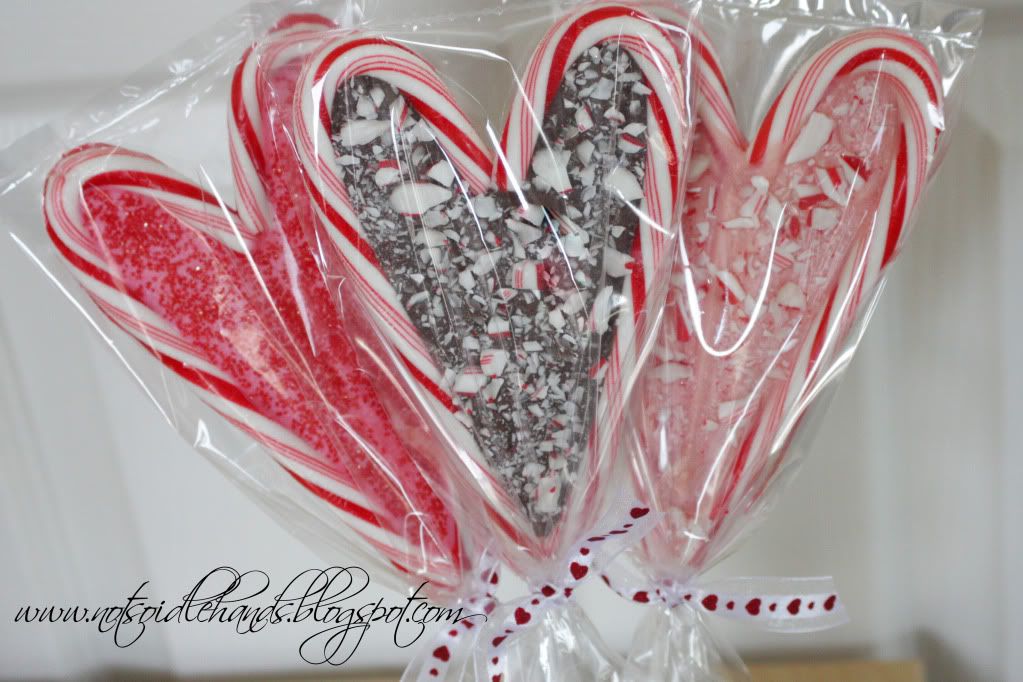
The Original Pin
http://notsoidlehands.blogspot.com/2011/02/got-candy-canes.html
who actually got their idea from:
http://www.theidearoom.net/2010/02/heart-suckers-and-heart-candies.html
Aileen tried these out for Christmas and had a devil of a time getting them to work. She sent us her story from her blog. Here it is, in her own words:

The Pinstrosity

In my desire to over-achieve the crap out of Christmas this year, I prepared Jonathan’s to-Afghanistan holiday care package with both the sweet and the sentimental. So, naturally, I had to prepare an element that melded the two ideas, while also oozing Christmas spirit. Which sounds kind of gross, but I promise it’s not.
I found these chocolate candy cane hearts on Not So Idle Hands, and I should have been more aware that this was a craft blog and not an anybody-can-do-this-go-ahead-and-try! blog. Because, as much as I like crafts and baking, I will easily admit that I’m not actually that good at crafts and baking. Which is evidenced by the fact that I can only crochet things that basically go in a straight line, and I think I’ve given more than enough proof on this blog that I can even mess up a simple brownie recipe, so I’m not going to elaborate.
But what I lack in skill I make up for in intense neurotics and an extreme fear of total failure.
This task required a lot of room, so I waited until a weekend when I could take advantage of my parents’ huge (pink) kitchen, and also of my mom’s willingness to help despite my aforementioned neurotics. The process itself looked easy enough:
1. Unwrap the candy canes and arrange them on a baking sheet with lollipop sticks.
Beautiful. This is easy.
WRONG. It should have been a sign of things to come that the very first step (unwrapping the candy canes) took about an hour longer than I expected it to. Can you recall the last time you unwrapped a candy cane from it’s DELIGHTFUL cellophane packaging? Can you recall the last time you unwrapped a candy cane from its NOT-AT-ALL-IMPOSSIBLE cellophane packaging without breaking the candy cane? Can you recall the last time you unwrapped a candy cane from its APOCALYPTIC cellophane packaging without that cellophane packaging clinging for dear life to your hands, and then to your shirt, and then to your arm, and then to your hands again, but NEVER TO THE TRASH CAN?
It was about at this point that the F word became the only word I was capable of saying out loud. Which usually upsets my mom, but I think she was with me on this one.
2. Stick the baking sheet of cane pops into the oven for a few minutes, being careful to remove them just as the candy is melting to the stick.
Wow! This looks like it was pretty easy too!
WRONG AGAIN. See, the great thing about parchment paper is that it prevents your baked goods from sticking to the pan. But the inconvenient thing about parchment paper is that it doesn’t prevent a smooth, glossy piece of candy from sliding all over the place. Especially when you need it to remain purposefully touching the rounded edges of a lollipop stick in several places.
I remedied this by walking the pan over from the counter and into the oven as slowly as was humanly possible for me to move. Then when the candy canes all slid around anyway, I just stuck my face and the upper half of my body into the oven to fix it. Which is also what Babe from Crimes of the Heart did when she wanted to murder herself. So try not to read too far into this.
3. Working quickly, remove the candy cane pops from the oven before they melt into a pool of peppermint-flavored corn syrup, and carefully press the ends to secure them to the lollipop stick.
Hmmm, now that part sounds a little tricky.
SOUNDS TRICKY? YOU ARE CORRECT. Even though I’d stuck my head into the oven to make sure the candy canes were touching the lollipop sticks properly, most of them decided to freak out when I closed the oven, and flee from their sticks. So I got into the habit of opening up the oven every 30 seconds, sticking most of my body back in, and attempting to move the candy back onto the stick while it was melting.
When I took them out of the oven completely, I at first tried using the rounded ends of two table knives to gently press the melty candy to the lollipop sticks. But I quickly realized that the utensils were too heavy for this delicate task, and pretty much just squashed the candy cane ends into misshapen, flat little failures. But since the candy hardens again extremely quickly, I had to think on my feet.
Or, more accurately, on my fingertips, all of which I spent the next few hours burning so badly that I could probably apply to be a Men in Black agent now.
At this point, I think my mom asked if I wanted a drink.
4. Let the candy cane heart pops cool. Meanwhile, prepare your toppings.
This part actually was easy, because my mom offered to do it. Which I think was partially because she was still pissed about how many candy canes we broke while attempting to unwrap them, and needed to channel her rage appropriately.
5. Melt your chocolate, fill the pops, and add your toppings!
The instructions indicate that this part is actually a bit difficult; while the melted chocolate (or candy melts, which I used) will dry quickly once poured, if you add the toppings too soon they will weigh down the chocolate and create a sunken effect.
If you’d like an example of that incorrect sunken effect, please see all the above photos.
(If you see any that do not appear sunken, it’s because my mom did those ones.)
What the directions do not indicate is that, after you’ve applied maybe 70 candy canes to the lollipop sticks, burned off your fingerprints, and waited for them to harden again before filling them with melted chocolate, probably half of those candy canes will decide, once hardened and dry again, that they no longer feel like staying on the lollipop sticks. You will find this out when you pick up one of the finished pops, and it crashes to the beautiful pink floor in your parents’ kitchen, dusting a three-foot radius with your shattered, minty dreams.
The rest won’t be nearly as dramatic, but they will prompt you to furiously stick them back in the oven in an attempt to re-melt them to the sticks, which works a couple of times, but mostly just seems to piss off the candy canes more. 
6. Allow to cool, then package.
Wow. I know that was a lot of hard work, but the finished product is beautiful! And look at how nicely you tied that bow!
(The bow looks good because, obviously, my mom tied it.) As you can see, the candy bags I chose didn’t quite fit the massive heart pops. So my mom and I formed an assembly line, in which I would tape the bags to the pops while doing everything in my power to prevent them from snapping off the sticks, and she would tie them beautifully into a selection of ribbons I got from a holiday ribbon display at Michael’s. Some of which my mom said were perfectly fine to work with. Others, like the one seen above, coated her hands in cheap blue glitter.
Happy holidays.
7. Realize you’ve only made about half the pops you need for various care packages and holiday gifts. It’s 9:00 at night, and you’ve gotten nothing else accomplished today. Go get a drink with your friend Becky. Say you’ll make the rest later.
Clearly that does not happen. You cut your losses and use the extra materials to make candy cane bark. It is delicious. Punch yourself repeatedly in the face for not just making candy cane bark in the first place.
8. Transport them back to your apartment.
Luckily your mom has some bubble wrap that you layer between the layers of pops, and there are minimal casualties.
9. Prepare for shipping. Realize they are traveling via USPS to Afghanistan, and you could barely keep them from breaking just from picking them up and putting them back down. Rethink your future as an army wife.
10. When Jonathan receives the package and informs you that the chocolate candy cane heart pops arrived intact, pretend it’s not that big of a deal, but secretly celebrate for the rest of the day.
11. Move onto the three gifts still left for Jonathan’s care package.
 
Hope you all are having fun gearing up for Valentine's Day!
 

Monday, February 10, 2014

Mix It Up Valentines

It's Valentines Week! Here are a few of my favorite Valentines from around the internet:

http://www.gocomics.com/calvinandhobbes/1986/02/13#.UvgwtfldWqg
http://www.gocomics.com/calvinandhobbes/1986/02/12#.UvgwsvldWqg
http://www.gocomics.com/calvinandhobbes/1986/02/14#.UvgwuPldWqg
http://wworldstyle.com/funny-wish-on-funny-valentines-day/

http://ivalentinesday.com/funny-valentines-day-pictures/
http://www.pleated-jeans.com/wp-content/uploads/2013/02/Screen-shot-2013-01-29-at-1.00.59-PM.jpg
http://xaxor.com/wp-content/uploads/2013/02/Funny-Valentines-day-cards6.jpg
http://www.melissabeckphotography.com/2011/02/14/because-love-is-simple/
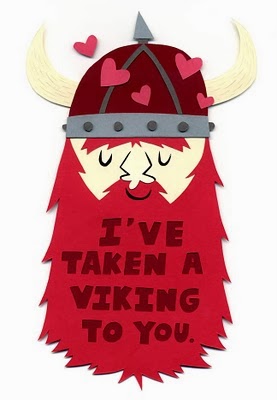
http://jaredandrewschorr.blogspot.com/2011/02/ive-taken-viking-to-you-valentine.html

http://media-cache-ak0.pinimg.com/originals/14/a0/1c/14a01c82942942065e0a4c9d825867ec.jpg
http://theotherausten.tumblr.com/post/43070751116/happy-valentines-day-janeites