Saturday, June 29, 2013

Show-and-Tell Saturday: Rainbow Spoons!

So I am super loving this Show-and-Tell Saturday thing, it is the perfect excuse I have to work on projects! I have started and finished 4 projects this week! This is a record in my household. Usually I start 7 projects but don't finish them for months! So this is just awesome! :)
This week I will be "Show-and -Tell"-ing two of the projects I did this week, because I feel they are related and well I won't always have this much time to work on things so I better save the others for another time!!

My kitchen features two fun paintings , and a bright red teapot which I love dearly. I thought instead of sticking to the color theme of the rest of the house( peacock and black) I would do "bright colors" as my theme! So far I LOVE it!
Here are the paintings that were my inspiration:


This was a wedding present from Marquette, she is so dang talented!!

I drew this in high school, it's not perfect but it was my first painting and I just LOVE the colors so I can't part with it.

I have a FABULOUS red teapot that I just adore...


I feel like all of these colors just scream bright happiness and I thought these two projects would compliment them perfectly!

The Originals


and this little art piece...


Here are my versions!!

 Show-and-Tell


So there they are! I love them! I think they add just the flair I need to get my culinary juices flowing creatively!

So here are the steps I took to makes these happen, I read a few blogs for each and like every other project I have ever done I tweaked them to my tastes and the supplies that I had.


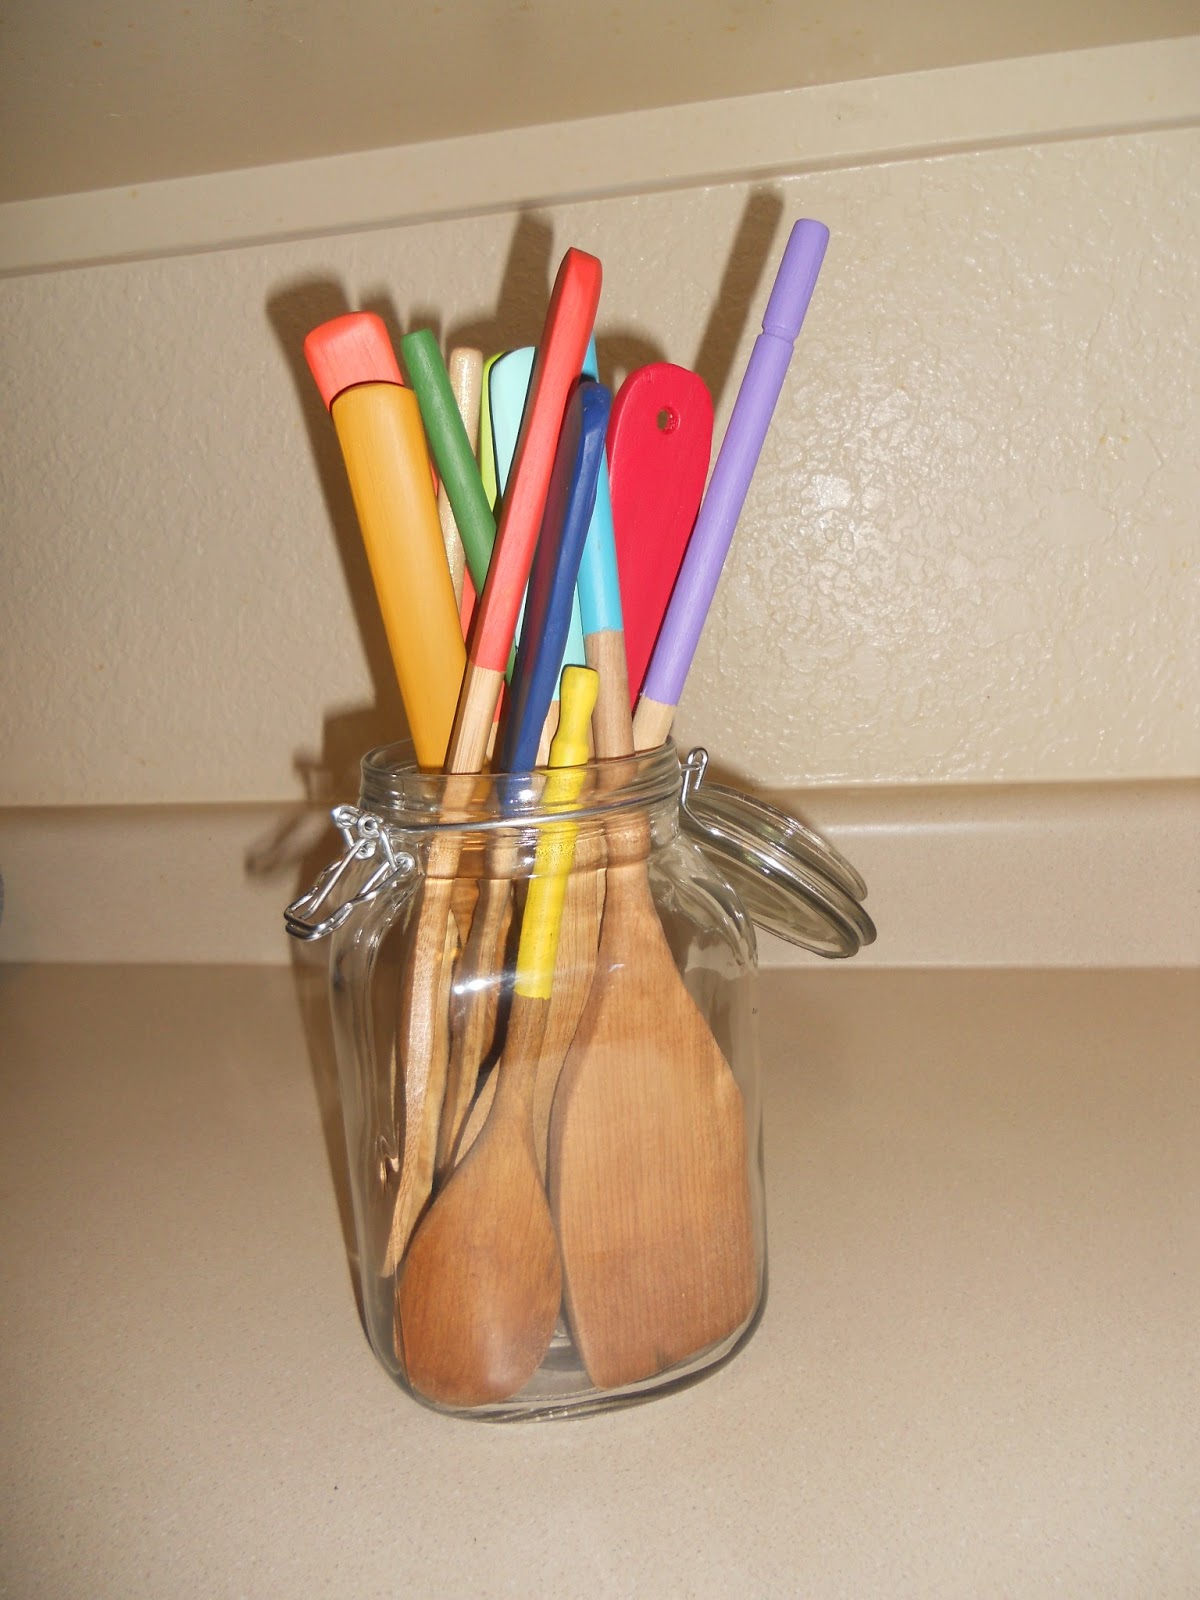
First off I had all my kitchen wooden mixing spoons clean and dry.

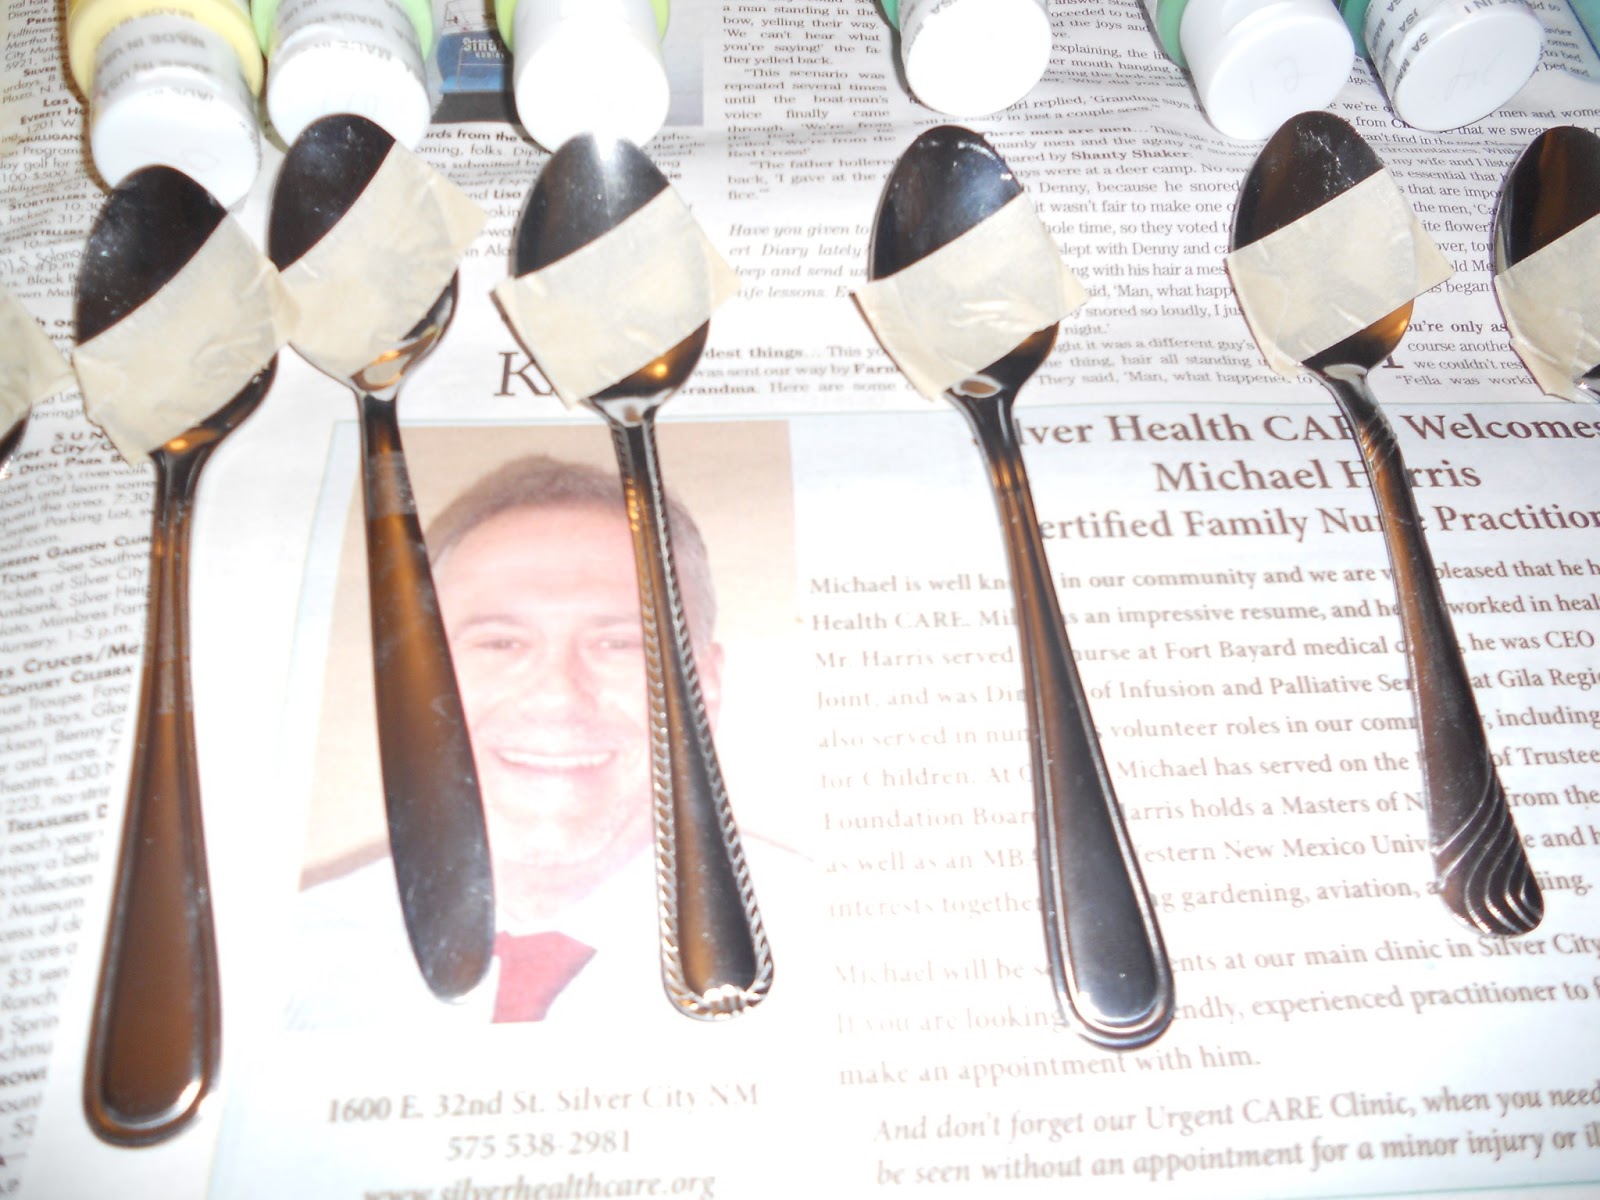
1. Gather your materials, I had my paints, spoons, tape (all I had at the time was medical tape, so I made it work lol),measuring tape, sandpaper, something to put paint on, paint brushes, water, and paper towels.
2. Measure where you want to start your paint on all the spoons and tape it off so when you pull it off you have clean straight lines. I varied my lengths depending on how big the spoon was, the shortest was three inches, and the longest five and half inches long. When you finish measuring and taping sandpaper just the bottom part of the spoon so any varnish that is on it already will be gone. The bamboo ones were a little difficult, I just tried to get the shine off really.

3. Next start with one coat of the color of your choice on the spoon. Wait for it to dry then add your second coat.

I found some creative ways to let them dry, the cooling rack ended up being the best option though.


4. Wait for your spoons to dry COMPLETELY and then you can varnish the spoon with a matte over coat (can you tell this is my favorite thing right now, I am using it on EVERYTHING!). Make sure to only spray the handle and not the part you will have touching food.


Wait for them to dry, remove tape and voila!! When you wash them make sure you hand wash and don't soak in water for an extended period of time (Chip learned this one the hard way lol, no worries the spoon wasn't too bad to fix up).

Next, more spoons!

This project isn't anymore complicated than the first, but they are both pretty time consuming just a heads up.

For this my materials were pretty much the same except I broke down and bought masking tape.

For this I picked my colors, and then laid out my spoon variations so they would be somewhat random. Unlike the original bog I wanted differing kinds of spoons and I originally had tried to find some at local thrift stores but came up empty handed. My boss told me about Wal-Mart's 4 spoon bundle for a $1!! Can't beat that so I went to Wally World and got 24 spoons ( I only ended up having room on the canvas for 21 though).
I had tested one spoon to see if I needed a primer before painting however since these are just on a wall and won't be seeing any wear and tear I decided they should be fine without it!


You can see here that the spoons are all a little different, just a cute little detail I thought might be fun!

Next I taped them all at a slight angle. I didn't do any measuring for this I just eyeballed it.


Next I painted the first coat and laid them on the newspaper to dry, the paint is high enough on the curve of the spoon that it didn't ruin any paint.


I laid down the second coat, let them dry, then I needed a little glitter so I picked 5 different spoons and added a little clear holographic paint on them for some bling ;) It isn't a Emilee project without a little glitter (one of the wooden spoons is glittery too, I just can't help myself!).

When the spoons were finished and completely dry taking the tape off can be a little tricky. You need to do it in one quick motion, one side at a time. If you go too slow it tends to peel the paint back a little and then it's a hassle to fix.

I decided against varnishing them because I like the look of shiny metal against the matte paint and all I had was matte spray so the whole spoon would have been matte.

When that is finished I heated up the hot glue gun, arranged my spoons how I wanted them to look on my canvas, it's a 16x20 and then glued the base of the "bowl" of the spoon and the handle down. Be sure where you are about to place the spoon is EXACTLY where you want it though because one that glue hits that canvas it's on there forever.

There we have it two Rainbow Kitchen Projects, not hard or too expensive but a little time consuming. I also think this idea could be tweaked to do ombre` of one certain color or stripes or any number of fun variations. If anyone does this send them our way and we will do a Reader's Show-and-Tell Compilation!

Hope everyone is having a great Saturday!!


Thursday, June 27, 2013

I'm Blue Da Ba Dee

 
So now that I have that song stuck in your head, you might as well watch the video and get it really  jammed in there
Ok so today's Pinstrosity had me thinking of this song right away!!! I has to share, after all when is the last time you listened to this 90's gem of a jam eh?
Also I would like to apologize for not posting Tuesday, I was ironically enough working on another post for Saturday! A sacrifice for the greater good I would say!
So Holly sent this to us and I have to say it gave me a chuckle. But no worries Holly, we have all had beauty blunders. Like that one bad haircut in 8th grade, and 9th, and probably 10th too. That time we waxed/plucked our eyebrows too much. Or perhaps that facial mask that made our skin worse. The gist is we have ALL been there, so don't worry about it! This will just serve as a warning to other pinners!!
The Original

This pin is helpful for all of us who tend to forget about keeping our feet nice during the long dry winter.
Holly tried this pin out and followed ALL the directions exactly but accidentally lost track of time (relaxed much? haha) and left her feet soaking for 30 minutes, instead of 10! She said her feet felt amazing but that she will be staying away from sandals for a while...oops!

The Pinstrosity

It looks like she accidentally stepped on a smurf village!!
 Ah! I feel like this would happen to me, haha.
Thanks for sharing with us Holly!!

Now she didn't say what she used that was blue in her foot bath mix, but the only thing I saw that would perhaps do that in the articles ingredients list would be shampoo? So when using this pin make sure you follow time directions, and stay away from weird colored dyes!!

Happy Thursday Pinstrosipeeps!!


Wednesday, June 26, 2013

Watermelon Shoot

The Fourth of July is coming up here in the States (well...I guess everywhere has a 4th of July, but it's not Independence Day for everyone)! I LOVE Independence Day. It is one of my favorite holidays. I love the parades, the food, the fireworks, and the fun. I still don't know exactly how we're celebrating it this year yet, but it'll be fun! 

I went back through our submissions from this past year to pull out any 4th of July emails that we hadn't posted yet, and we don't have all that many! I was surprised. We must have used them all last year (I guess that means we need more 4th submissions!). But I did find a gem to show you today about a 4th of July photo shoot. Rebecca saw the pin below and used it as inspiration for their Independence Day picture adventure.

The Original Pin

Her happy baby couldn't sit up on her own yet, so they decided to modify things a little to fit the situation. Instead of having the watermelon sitting up, they hollowed it out and had it laying down. They left it out in the sun to warm up, lined it with a towel for comfort, and then they put their normally happy baby in. To see the photo that they found on Pinterest go to http://fullerfun.blogspot.com/2010/07/baby-watermelon.html.


The Pinstrosity


She just wasn't impressed at all, poor thing. But Rebecca did say "Luckily she cheered up as soon as we stopped, and the watermelon was one of the best ones I have ever had!"


At least the watermelon was yummy! For tips on taking pictures of babies (especially babies in pumpkins/watermelon), see our previous post, Pumpkin Patch Babies. One extra tip I can give with the watermelon is to cut a slice off the bottom so it stays in place better. That doesn't do much to help an unhappy baby, but anything you can do to make taking pictures with babies easier is a plus in my book!

Monday, June 24, 2013

Mix It Up Monday

I hope you all enjoyed Mug Week last week! It's always fun to do theme weeks. We have a few more up our sleeves for the near future. I really want to tell you our ideas, but it'd be way fun to spring the themes on you too.  Let's just say it'll be awesome. Are you excited? Well I am. Are there theme weeks you'd like to see on the blog? 

I've been trying to think what to do for today's Mix It Up Monday post for a few days (which is funny, because these are supposed to be easy...hahaha). I don't really have any funny stories, other than the story about driving home from a wedding on Saturday and having a deer cross the road in front of me and try to run off, but it ended up doing a somersault instead. It looked up with a "You didn't see anything" look and sauntered off. It's funny to me, but I'm sure it's not all that funny to read. 

So I figured I would show you a few of my favorite pins that I've pinned this past week. 
http://lolsnaps.com/news/70434/0
Have you seen Monster's University yet? We haven't, but we will eventually. I've heard mixed reviews on it. But regardless...I thought this was hilarious (think back to the commercial Mike and Sully made in the first movie if you're having a hard time getting it). 


http://www.etsy.com/listing/108956803/funny-baby-pirate-t-shirt-funny-toddler?utm_campaign=Share&utm_medium=PageTools&utm_source=Pinterest
I thought this was hilarious. Luckily Cameron has already assured me he's good with diapers, but I think this shirt is still work getting. 


http://www.divine.ca/en/health/exercise-finder/c_266/
Anyone else see this pin and have the first thought be something about periods or peeing your pants? I know the pin links to an exercise site...but that's just unfortunate color placement on that picture, lol.


This is one I've been trying to integrate in my life lately, especially concerning Merle. I'd heard this quote before and it sounded cliche and I passed over it, but right now in my life it hits just right. Funny how that works. 

http://w3spine.com/self-control/
I laughed so hard at this. I love it. What a good dog!

http://www.alittleglassbox.com/2011/12/sad-little-potty.html
I love that picture! When Merle (that's what we're calling our kid until we know for sure what we're naming him) is a little older (maybe Christmas 2015...) this would be perfect. Especially if we get his car and our car (pictured below) in the same shot, hahaha. 
I know...the tree on top blends in with the trees behind so you can't see it well...but it overhangs on each side by quite a bit (12 ft. tree on a Geo...I love tree hunting!). 
And then finally this one, which I fully endorse:

Happy Monday everyone! Pull on your big-kid undies, put your chin up and have a great week. I'll try if you will at least. 

Saturday, June 22, 2013

Show-and-Tell Saturday: Mug Garden

If you have checked out our newly updated Schedule page in the last two weeks or so you'll see that we decided to add another fun day to the blog...Show-and-Tell Saturday! Here's how we described it: "Each Saturday we will be showing you a project we did from Pinterest. The idea here is to show you techniques we learned, pins we tested, store knock-off projects we did, and to share our "marvelous" ideas on Pin Spins. Now...we'd love to say that we're crafting/cooking/handyman/beauty/gardening gurus...but we're not. We're pretty average 20-something year-olds, so these projects most likely won't be magazine worthy...but that's not what we're going for. We just want to create and enjoy the process and to help you be motivated to get out and try something. Life isn't Pinterest-perfect, and that's perfectly okay!"

We're really excited for Show-and-Tell Saturdays, especially during these theme weeks! Emilee and I will be switching weeks off so that one week I get Mix-it Up Monday and the Wednesday/Friday posts and she'll get the Tuesday/Thursday posts and Show-and-Tell Saturday, and the next I'll get the Tuesday/Thursday/Show-and Tell Saturday posts and she'll get the Mix-it-Up Monday/Wednesday/Friday posts. I was pretty excited to get to do the first Show-and-Tell Saturday and to plan a project around mugs for the finale of Mug Week. Perusing Pinterest I found a number of different ideas that I smashed together for my project and I'm pretty happy with the way it turned out. 

So to start, here were my pins of inspiration:


http://theclassywoman.blogspot.com/2011/03/decorating-mantras-to-live-by.html#.UcW36fmOSSo
I've been trying to incorporate these decorating mantras in my house. #3 is harder than you'd think! So my goal with this project was to get something living in my dining/living room. 

Here was my plan:
-Hit up thrift shops to find mugs.
-Spray paint and hand paint the mugs to cover any pictures I didn't like
-Write on them with sharpies or paint pens
-Buy fun succulents to go in the mugs
-Plant the succulents
-Have a fun mini succulent garden in mugs!

The day before my planned thrifting day I had to make a Walmart run and decided to go through the dishes section just to see what they had...and they had some great mugs for pretty decently cheap (the cheapest ceramic mug was $1.25 and the most expensive one I bought was $3.29). Plus, they were already plain and I wouldn't have to paint over any pictures already on the mug. I was sold. So I picked out 4 mugs in various shapes, colors, and sizes:

Next I went to the paint and craft section to pick out my paint pen colors and I discovered something else I wanted to try...crafting enamel paint!

Did you know Walmart has this stuff?! I didn't. On the description on the shelf it said that this paint is good for glass, ceramics, and enamelware. Now, for this project it's not essential that you use the enamel paint since you won't be washing these like you would a regular mug. If you're turning mugs into planters, you can use just regular craft paint. I just really wanted to try this paint out and see if it works. The back of the bottle does says this paint is dishwasher safe, so you can use it on your drinking mugs! I decided I wanted to give this a try and see how it worked so I picked two colors from their very limited selection and then grabbed some of those awesome Fine Tip Tops (see my eagerly opened Fine Tip Top package below). 


With a big Youth Conference and a wedding this weekend, I knew my time was going to be short to be able to get this done, so I pulled a late night on Thursday and worked on painting the mugs until about 2 in the morning. The fine tip tops worked great, I loved them! And the paint was really easy to use too. I ended up restarting on the mugs a number of times because I didn't like how they were turning out. It was really easy to just run them under water and wipe them off with my green scratchy pad. I finally got the mugs how I liked them and let them dry overnight. The instructions on the back of the paint bottles said to "air dry for 21 days or air dry for 1 hour". Well...I wasn't going to stay up for another hour to let them air dry, and then another to bake them (as this is enamel paint, you bake it to get it to finish)...and as I was doing the project this past Thursday night I didn't have 21 days to wait between then and Saturday. I figured it wasn't an either/or kind of deal and just let them dry overnight (but I still think 21 days or 1 hour seems a little odd). 

So Friday morning I got out of bed, and followed the baking directions on the paint bottles: I put the dried mugs in the cold oven, turned it on to 350, started the timer once the oven had fully warmed up, let the mugs bake for 30 minutes while I got ready, and then I turned off the oven and let them cool in the oven while we were gone for the day. During the day I stopped and got my succulents (which I should have bought about a month ago when there was an awesome selection...there was very very little left, so I ended up with kinda an odd assortment of plants) and I couldn't wait to get home and see how the mugs had worked. 

We pulled in, I ran to the oven and it'd worked! The paint didn't run and I tried to scratch it away with my fingernails and the scratchy pad and it stayed firm. YEA! So I picked which plant I wanted for each mug, potted them, and found them a home on my shelf by the dining room table. 
I know, I know...bamboo isn't a succulent. But I'm telling you, the selection of plants was awful.
For the life of me I couldn't get the succulent in the tall white mug to stand up straight. Oh well. The blue mug has "hope" written on it in black...it shows up better in real life than it does in these pictures. 


The bamboo came in a container of gel substance to hold in water, but there wasn't enough of the gel stuff to fill the mug. I didn't figure just straight soil would be the best bet, so what I did was I put a layer of dirt in the bottom of the mug, the porous gel container, then a layer of dirt over the top. I'm hoping that works. We'll see! Good thing the bamboo was on sale for $2 so if it dies, I'm not out much.


So there I have my inspirational succulent mugs! I'm pretty happy with them. Now we'll just see if I can keep the plants alive...my track record is not very good.