


So a friend of mine is a nail tech and posted these really fun pictures of her and her client ALL covered in paint splatter from this cute trend:
The Original

I think they have a certain artistic push to them that I think is fun! With the holiday's coming up you could do any combination of colors and it would be cute, and easy! Here is one nail trend where it pays to be messy! Only problem...the splatter gets on EVERYTHING!
The Pinstrosity

**This is not my friends outcome, but it looked similar!! The mess in my frineds picture went up to the clients wrists, and it was EVERYWHERE!!**
How to prevent this?
Take a pair of disposable gloves.
Cut the very tip off each finger.
Put the gloved on before painting anything, or put them on after the base coat is COMPLETELY dry.
Splatter.
Cut the gloves off.
Clean up right around the nail with a Q-Tip and water ( if you are using acrylic paint) or acetone (for nail polish).
*If you are feeling really ambitious use a Q-Tip to put Vaseline around the nail border. This makes it SUPER easy to wipe off with a Q-Tip or a paint brush dipped in acetone immediately after the nail is splattered.*
Top the whole thing off with a good top coat and voila!
Also, I would lay down paper towels, or an old towel down wherever you are doing this.
I would suggest not using nail polish as the splatter paint ( it's way too thick to give a good splatter pattern) . I would use acrylic paint as it splatters much cleaner than actual polish or nail lacquer.
I have also seen people prevent splatter mess with tape around the sides of their nail, but that doesn't cover the rest of your hand, this is still a viable option though.
If you are REALLY into splatter, you can use this fancy tool ( I have always loved this thing, my mom has had one since I was a kid)...

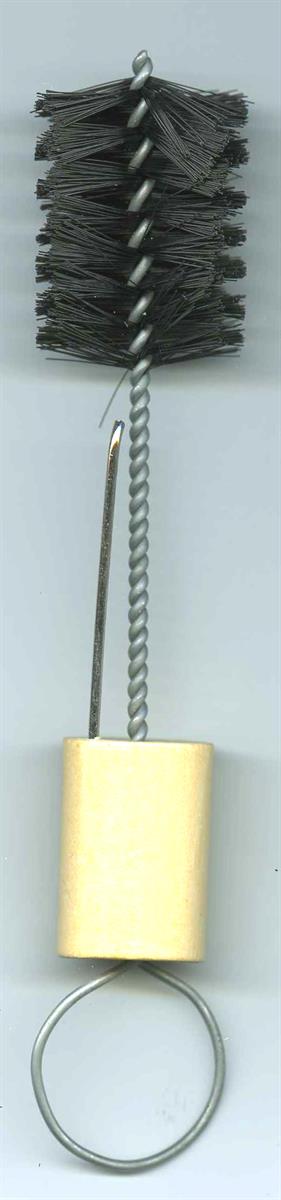
The wood piece you see at the bottom is attached to the wire sticking up. It pushes up into the brush and flicks around the brush creating literally the perfect splatter! Maybe I'm spoiled but I have always loved this tool. You can find it at any craft store, JoAnn's, Michael's, Hobby Lobby etc.
Don't have a tool, and don't want to buy one? You can use your thumb and an old toothbrush, or an old paint brush.
Happy painting!!

I could be wrong, but it looks like the "polish" in the original picture is a decal like Revlon Style Strips or something.
ReplyDeleteEither that or they did blobs and drew them out into spatters with a needle or something.
DeleteNo, it's really easy!! http://www.thepolishaholic.com/2011/06/neon-splatter-mani-tutorial.html
DeleteActually the best and least messy way I've found to do splatter nails is with a straw. A coffee straw, the little red ones, or a regular sized drink straw both work. You get a lot thinner distribution of polish and way less mess. Here's my blog on it: http://maptobeautiful.wordpress.com/2011/07/27/engine-part-nails-and-earrings/ Also, I've never been able to clean up my cuticles with a qtip because I'm not coordinated enough to not end up touching my nail with it, but a tiny makeup brush (like an eyeliner brush) works really well! I had no problems cleaning up the overspray with just my brush and acetone, no tape or gloves :-)
ReplyDeleteIn fact the original picture (which has had it's watermark removed) is done using the straw method (the same tutorial I linked to!) http://spellboundnails.blogspot.com/2012/07/patriotic-splatter.html
Uh, the paint will probably stain your nails until it grows off. Michelle Phan posted about this over a year ago, so check her video here (http://www.youtube.com/watch?v=EtNOIUZyhQI it's the very beginning) where she explains and goes step by step on how to achieve these without the mess. And she does two versions, one with a toothbrush and just flicking, or drip nails, with a pencil, which isn't so messy and has that same look.
ReplyDeleteI think you're supposed to put down a basecoat first.
DeleteYou can also use Elmer's Glue for an easy clean up and as Stephefc mentioned, dipping a (cheap, for example one by e.l.f.) eye liner brush makes the easist clean up around the cuticles. Either pure acetone (with some glycerine in it so it's not that drying) or a nail polish remover of your choice works best.
ReplyDeleteI gave up on the diy nails and started using Jamberry nails instead. They are vinyl shields that are super easy to put on and stay on for about 2 weeks. There are a ton of different designs and you can even create your own. You can check them out at www.alis.jamberrynails.net.
ReplyDelete