


Tuesday, November 19, 2013
Recess
Hello hello! Today you actually have real me and not pre-scheduled post me. I can't believe how fast those pre-scheduled posts ran out...I felt like I wrote a ton of them. But even though I'm here, I'm only on my brothers itouch (which is a pain to blog from). I'm mostly here today to let you know that Em and I discussed things and we're going to put the blog on the back-burner until January. My little guy is having trouble gaining weight and is on a super frequent feeding and supplementation schedule, so when I'm not working on trying to fatten him up I'm sleeping. Em's semester has been grueling for her and she's in the final throws of major papers and projects, so of course we want her to do well there. We're not shutting down the blog, and we may still do a random post here and there, but we will be cutting way back. Hopefully by January I'll have a fat little baby and Em will have a less hectic school and work life and we can get the blog running full steam again. So for now hang tight, look back at old posts if you haven't before, browse Pinterest, test pins, and keep the awesome submissions coming our way. We'll miss you all and can't wait to be get this blog running strong again! Have a wonderful holiday season and we'll catch you all later.
Friday, November 15, 2013
Sticky Spider Web Flop
Hello fellow Pinstrositeers! My name is Diedre, and I'm Marquette's favorite little sister (don't tell the others I said that!) I'm a stay at home mom who likes to read, cook yummy things (especially if chocolate is on the ingredient list!), and dabble a bit in the blogging world (if you're bored, you can check out my blog here). Marquette asked me if I'd like to write up a guest post for you all, so here we go. Actually, if I were to be honest, I'd tell you that she asked me to do this something like six months ago, and because I'm a lazy bum I'm just now getting around to doing it. But why would I tell you that when I could just say something like "I was wanting to do something to help out while Marquette and "Merle" get settled, so I decided to write up a Pinstrosity post so she would have one less thing worry about." I like that one, it makes me sound way better, let's just stick with option number 2, shall we?
One of my favorite uses for Pinterest is finding new ways to keep my super active toddler busy. I learned quickly that if he's bored then things go down hill VERY fast, so I try to have a few ideas in reserve for such days. Now, I could just plunk him down in front of the TV (and sometimes I do) but that doesn't do much to use up his mountains of energy or enrich his world in any way, so I try really hard to come up with fun things to do that are also in some way beneficial. I must also admit though that I am cheap and lazy, so I'm a huge fan of activities that require little (or NO) prep work and that don't require special supplies.
Around Halloween time, I stumbled across a pin for an activity that was perfect for us (aka: super easy and didn't require a trip to the store), but that we didn't get around to doing until just a few days ago (did I mention I'm lazy?)
The Original Pin
 |
| http://handsonaswegrow.com/halloween-activity-a-sticky-spider-web/ |
Really, you could do this one without ever reading the blog post, it's pretty apparent from the picture what's going on. You take some painter's tape, make a spider web in a doorway, and throw things at it to see them stick. The result is your kid is kept occupied while also building muscles and hand/eye coordination. Yes, it does take two or three minutes to slap the tape up in some sort of spider web configuration, and then you have to wad up some paper to throw, but if it keeps the little monsters busy for a while then it's worth it, right?
The Pinstrosity
 |
| Perhaps it's a little hard to see why this is a flop, keep reading... |
Well, I happily set to work sticking the tape to my doorway, but the thing about painter's tape is that it's made to come off without taking paint with it, and I just couldn't get the tape to stick to the painted door frame. No problem, I just stuck it to the wooden frames of my two chairs in my living room instead. While I constructed the web, I set my two year old down with some paper to wad up. Things seemed to be going great, that is until we were finished our prep work and tried to get things started.
I grabbed a ball of paper, and excitedly demonstrated what would happen when it was thrown into the web. It bounced off.
Ummm... that must've been a freak accident, right? I cheerfully picked up another wadded paper and tried again, and it bounced off. Again.
We tried a few more times with no success, and I even tried just walking up to the web and sticking my paper wad right onto the tape. It held for a few seconds, then dropped.
Obviously, the paper wasn't going to work. Thinking I was smart, I grabbed the roll of tape, made a ball out of it (sticky side out), and threw that at the web. It stuck alright, but it was quite a bit heavier than the paper and it started pulling the web apart, so that was a no go.
At this point I decided I was just too stupid to make this thing work, so I threw the whole mess away, and plunked my little guy down in front of the TV. At least there's always Elmo, right?
So what went wrong here? I went back to Hands On As We Grow and this time I read through all the comments. Apparently I'm not the only one this happened to, which means I'm actually NOT dumber than painter's tape (always good to know about one's self, right?). Some people suggested using tissue paper instead of regular paper, others said to try a stickier tape, like duct tape. My suggestion? Keep perusing Pinterest for new ideas, and just don't bother with this one.
Wednesday, November 13, 2013
War of the Roses
Marquette here. I'm being lazy today and not writing up a post with my own wit and wisdom and tips and tricks (just flatter me and say that's why you come and just for today I'll pretend that's why too). Luckily we have a great submission in our inbox from Jesse with a fun project that you can use to decorate with for the holidays, for anniversaries, for parties, or whatever. Here is her awesome submission:
Well, let's start this out by me saying what a big fan I am of your website. I am an even bigger fan of Pinterest. For a couple of years now I have been pinning all sorts of crafts that I am going to do, but I am a poor 20 something who has mastered the art of excuses.
Enough boo hooing about me. Last week I decided to take the plunge into the craft world and bought myself a bottle of mod podge from Amazon. I stuck a couple pieces of paper to jars that I have been saving for two years and they came out great. I must be an expert. And I have a whole garage full of stuff that I have been saving for this very moment. I must run out to Michael's (an hour away) to get more supplies. All of which can not be used for the stuff I want to work on in the garage, but on new projects that I thought up on my shopping spree. Look at all the great stuff I got.

And there's even more stuff.
One of these projects that I wanted to do is a wreath wrapped in burlap with paper flowers on it. I don't want to glue the paper flowers on cause I want to change them out with the season.
Once I arrived at home I hopped onto Pinterest so I could figure out how to make these so-called-flowers. Wow there are so many different paper flowers I have pinned over the years. Only I didn't have the right paper, or the cool hole punch that would make everything perfect, or and ink pad (do i really need that), or even a one hole punch. None of the right supplies. I was so disappointed I wanted load everything up and take it back to the store.
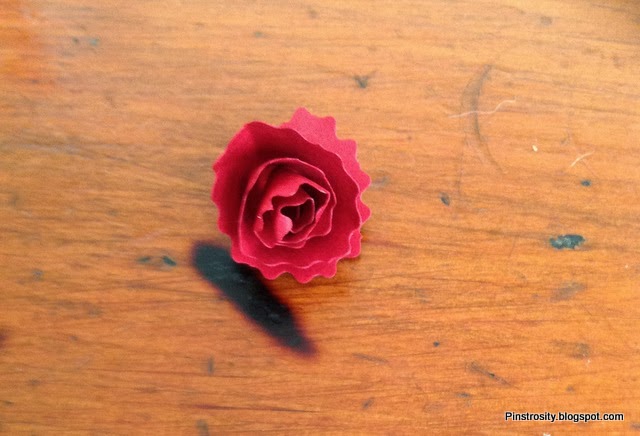
Just as I was about to whelp into tears over the end to my very promising crafting career that would bring me fame and fortune; I found these swirly rose flower.

photo via etsy
It was like it was made just for me. I read the instructions and I had everything. And most importantly it seemed easy enough so I could continue to claim to be the best in all the land.
Ok time to lay out all my supplies on the floor in front of my TV, cause I couldn't possibly do something and not watch TV at the same time. Got my iPad set up for optimum viewing. Wait... Where are my scissors? And my flip flops? There was just two here and now only one. Did I mention I have a 3 month old puppy plus three other dogs. Under the bed I must go.
Just then I hear the dogs going crazy in the other room. Could it really already be time for Daddies to come home? It is and I don't have dinner ready. I know what you are thinking and no it's not the 50s. It's just that my boy friend works all day without breakfast or lunch and is always staving. To the freezer I go. Pizza in the oven while the oven is still cold. He will never know the difference.
Some time later... My boy friend is playing video games. The puppy is asleep and the other dogs are relaxed, caused the puppy is asleep. All of my supplies have been moved into the living room so that I can be a supportive girl friend and "watch" Tom play video games. It is time to tackle the roses. Wait... Where is my iPad. Darn it's charging in the other room and if I get up I will have to walk in front of my boy friend and risk waking the puppy who is sprawled out across my lap. Best for everyone if I wing it. I read the directions a couple hours ago anyways. Well, I looked at the supply list and the pictures. What could go wrong?

Absolutely nothing! It came out beautiful. It even made its own base. That wasn't in the instructions. Now a little mod podge and to show it off to Tom and the pups...
They loved it. Well until Tom did a closer inspection upon dying and commented on how it wasn't very rose like. That it needed waves. And you know what... He was actually right. There must be a better way to make it.
No problem. I bought a set of scissors for that. And I set out to make another one.
This one really didn't come out right. And then the puppy got ahold of it after my boy friend offered it to him and it actually made it better. (There should really be a list somewhere of the supplies a newbie can't live without).
Anyways, then I decided to draw my own waves and cut them out.

Even worse.
Then I finally decided to do what always works best for me and free hand it. And guess what?

These came out perfect. Very rose like. Well I have a lot more flowers to cut and the dogs have to go out, so you will have to wait until another day to see the final result. I still don't know how I will get these buggers on there without glue so any suggestions are welcome, but I will probably just wing it as always!
-Jesse
Monday, November 11, 2013
Mix It Up Monday Holiday Hazards
Many of us love this holiday season (I know...some of you don't) and want to make better and better memories each year. While I'm all for the great memories, I'm also for low stress and simplicity. The holidays don't have to be meticulous, overdone, or fancier than the neighbors to be great. That's easy to say, I know, but putting it into practice can sometimes be hard. We want every holiday to be the best yet! What is one thing you can do to help lower the stress of the holidays and to enjoy them more? Know the hazards ahead of time. If you know what your pitfalls are, they are easier to avoid. Last year we were sent a great graphic about the Hazards of Holidays, but we were unable to use it in time. This year, we definitely want to get it up with plenty of time. So without further ado, I give you The Hazards of Holidays (I know...these are mostly geared towards Christmas, but you can apply them to Thanksgiving and New Years as well):
 |
| by MastersInHealthcare.com |
This isn't a graphic to scare you into being a Scrooge or not celebrating. It's here as a heads up. Don't let these hazards take over your holiday. Normally feel stressed with the holidays? Did any of these jump out at you and make you go, "Yeah! Me too!"? Focus on minimizing that stress this year. Say no to parties if you have to. Go homemade with all your gifts if money is tight. Stay home with your own family if the extended family affairs are more than you can normally handle happily. It's okay to do the holidays your own way! They are here as celebrations, not as downers. So celebrate and enjoy!

Saturday, November 9, 2013
Show and Tell Saturday: The Pinstrosi-Babe
Well, here's what I made recently...only I didn't get the directions from Pinterest (that would be quite a disturbing Pinterest pin to find):

I still can't get over his hair! I love it so much. I've always figured I'd have dark haired babies, but I guess I was wrong. Each new nurse that came on staff was brought to our room to see his hair, it was funny.
We named him Darrow after my grandfather who died this past January, and the name fits him so well.
We named him Darrow after my grandfather who died this past January, and the name fits him so well.

Labor/Delivery went well (6 hrs from start-waking up at 3 am with diarrhea and vomiting-to finish. Hooray for the awesome quick labor family genes!) and we're all doing great and recovering well here at home.
.jpg) |
| Bahaha, we've had quite a few comments about him looking like Donald Trump in this photo. It's true, lol. |
A few of my favorite things about this little guy so far:
-His hair. That's just a given. It is fantastic.
-He loves having his little fist up on his cheek when he's sleeping or just when he's content and looking around. We have an ultrasound from around 20 weeks of him in that same position. That is also the position he was born in (one hand at his side, one in a fist at his cheek).
-His pooping stance. I find it hilarious. The "I'm pooping!" face coupled with the "torpedo legs" (straight out and tense). I don't know why it's so funny.
-He's not in me anymore! I really really love that about him, hahaha. I can bend over, roll over in bed, slouch, breath, etc. again. Oh it feels so nice.
Thursday, November 7, 2013
Cinnamon Candles
I love the scents of Fall. Apples. Cinnamon. Spices. Baked Goods. Pine Cones. Sap. Green Chile. Mmmm, it's the best time of year! I'm always looking for ways to bring those scents in the house. There's just something about walking into a house and smelling fresh pine, or yummy baked bread, or roasting green chile stew that makes it feel so autumny and festive and wonderful. I love getting the smells naturally (by baking, bringing nature indoors, or making stove top scents), but those scents don't always last long and I'm honestly not a huge baker (which is probably a good thing as then I'd be a huge eater and then I'd be just huge in general). I'm not an avid candle burner, but I do like a food strategically placed and scented candles during the holidays. You can buy the prescented candles, but there are always ways of sprucing them up visually while also adding some awesome scents to the air. We've seen so many pins about securing aromatic items to a candle and then burning the candle to help release the scent. Coffee beans. Candy canes. And now today we have a submission with cinnamon sticks.
The Original Pin
 |
| http://www.homestoriesatoz.com/holiday-ideas/cinnamon-stick-candles-fall-ideas.html |
The directions are simple. Use a rubber band to secure the cinnamon sticks to the candle. Cover rubber band with twine. Burn candle. Smell cinnamon. Actually, the smell cinnamon part isn't ever really mentioned in the directions, but that is the caption that is often pinned with this picture. But it would seem to make "scents", right?
The Pinstrosity

It looks gorgeous! But here's what Carly has to say about the scent: "The look was there for a cute, fall candle..however there was absolutely NO cinnamon scent! I let it burn for hours in a room with a closed door to see if I could get a scent & no such luck! It seemed like such a great idea! 2/5 on GTC fail scale--a moderate fail; the look was there but the scent wasn't!"
I've tried decorating with cinnamon sticks a few times and it's been a hit and miss thing. If you buy the sticks in a pre-packaged sealed bag you never know if you're getting good aromatic sticks or just slightly cinnamonized sticks. When we lived in Tucson we would get good aromatic sticks of cinnamon from Sunflower Market. Sometimes craft stores have cinnamon sticks that have extra cinnamon scent on them...those could be fun to use!
So this project may or may not fill your house with a yummy cinnamon scent, but it will spruce up your candles and give a great fall look to your house. That's a win at least.
Wednesday, November 6, 2013
Paint Splatter Nails, The Easy Way!
So a friend of mine is a nail tech and posted these really fun pictures of her and her client ALL covered in paint splatter from this cute trend:
The Original

I think they have a certain artistic push to them that I think is fun! With the holiday's coming up you could do any combination of colors and it would be cute, and easy! Here is one nail trend where it pays to be messy! Only problem...the splatter gets on EVERYTHING!
The Pinstrosity

**This is not my friends outcome, but it looked similar!! The mess in my frineds picture went up to the clients wrists, and it was EVERYWHERE!!**
How to prevent this?
Take a pair of disposable gloves.
Cut the very tip off each finger.
Put the gloved on before painting anything, or put them on after the base coat is COMPLETELY dry.
Splatter.
Cut the gloves off.
Clean up right around the nail with a Q-Tip and water ( if you are using acrylic paint) or acetone (for nail polish).
*If you are feeling really ambitious use a Q-Tip to put Vaseline around the nail border. This makes it SUPER easy to wipe off with a Q-Tip or a paint brush dipped in acetone immediately after the nail is splattered.*
Top the whole thing off with a good top coat and voila!
Also, I would lay down paper towels, or an old towel down wherever you are doing this.
I would suggest not using nail polish as the splatter paint ( it's way too thick to give a good splatter pattern) . I would use acrylic paint as it splatters much cleaner than actual polish or nail lacquer.
I have also seen people prevent splatter mess with tape around the sides of their nail, but that doesn't cover the rest of your hand, this is still a viable option though.
If you are REALLY into splatter, you can use this fancy tool ( I have always loved this thing, my mom has had one since I was a kid)...

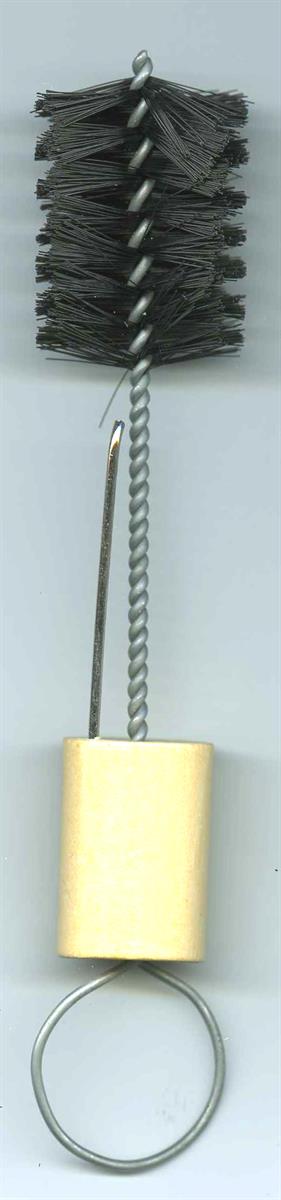
The wood piece you see at the bottom is attached to the wire sticking up. It pushes up into the brush and flicks around the brush creating literally the perfect splatter! Maybe I'm spoiled but I have always loved this tool. You can find it at any craft store, JoAnn's, Michael's, Hobby Lobby etc.
Don't have a tool, and don't want to buy one? You can use your thumb and an old toothbrush, or an old paint brush.
Happy painting!!

Tuesday, November 5, 2013
A Cracked Spin
Not every "failure" is a failure. It's just another project waiting to happen! Here, we'll show you.
The Original Pin
 |
| http://dream-it-make-it.blogspot.com/2009/10/mmmmm-fried-marbles.html |
Those are so pretty, I love them. The lighting in the photo really makes them shine! Rowena gave them a try, following the instructions exactly, and this was her outcome:
The Pinstrosity

She said, "not exactly what I was going for, but not a total failure. They cracked some, but not the way the picture showed it. Maybe the oven should have been hotter, I don't know."
You definitely want those marbles to be hot coming out of the oven so that when you put them in the ice water they crack through the center. Another issue may be that Rowena used cat's eye marbles and not just plain/solid marbles. The cat's eye might have prevented the marble from cracking just how she wanted.
But, even though these didn't turn out quite like she hoped, luckily Rowena didn't give up on her project. She turned back to her Pinterest and found this pin:
The Other Original Pin
 |
| http://www.etsy.com/shop/bullseyebeads |
Aren't those pretty and clever? Here's how Rowena's turned out:
The Pin Spin

Perfect! So don't despair when a project doesn't come out just quite like you hoped. Set it down and return later if you have to, but often there's a great Pin Spin that you can get out of what seems like a sad project.
These acorn marbles would be so cute in a bowl, put in a bouquet, used as place cards for a nice dinner (just add a fun string and tag!), or made into jewelry! Great job Rowena!
Sunday, November 3, 2013
Pinstrosity Halloween Costume || Part 2
Carolyn sent us the details of how she came up with her Pinstrosity costume, and I thought it needed sharing. She tried to pick costume components that would probably be Pinstrosities in and of themselves (based on previous posts on the blog). Here's her story:
I decided kinda last minute I wanted to dress up for Halloween after all. So last minute I couldn't just go buy a costume because Wall Mart sold out of all but one of the women's costumes, and that one was two sizes too small (bummer because it was pretty too). So I turned to Pinterest and Google. I finally stumbled upon this simple, really easy, last minute costume:
I decided kinda last minute I wanted to dress up for Halloween after all. So last minute I couldn't just go buy a costume because Wall Mart sold out of all but one of the women's costumes, and that one was two sizes too small (bummer because it was pretty too). So I turned to Pinterest and Google. I finally stumbled upon this simple, really easy, last minute costume:
 |
| http://partiesforpennies.com/2012/10/halloween-costume-ideas/#.UnbS9PmOSSq |
I thought it was really fun, and simple, and the bulletin board was reusable in my house. Then I realized that it would be annoying to wear that, and haul around a 6 month old and a 2 year old. Then I got bummed because I didn't think I could pull off any of my other favorite costume ideas. They would all be Pinstrosities. Then it hit me. I could be a Pinstrosity! And not worry about 10 other people having a similar idea! Only I came up with that at about 9 in the morning. And the Halloween party was at 5 that evening. Not much time...
I turned to these posts to help me out:
The bleached shirts http://pinstrosity.blogspot.com/2013/09/bleach-blotches-and-pin-spin-save.html
And the same curls that I messed up last year http://pinstrosity.blogspot.com/2012/04/crummy-curls.html
With the bleach shirt I did almost everything the directions called for. Only I didn't have freezer paper so I used painters tape. My design was the Pinstrosity logo. I just had fun with this one. I didn't care if it turned into a Pin Win or a Pinstrosity. The tape actually worked out really well.

There were a couple spots where the lines weren't as clean as I would have liked them. And the top of the P went higher and wider than it was supposed to. However I think I ended up with a Pin Win. Now to go find a nicer shirt, so I can make a fun design, instead of an old shirt with a bunch of small holes...

For my hair I thought I did exactly the same thing as last time (I was going for a Pinstrosity here). Only my hair is shorter now. And I did it in the morning so instead of sleeping on it, I spent the day with it up. So not exactly like last time... My hair was long enough it stayed up fairly well. Except for the very back. It didn't want to stay up. I pinned some, and kept tucking.

When it was time to go to the party I didn't have time to let it down before we left. I didn't get to see it until we got home. And I was way impressed with the curls. There were a couple patches in the back that I would need to hit with a curling iron to have a bunch of great curls. I was amazed it actually worked for me this time. I figured I would have the half curled, half flat, frizzy mess like before.


Then for the rest of me I made sure I was paint and nail polish splattered (use a shirt and pair of pants you don't care about), I had fabric, ribbons, scissors, and paint brushes sticking out of pockets. If I had time I would have made sure I had a smattering of flour as well. I basically looked like a craft exploded all over me. I had a ton of fun with it, but wish I had a couple more days to add to it and make it an even better Pinstrosity.


My only warning to those who might attempt this outfit idea. Make sure the paint splatter is completely dry on your jeans before kneeling on your boys' bedroom floor. I am lucky I had decided months ago to put a rug in their room to try to keep what ever nasty stuff the boys will bring in their room out of their carpet. There is a nice blood red paint smear on it from my kneeling down to get the hooligans dressed for the party. That's gonna be a fun one to explain...
Friday, November 1, 2013
A Very Pinstrosity Themed Halloween
So Thursday was Halloween! After checking out my Facebook Thursday night I saw some REALLY creative Halloween costumes, but we at Pinstrosity had one in particular that was our favorite, check it out:
The Pinstrosity (literally)

This lovely lady is Marquette's sister Carolyn (also my cousin and friend).
This Halloween Carolyn dressed up as a Pinstrosity!!!
I love this! What a creative idea! She has food,paint,fabric and I think there is even some glitter in there too! She even made a bleach shirt with the Pinstrosity logo on it!!
Carolyn you are THE best! We love it!
Hope everyone had a happy and safe Halloween! Did YOU have any Pinstrosities over this last spooky holiday!? Send them in! We would love to see them!
Goopy Turkeys
We hope you all had a very safe and fun Halloween. A part of me wants to add "and that you didn't have any major Pinstrosities with parties or costumes" but at the same time a part of me is hoping to see some great Halloween Pinstrosity submissions. Is that sadistic of me? Sorry.
Well, as Halloween is over we'll move on with the next major holiday here in the U.S., Turkey Day! Or in our family it's Turkey/Ham/Steaks/Whatever we want to eat that year Day. And to start us out with this year's Thanksgiving Pinstrosities we have a turkey submission for you from Sita!
The Original Pin
 |
| http://www.ourbestbites.com/2010/11/oreo-turkeys-and-cookie-pilgrim-hats/ |
Aren't those adorable? Little naem cards were added to each turkey and then set out on the plates as place card holders. Genius! Sita read the directions, went out and bought the supplies, and assembled her darling turkeys...
The Pinstrosity


They remind me a little bit of the zombie ducks and owl cupcakes we've posted up previously. Maybe this is just a fowl problem? Hehe.
This food "craft" will take some patience and practice. Writing/drawing with those icing packs is hard! Sometimes I can get it looking okay and other times it's a disaster. It is often way too easy to squeeze out more frosting than you actually need, as only little dabs will usually do the trick. I think many of us are used to crafting with glue that dries clear and so it doesn't matter as much if we're slightly goopy or messy. Frosting isn't as forgiving sadly. But luckily the clean up tastes better!
Subscribe to:
Posts (Atom)