Showing posts with label Use It Up Wear It Out. Show all posts

Sunday, May 3, 2015

Show and Tell: Use it Up Projects

I put this post off a day hoping that maybe we'd have some late entries for the April challenge, but figured I'd go ahead and do the post today. I was able to get two Pinterest projects done this month using the Use It Up theme we had. Everything I used came from things I found around the house. I was pretty proud of myself! 

First, I made a table topper Dresden Plate, following one of my pins to a great tutorial. It was fun to dig through my fabric stash and pick out colors and prints (I don't have a huge one, so finding 4 fabrics that fit together perfectly was pretty exciting). I even found thread and batting in just the right amounts (I used just about every inch of the remaining gold thread I had, it was the perfect length left on the spool).  You can read more about this project here. 


Second, I made me a Home sign, using this site as my inspiration. I had spare 8x10 canvases in my painting box, a printer with ink, and mod podge, and made that work. I like how it turned out (especially now that it's dried all the way and the wrinkles in the paper are stretched out and gone). You can read more about this project here.


Friday, January 30, 2015

Rag Rug Sombrero

I love it when my friends send me photos of their Pinterest projects, especially the ones that didn't go quite as planned. It seems odd for a person to enjoy the fact that their friends think of them when they see a "failed" project, but it truly makes my day. My friend Sandy (who is incredibly crafty and talented in so many ways) found a pin on Pinterest about making a toothbrush rag rug and gave it a try. 
The Original Pin
http://ragrugcafe.com/toothbrush-rugs-complete-video-instructions-part-1-beginners
The instructions on this site are pretty good. Her instructions are easy to understand, and you don't have to have any prior crochet or knitting knowledge before hand to do this as it is just the same knot over and over again. Neat! 

Sandy gave this one a try and didn't quite end up with a rug. 

The Pinstrosity

Unless you have a bowl shaped floor, this rug probably isn't quite what you're looking for. Luckily her husband found a great use for it anyway!

I don't have the fabric strips on hand to personally test this one out so I turned to the original site, Google, and perused rag rug sites and discussion boards to find an answer. In her picture it looked like she made the knots more and more loose as she went around. Finding that perfect looseness though can be hard, especially for a newbie to rag rugs (or so I'm reading on sites I have found on rag rugs). I finally happened on the jackpot of knotted or crocheted rag rug tips for rugs that won't lay flat.

Some of the suggestions from the discussion board to prevent a rug from turning into a bowl are:

  • "Just add another stitch every 4 or 5 stitches all around the whole thing whenever I wanted to increase OR, do the regular stitch for 3 or 4 rows, then do 2 stitches in a hole every other stitch for one round, then go back again to one stitch per hole for 3 or 4 rounds" -Cyinda
  • "Lay the rug down quite often to see if it is staying flat. When ever it looks like it is going to start turning up I crochet a extra crochet stitch in the same hole." -Suzin
  • "If you are trying to make a round rug you have to increase the amount of stitches at the ends. When you go around the end of the rug put two stitches in every other stitch until you get back to the long sides. It is much easier to do a square or an oblong rug rather than a round or an oval rug.
    Good luck." -Judy Bond-Tucker
So to try and get a flat rug you need to monitor it as you go along. If it looks like one side is starting to pull, add in extra stitches! In the few round crochet projects I've done you have to add extra stitches in each time around. The first time you do one stitch in each hole. The 2nd row you do a pattern of 2 stitches in one hole, then one stitch in the next, 2 stitches in one hole, one stitch in the next. The third row you'd do two stitches in one hole, then one stitch in each of the next two holes. The rows increase like that each time. I imagine it would be the same idea with a round rag rug. 

Some suggestions to try and flatten an already bowled rug are:
  • "You might try steam ironing it. Mist lightly with water, then
    place a towel underneath and iron it directly on the floor." -Lesley
  • "Dampen it then set something heavy on it until it's dry." -Cyinda
  • "If it was made of wool, you could block it with pins & then steam it with an iron. These may force it down. But, this technique won't work if your fabric is polyester or not a 'natural' fiber." -Cyinda
  • "I had the same issue on mine I made from old flannel plaid sheets i used. It turned out wonderful but wants to rise up in the center much like a bowl with sides. I laid a heavy item on it for days and it helped some by still not completely flat." -Julie

If none of those tricks work and you really wanted this to come out well, you may have to go back through and pick out your work and redo (which will be quite tedious with this knotting pattern). 

I just love that the internet makes it so easy to find answers, and to share your knowledge and help others. There are a lot of negative things you can say about the internet, but there are a lot of positive things too! 

Thank you Sandy for sending your project to me and letting me share it on here! What a fun way to use up extra scraps!

P.S. Don't forget to enter the Craft Fail Book giveaway by tonight at 11:59 PM MST! 

Wednesday, August 27, 2014

Throwback Thursday- Wax On Wax Off

Hello! As Fall quickly approaches, (I'm ready!!! Hurry Up!!!) I think about how it's candle season! Yummy cranberry candles, spice, cinnamon, and for all you pumpkin lovers out there, pumpkin spice too I suppose (never been much of a pumpkin fan). Well, to prepare for this glorious season I have a pin for you to keep in mind when you start pulling out all that fall décor. I would think it might be too hot in many places during the summer for candles, so fall just seems to fit here and it just happens to be right around the corner. Here is a pin Marquette wrote back in 2012, Happy Thursday and Enjoy!!
-Em
Wax On Wax Off
This whole Upcylce and Reuse movement that's going on has led to some pretty fun ideas and crafts. Sometimes it reminds me of the Depression verse "Use it up, Wear it out, Make it do, or Do without" (can you imagine how much money everyone would save if we all lived by that). I have a box of things that normally would have gone in the trash but now they're waiting to be used for some grand new idea (I really do make things from that box...the proof is here). This Pinstrosity submission gave me more ideas of Upcycle projects to do...only I have to finish burning the candles I have.

The Original Pin
The cold temperature will cause the wax to shrink and loosen from the sides of the jar. Get a dull knife and carefully stab the wax to break it apart.
http://snapguide.com/guides/remove-residual-candle-wax-from-candle-jars/
How many of us have burned a candle down to the bottom and have a lovely little jar with a small layer of wax at the bottom (and on the sides-not because fingers have been dipped in the melted wax of course)? Okay, I currently don't but that's because I was given quite a few candles all at once and I haven't gotten to the bottom of any of them. But I will before too long. Lizzy had  a few lying around and saw a pin on how to get the residue wax out and decided to give it a try. 

"I'm not really into manual labor, so I very rarely DIY. But i saw this pin and thought it was a no-brainer, plus I have several candle jars with like 2 mm of wax left, and it felt like a waste not to try this one out. Directions were easy: pop into the freezer, pull out, scrape, peel label, voila! I planned on turning my jar into a mini flower vase." 


"So I put mine in the freezer, I take a dull knife out, and as I begin to scrape out the wax, I see that it's frozen solid and ready to slide out. Easiest. Pin. Ever. "


The Pinstrosity

"But apparently, I squeezed the glass a little too hard, and the glass shattered in my hands. Something so simple, a toddler could have done it, and I end up almost slicing my hand open."

"The problem: Perhaps it was too frozen? The directions said to leave the jar in for an hour and than jokingly, the author notes that s/he left in for days by accident. So did I because I totally forgot about it for about 4 days."

The glass being really cold could definitely have been the cause of it's breaking. As things get colder their particles contract and pull closer together causing a high level of brittleness in some cases (like with glass). I don't think it's terribly common to be able to squeeze a cold glass and have a break, but if there was already some structural damage (a chip, a small fracture, or sometimes even an air bubble) the glass can be weakened enough where it will shatter easy. 

The idea of the pin sounds plausible and easy enough. It's a new method to me, but I know chipping away at a frozen glass would make me a little nervous (I'm a little clumsy sometimes). Let me share a few other ways to get rid of the candle remains from those pretty little jars. At the end I'll tell you how to get the thin residue layer of wax off the sides. 

1. Microwave Method: Put the jar in the microwave and nuke it for about 30 seconds. The wax should melt enough that it can be popped out with a butter knife. I've nuked a jar longer than that so the wax is melted all the way and then I pull the jar out (with hot pads of course...DON'T just grab it with your bare hand) and I stuff napkins in to absorb the melted wax. 

2. Place the jar in a pot of boiling water (make sure the jar is room temp) or in an oven at 200F. Let the wax melt either to wear it is easy to pry out or allow to melt completely and then remove the jar with hot pads. Either pour out the wax (in a paper cup or the trash, NOT the drain as it will make instant clogs) or soak/wipe it out.  

3. Wikihow suggests to "Pour boiling water into the jar. The wax will melt and float to the top. Leave the jar for a few hours, and when you come back the water will have cooled and the solid wax will be floating on top."

After removing the main chunk(s) of wax, there will likely still be a residual sheen of wax on the jar. This can be removed with hot soap water, baby oil, or olive oil. If there is still a strong smell leftover from the candle that you want to get rid of pour baking soda OR vinegar (NOT both) in the jar and let it sit overnight and wash it well in the morning. 

And one final method I recently discovered to rid the jar of the extra wax: leave a candle up-side-down in your car on a hot summer day and the wax will melt out of the jar. Yeah...don't try that one actually.

Tuesday, May 27, 2014

Weaving Wonders and Woes

Today's post has been 2 years in the works. This is not because I've been working on writing it for two years, but because the submission has been sitting in our inbox for 2 years. I'm not a weaver; the only weaving I've done was in 3rd grade with those cardboard looms and yarn. That doesn't quite make me an expert. I tried reading about weaving to figure out how to trouble shoot the submission and I just didn't feel like I got it enough to give tips on how to get this project down. So I waited. My aunt is working on her BA in Art and has recently completed weaving courses. Now that I have someone who really knows what they are talking about when it comes to weaving, I figured it was time to pull this submission out of the archives. 

The Original Pin
http://www.craftpassion.com/2010/03/recycle-tutorial-woven-rag-rug.html
That is a cute rug made from old bed sheets! Isn't that fantastic?!

Anna gave this a try and didn't have the results she'd hoped for. 

The Pinstrosity
"First of all I think I was too aggressive in pulling the fabric - I should have just looped the fabric around the end pieces and not pulled tight at all. Secondly, I think the cardboard was not nearly strong enough (or I wanted to make my rug too big and therefore the weight of the fabric was too heavy?)."

"I tried making a wooden frame out of wooden dowels and nails. Alas, I kept pulling too tight (even though I tried really hard not to) and it started cinching in again!!!"

"Kept it small because I couldn't keep the larger shape intact"

"Cats like it at least".


Before I give Alice's response I thought I'd add in this photo as a reference for weaving nomenclature:
http://www.cd3wd.com/cd3wd_40/vita/handloom/en/handloom.htm
So the weft is the fabric that you weave into the warp (which is the vertical fabric attached to the loom). 

Alice says, "Anna, I love the colors you've used in this. First thing to know is your warp has to be super tight, so the heavy fabric needs a wooden frame, or even PVC pipe or any other clever frame. Secondly, if your weft fabric has any stretch, when you lay it into the warp it will indeed contract and squeeze the middle of your rug in too skinny. While I would love to make something that has that particular effect on my personal middle, on a rug it's just a disappointment!  Stretchy fabric will work, just make sure you've not pulled it tight before you beat or pack it into the warp. I just made a frame for weaving you might be interested in, to see it go to www.whatercolorit.blogspot.com. Good luck and happy weaving!"

In addition to weaving, Alice also works in watercolor and pastels. Check out her blog and her work!

Saturday, April 12, 2014

The Final Use it Up Project: Wedding Card

And now I'd like to share with you the final Use it Up project we received for our Use it Up Challenge! I think this one's lovely! Take it away Michelle!

Hi Pinstrositeers,

I discovered your blog just after discovering Pinterest, and to be honest, I’m not sure which I enjoy more....!

I am a cardmaker and scrapbooker from way back – I started scrapbooking when I was pregnant with my now 11 year old daughter.  And if you know any scrappers/cardmakers you will understand and appreciate how huge their ‘stash’ can be.  We buy papers because they are beautiful. We hoard stuff to be used ‘one day’. All for the future. All for ‘some day’. 

Well, I must admit when I read your post about “Use it up” month I didn’t really think much more about it.  At least not consciously.  However, my subconscious obviously took the challenge on and was rummaging  ‘mentally’ through my stash of supplies.

You see, I had a wedding card to make. A very special card for my husband’s brother and wife to be. So I wanted it to be gorgeous. And pretty. And special. I found this card on Pinterest (where else?):

But wanted it to be monochrome like this card (also on Pinterest):
http://prettyinkspirations.com/2012/10/stampin-up-happy-i-do-day-card/happy-i-do-wedding-2/

So I was thinking about popping down to my local scrapbooking store (conveniently located only 10 minutes away) to pick up some (more) gorgeous paper, when I suddenly remembered (or my subconscious threw up into my conscious brain) a beautiful piece of embossed vellum I had purchased at least 10 years ago (and which cost $4.50 (for one sheet!)).  So with my beautiful vellum about to be used, I searched for everything else I needed, and as you can imagine, found quite easily in my stash. 
This is the card that I made:
So thanks, Pinstrosity, for setting the Use It Up challenge. I made a beautiful and special card. With supplies I already had! Win Win!

Kind Regards

Michelle

Friday, April 11, 2014

DIY Photo Canvas Command Center

It's another awesome Use It Up project! This one is a submission from Amber!

Back in October I purchased a 10 pack box of 16x20 foam boards to recreate the DIY canvas pin (like this one) that I have seen over and over. I had collected almost half a dozen 16x20 prints from Shutterfly from multiple free large prints offers over the years.

Tonight I put the first one together and finished a 'command' center by my garage door.

Looks fantastic! Makes me want to pull out the stack of canvases I bought (it was 7 for $4! Couldn't resist stocking up!) and play around with them! Thanks Amber!

Inside Out N'Thanks

You know those times that you just HAVE to have chocolate/peanut butter/bacon/insert awesome food here? When those cravings hit, we'll do just about anything. That's when I find myself searching my Pinterest boards to find something quick and easy I can throw together. All too often I find something I only have 1/2 the ingredients for, but for some reason my brains says, "This! This is what you must make!" So, I decide to see if I can throw something similar together with what I have in the house. Sometimes it works...sometimes it gets thrown to the crows.

Aimee sent in a submission of a project that fits this scenario. Behold: Inside Out S'Mores:

The Original Pin

Mmmm! So, what do you do when this is what your brain tells you to make, but you only have a cake mix (not a brownie mix), and graham cracker crumbs (rather than whole crackers)? You try it anyway. Obviously it will turn out different, but hopefully a Pin Spin will come out of this!

The Pinstrosity

Doesn't look like the original...but let's dig in...
Aimee said, " I ended up pouring milk in it just to get it to be editable. And YES I ate a piece of it, lol! After all, I would have punched someone in the face for the piece of chocolate in their pocket."

So these substitutions didn't work. Gotta have the brownie mix and whole crackers it looks like. This is completely along the lines of something I'd end up making in an attempt to make a snack out of what I found in the cupboards. For St. Patti's day I wanted to make a green pie, but I didn't have time to run to the store before our friends came, so I had to wing it. I found a box of cheesecake pudding and a box of lime jello and graham cracker crumbs. So I made the crumb crust, and then mixed the two boxes of pudding/jello together with milk (the amount on the pudding box for making a pudding pie with two boxes of pudding) and let it set up. The consistency was a little weird, but it tasted kinda like key lime pie and it did the job of a dessert! Sometimes you just have to make do with what you have on hand! 

So this was perfect for our Use It Up week, even though it wasn't technically a Use It Up submission!

Again, check back at noon for another Use It Up project post!


Thursday, April 10, 2014

Use It Up- Pay It Forward Crafty Style

Hello peeps!!
 
Today we have a Use It Up submission from Rebecca.
 
Do you ever have a million different half used balls of yarn in a million different colors and your thinking, "What the heck do I do with all of this??".
Rebecca had this dilemma and decided to combine all of her bits of color and crochet them into small squares, combine the squares, and then use the quilt as an act of service.
Check it out:
 
Use It Up Challenge
Isn't that beautiful and spunky?!?!
 
Here is what Rebecca said about it:
"I used to crochet all.the.time when I was younger, and have just now gotten back into it. The challenge was the perfect excuse to use up some of my little random balls of yarn, and a lady at my church took it to a women's shelter."
 
How great is that?? I love crafting, and I love being able to craft for family, friends, and myself. Sometimes is also great to create/craft for others. I love when people use their abilities and talents for the good of others. This totally makes me think of someone whom I am close with that very much so also lives her life in this way, DeAnn over at The S.I.P. Project, if you haven't been by there, go check it out! She is pretty crafty in her own way!
Great submission Rebecca! We love it!
 
Happy Thursday Pinstrosipeeps!!


Wednesday, April 9, 2014

Use It Up Mobile

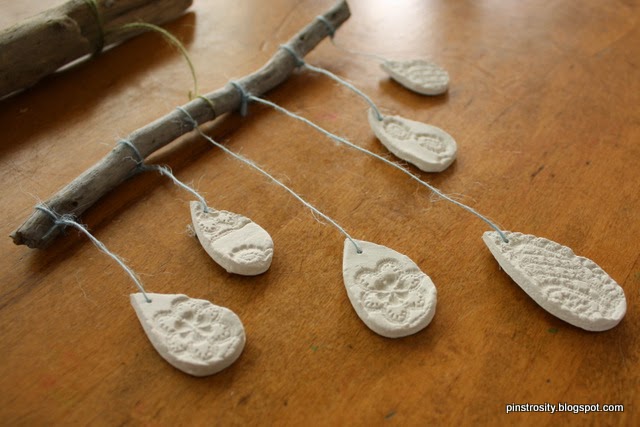
Today we have an awesome Use It Up Pin Spin from Christina to show you! Here's her submission:

Hello, Pinstrosity ladies! From the moment I found your charming corner of the internet I was hooked. I love your kind and positive attitudes and the way you are solution-oriented without taking yourselves too seriously. It's the perfect mix. And I have finally gotten my act together enough to send a submission! Happy day.

I'm renovating a nook in our house into a tiny art studio for myself, and I've been having so much fun coming up with artsy, girly decor. I decided to combine these two pins to make my own fabulous mobile for my corner (because who says mobiles have to be only for babies?):

http://media-cache-ak0.pinimg.com/originals/f7/d8/b2/f7d8b223cb37daad33e0946dbfde3efe.jpg


https://www.etsy.com/listing/50510845/lace-imprint-egg-jewelry-plate-m-dish


I rolled out some air dry paper clay I had leftover from an assignment in an art class I'm taking, and made the lace imprints with lace scraps I've had for years.  Then I free-handed the drop shapes with a sharp knife (I didn't have a drop-shaped cutter).  Finally, I hung them from driftwood I collected on our vacation last year with some pretty, colored twine I had in my stash of crafty...stuff.  Voila! A beautiful mobile to hang in my space. It was an easy and very rewarding project.


I LOVE this. What a great project. And, I love the handkerchief "garland" you can see in the background of the last photo. What a great space! So light, and feminine, and happy! Thanks Christina for this awesome project! 

Tuesday, April 8, 2014

Use It Up Challenge- Book Box Awesomesauce!!

Pinstrosipeeps!!!
I am back and ready for some crafty Pinterest action!
Thank you all for your well wishes, for those of you who read H.I.A.P. Day Pinterest Blues post, I will be to the doctor within the next 24 hours to hopefully get the green light to get my tonsils out! Everyone holla for a tonsil and strep free happy and healthy Emilee that will hopefully be coming to you in the next 4 weeks! Whoohoo!
But for now, I am back and feeling MUCH better, I thank you all so much for your wonderful well wishes and support during my rough less than stellar few months.
This is a new and beautiful week :)
Today I have a fun little craft by Serena for our Use-It-Challenge. If you are new here, go read all about it and then try it for yourself, use some of your stache', get creative, have fun!!
Here is Serena's Book Box which is just funky enough that I totally want to five-finger-discount it and have its new home be my house :) You have inspired me Serena!
Here is her handy work!
Use It Up Challenge-Win!
"I hadn't been to the blog recently (I know, for shame on me!) real life intervening and all. But I found myself visiting and lo and behold, a new challenge! I love your idea's and ways you inspire your readers and this is one I can do!!

It is a fabric covered book box. I found the bare bones box at Goodwill. I am a sucker for thrift stores. They have the ugliest stuff!! Its great!
I digress. So, I found this yellow box with these red flowers in this boho pattern. Meh. Like a year ago. For 3 bucks. Shazam, I KNOW. And the inside was the beautiful plum soft velvety material. No damage. GET IN MY CART. And then Joann's had this gorgeous blue velvet remnant. As many of you know, those are 50% off. And if it is on sale (the reg material) then it is 50% off the sale price. And I had a coupon. And I said...this is lovely Whovian material, and its going home with ME.

Stuff has sat in my "closet" for about a year. I hoard stuff in a space in my craft room that will be a great gift when I get motivated. I was gonna, was gonna, was gonnnnnaaaa. And never did. 
Then I read the blog. Your the best. So here we go. "


Box  on hand
Modge Podge  on hand
Scissors  on hand
hot glue  on hand
ribbon  on hand
Straight razor  From husbands supply
Paint  on hand
A drink    your choice, I had a blueberry lemon sprintzer

"Ta freaking DA, peeps! Less then an hour worth of work. Someone is getting an awesome Christmas gift this year. Yeah Buddy.

I like it like this but my friends say I should add police box sign at top. I dunno, we will see.
Enjoy!"
Serena! We love it! And I know we have some Doctor Who fans who will love it too :)
Happy crafting all! Stay tuned this week for more Use It Up Awesomeness!!


Monday, April 7, 2014

Use It Up: A is for Anteater

The very first Use It Up submission we received was submitted the same day as our challenge. Kilani was fast! Here is her Use it Up story:

I don't really use Pinterest (I know I know, blasphemy!), but I follow tons of DIY blogs and go to several annual indie craft fairs. I haven't had many Pinstrosities, but I think that's probably because I never follow tutorials properly anyway and expect the worst!

I am doing a craft challenge this year, Iron Craft (http://www.justcraftyenough.com/) and I am also about to become unemployed. The Use It Up challenge is perfect since I am suddenly very much on a budget! 

Iron Craft sets a theme every two weeks and this "mission" was something to do with the letter A. I am learning to knit on DPNs so I was super excited to make a pair of armwarmers for this challenge. Then I realized that based on the amount of yarn I had left it would be armwarmer. Singular. Back to the drawing board!

As my husband describes it I stomped around the house angrily going through craft books for A-inspiration. I didn't want to make any of the amigurumi patterns! I didn't want to make armwarmers anymore! What kind of jewelry starts with A?! Then I remembered some critters I loved at a recent craft fair. This little guy isn't on Pinterest, but his friends are. 
https://www.etsy.com/transaction/64937452? (the photo is small as the item has sold already, but you can get the idea in the thumbnail)

I freehanded a pattern on some drawing paper, and I cut up an old sweater I'd been saving for just such an occasion. I pinned him up and laid out his legs to trace onto some felt for his 3D belly. (I've never made a plushy so I wasn't sure how that was going to work! Beginners luck!) I had a set of plushy eyes in my notions box and plenty of embroidery floss for ants.

Voila! From frustration to inspiration to experimentation. I give you... A for Anteater!

Sunday, April 6, 2014

Some Time Ago Sunday: Cat Shelf Confessions

Good evening,

Hooray, at long last, this post is ready for reading!This week, Sunday Surprise is taking a vacation. It's been replaced with "Some Time Ago Sunday" (because Throwback Sunday just doesn't sound as good as Throwback Thursday). This story is also somewhat related to Operation Use It Up, because unfortunately, I still have ALL of the supplies for this project. Ugh, pinnstrosipeeps, I am so ashamed of the fails that took place during every step of this process. I almost want to punk out and not tell you, but, sometimes the worst Pinstrosities are the PinNOTsities. So, here we go, hang in there...

Do you know what I thought was a great idea a year ago? Making cat shelves for our two chubby cats Stella and Carly:

Stella

Carly

For any of you that are not cat lovers, you may wonder what a cat shelf is, exactly. Pinterest and I are happy to show you:

The Original Pin

Can we talk about the bat ears on that little furry? Oh my gosh, adorable!
Essentially, cat shelves can function as a more modern/ less expensive alternative to a cat tree. Please note that I said they are "supposed to be" (they weren't for us-- read on...). However, what really, really made us want to try cat shelves was that no floorspace would be taken up by a cat tree (since we have plenty of wall space, but minimal floor space).

It's kind of difficult to see from the following photo, but we wanted to put two shelves under each of the second story windows, so that the girls could watch the goings on outside from up high. We'd then use four small shelves as stairs, or a ladder, on a wall (not pictured) so the girls could reach the high shelves.

As you can see, they already loved the mini-cat towers that we got at Ross for $12.99 (What a steal!!!!)
Anyway, HausPanther posted this entry about the shelves that they installed in their modern loft. Totally adorable, right? They allow your feline friends to take advantage of high walls/ceilings (which we have) and they encourage activity (which my chubby cats need), so this seemed like a win. However...

The Pinstrosity

Shenanigans! Those shelves aren't even on your wall!
Now, who just tilted their head at the screen and thought "Well, it doesn't look like a cat could climb on those at all,"? You're right. The entire cat shelf project was derailed after a series of fails that I will detail for you now:

1. Questionable Material Choices.

Carly and Stella are actually Rob's cats, but since we moved in together, I've become their proud cat mom. So, naturally, when I had the idea of screwing shelves into the walls for them to play on, Rob had security concerns: the shelves must be sturdy, not too narrow, and not too slick. To which I said: "All right, I can handle that."When I explained the idea and showed him the photos, he was totally on board.

Since we were working off of the picture for this project here's the list of supplies we came up with:

Supply List:
- 4 small shelves: We used the Ikea Laiva for $1.99 each.
- 2 large shelves: We used the 75" Ikea Lack Shelf (this choice added more work for us later) for $19.99 each.
- 2 to 3 brackets per shelf: We used the Ikea Ekby Stodis for .50 cents each.
- Bath mats to use at the liner for the shelves: 1 for $6.99, 2 more at $12.99 each -- all from Ross.
- Industrial strength adhesive velcro (to attach shelves to the rugs, but ideal for removal if the rugs needed cleaning) - $19.99 ish
-Screws to attach brackets to shelves (Purchased at Ikea for like $7.99 in a kit).

At the time we were purchasing these items, it still seemed like we were getting a swingin' deal (compared to $150 for a cat tree). It would have been ideal to purchase the Lack shelves on Craigslist, but after two weeks of waiting for some to show up, the creative madness took over, and we buckled and went to Ikea.


2. Gross Underestimate of Time Required to Complete Project.

I'm famous for not understanding time. I mean, I know five minutes = five minutes. But, my relationship with estimating how long a project will take? 100% off. Every time. So, when I thought the cat shelf project was something that we could hammer out in a couple hours, I was sorely mistaken.

It took a couple of weeks to finally gather all of the supplies that we needed, which was torture, as you can imagine. We also have to borrow tools from my dad (who has ever tool known to humankind), so coordinating when we could borrow drills/ladders/levels also played into the schedule.

After what seemed like forever (two whole weeks, oh the trials and suffering), Rob and I had an evening free together. It seemed like the perfect "hammer it out" night. I started cutting the bat mats into pieces for each of the small shelves while Rob drilled the brackets onto the shelves:

Rob's work: Brackets attached to the four small shelves:


 My work: measuring the bath mat to fit each of the shelves:


Then, we allowed Carly to play on the shelves:
Carly thought this process was mighty fun.

3. Emergency Supply Revisions.

Part 1: Vexed by velcro adhesive.

The bath mat was cut up and ready for attachment. But... wait... the industrial strength, adhesive velcro has no interest in sticking to shelf or to the rug, let alone both at the same time. I've had bandaids that could have performed better. But, I'm a glass half full time of person, so it was time for Plan B: Needle and thread (because I don't have a sewing machine, and really can't sew to save my life anyway). Why a needle and thread? Because, CLEARLY, a tiny little needle would definitely be able to go through velcro and a bathmat.

Not.

After attempting to get a needle through the strip of velcro (with the adhesive, mind you), I was certain that the back of the needle would sooner go through my finger skin than said velcro. Don't even talk to me about it getting it through the bathmat. Basically, a critical bath mat/thread/needle/shelf crisis then took place on the floor of the living room.

Part 2: Hollow shelves call for additional hardware

What interrupts my crisis on the floor is an important observation from Rob. The huge Ikea Lack shelves? Yeah, they're HOLLOW. Why we didn't realize this before is beyond me, but we came late to the obvious-party. Initially, we thought maybe this wouldn't be a big deal. However, once we had attached the bracket to the shelf, it took only a slight tug for the whole bracket, screws and all, to come right back through the shelf, making us fear that the shelves would be unsafe for the furries.

Rob is a problem solver. So, he figured we would make the misplaced brackets work and we will use bolts/washers to attach the brackets to the shelves. No biggie, those can be purchased at a home improvement store, where Rob (the more level-headed of the two of us) pointed out that we also purchase Gorilla Glue to cure my bath mat ailment.

4. Late Night Trip to Home Depot

By this point, it's already 9:30, and I have to be at work the next morning by 7:00. However, we resisted the urge to give up. Dissatisfied, yet still determined, Rob and I made the late night run to Home Depot for Gorilla glue and bolts/washers. Because, censored word, we were going to make this thing work THAT night.

Good news? Finding Gorilla glue was no problem. Bad news? Home Depot did not have the length of bolt that we needed (since we wanted it to go through the shelf and the bracket). We went ahead and got the washers, sans bolts, and headed home.

I glued the velcro to the shelf and the velcro to the rugs, and then we (wisely) called it a night.

This is what the bottom of the shelf looked like with the velcro.

5. Fights throw projects off.

Rob and I didn't have another free night to dedicate to the cat shelf project for a several days (maybe even a week), so it sat and sat. We finally found the bolts we needed from the blessed Ace Hardware. The only trouble was that their hours were such that we missed them by minutes two days in a row. However, at long last, we had the bolts, which meant that it was time to attach the brackets to the shelves, trim down the bolts, and secure said brackets.

This part of the project took place outside, since the only thing we had on hand to trim the bolts was a hack saw. Shards of metal everywhere? Not in our house. Here, you can see our outdoor cat, Johnny, assessing the project:


This same evening (shortly after those photos were taken, actually), Rob and I got into some sort of argument. I can't remember what about, and he and I fight so rarely, that this really put both of us in a funk. We got the brackets attached to the shelves (thank heavens) before making an important realization: we had completely forgotten to measure the brackets to align with the studs in the walls. What did this mean, pinstrosipeeps? Either remove the brackets, re-drill the shelves, and re-attach the brackets or hope to find one stud in the wall and pray that our 30 lbs of cat didn't bring it crashing to the floor.

Unable to civilly decide how to move forward, we put the project away and spent the rest of the night apart.

6. Electricity is not to be meddled with by amateurs.

By this point, a couple of months has passed since we had touched (or wanted to touch) the cat shelf project.  The variety of shelves and brackets were traveling from room to room in our house, not conveniently anywhere.

A combination of a bad taste in our mouths, not knowing quite what to do, and being overwhelmed by other parts of life was keeping us from engaging with the project. Though, inexplicably one afternoon, Rob and I got the bug and made another attempt. After thoroughly discussing the bracket/stud issue, we decided not to mess with the brackets, and get the shelf against the wall. At least then we could see where we were at.

At long last, some good news. We got the first of the shelves onto the wall. And hot dog, it looked great!!! The door frame made it so that it was easy to hold up and drill in. And let me tell you, that thing isn't budgin'.

Flippin' sweet, right??
We were ready for large shelf #2 to go up. In the photo below  (where the ladder is). we wanted a second long shelf to go under the angled window.  The wall in the left-most part of this photo was where we were going to stagger the small shelves to create the stairs/ladder (so that the cats could climb up to the windows):
FINALLY!!!!!
We whipped out our stud finder so that we could check for ideal shelf placement. We have semi-textured walls in our rental, so the stud finder was making heinous confusion noises and started blinking on and off. After grumbling and moaning, Rob finally handed it to me. I got it against the wall and realized the worst news about this project: there was an electric current in the "ladder wall". Rob and I were totally baffled, since there is no outlet on the wall there.

That was until we remembered that there was an outlet outside on that wall. D'oh! Then we REALLY felt like idiots. No lie, we looked at each other and without saying a word, we stacked the shelves into a corner, poured some wine, and called it a day. The entire cat shelf project seemed like a wash, and holy cow, I just wanted to buy a cat tree and give up. I'll mess with a lot of things, but negotiating an electrical line with a drill? No, thanks. I'll pass.

Six months later, for Christmas, my parents surprised us with a cat tree!

Whatever could it be? 
Woohooo!!!! 
The girls have really enjoyed this new addition to the house since Christmas:
Play time!


Fast forward four months...This brings us to the present (well, least Saturday). Would you like to know what I did for the Use It Up Challenge?! Enlisted Superdad's assistance and got the second large cat shelf hung!!

Nothing like having a fresh set of eyes/tons of construction experience to fix your cat shelf problem and make you look really silly for making it into such a big deal. We ended up moving the brackets, trimming the center one down, and relying on the frame of the window for the studs.

Note the placement of the cat tree.
We placed the cat tree under the shelf so that we could avoid drilling into the ladder wall with the smaller shelves. We figure we'll re-use those elsewhere in the house (and just remove the carpet).

Robert and Papa 
First time on the shelves! Can you spot our stealthy black kitty?
Stella is so excited about the cat shelf! Carly is still a bit nervous (since the cat tree is kind of wobbly). We'll have to work her up to it. Stella was waiting for us on the shelf above the door tonight. Best. Feeling. Ever.


Holy cow, I'm so glad that I was able to share this near PinNOTsity with you.
Thanks for taking the time to read this novel of an entry. What did you think? Are we crazy cat people?
Cheers to you all,
Meow!
Rachel