We love to decorate for the Holidays, but store bought decorations can be so expensive! DIY supplies can be expensive! We went a few years without really decorating much because we couldn't afford it. Or that's what we thought. The past few years we have decided that we are going to find ways to decorate the house for various holidays without having to shell out a ton of dough. Will you ever see our house in a magazine because of our decorations? Heavens, no. Are some of the decorations slightly cheesy? Yes. But we found it is way more fun to have cheap and cheesy decorations and to add some festivity to the house than it is to just wallow in our poor pity and not do anything at all. So...I know the major holiday season is still a little ways off, but it'll come fast. I'll show you some of the things we've done for each season around the house, and some of our plans for future cheap seasonal decor.
Autumn:
Our biggest "trick" when decorating for Autumn is to try and incorporate nature into our decor. Autumn is so full of great colors and textures. Take a walk in your neighborhood and see what you have around you. This can work in rural or urban surroundings. Pick up leaves, nuts,dry and dead flowers, grass, twigs, rocks, etc. You can put these in bowls, vases, on wreaths, topiaries, etc. With the rocks you can even pick up boring ol' gravel pieces and paint them (solid colors or designs) to fill a vase or bowl. A few years ago I went out in my front yard to gather acorns to put in a bowl and found that the animals had beat me to them. But, there were still a ton of the acorn "shell" tops left, so I gathered those up, along with a bucket full of yucca pods. Luckily I already had 2 Styrofoam balls on hand (I don't remember why), and so I glued the acorn shells and the yucca pods to the balls to make a topiary and a yucca ball. I love the color and naturey touch they add to the house, especially during the fall.

Use nature items (gourds, leaves, rocks, etc.) as name "cards" for a fun autumny dinner.

Halloween:


Autumn:
Our biggest "trick" when decorating for Autumn is to try and incorporate nature into our decor. Autumn is so full of great colors and textures. Take a walk in your neighborhood and see what you have around you. This can work in rural or urban surroundings. Pick up leaves, nuts,dry and dead flowers, grass, twigs, rocks, etc. You can put these in bowls, vases, on wreaths, topiaries, etc. With the rocks you can even pick up boring ol' gravel pieces and paint them (solid colors or designs) to fill a vase or bowl. A few years ago I went out in my front yard to gather acorns to put in a bowl and found that the animals had beat me to them. But, there were still a ton of the acorn "shell" tops left, so I gathered those up, along with a bucket full of yucca pods. Luckily I already had 2 Styrofoam balls on hand (I don't remember why), and so I glued the acorn shells and the yucca pods to the balls to make a topiary and a yucca ball. I love the color and naturey touch they add to the house, especially during the fall.
Use nature items (gourds, leaves, rocks, etc.) as name "cards" for a fun autumny dinner.
Halloween:
My husband's favorite holiday is Halloween. I'm not a huge fan of gruesome Halloween decorations, or the overly cheesy Walmart decorations, so the past 2 years I've worked hard to come up with our own style of Halloween decor.
From bottom to top:
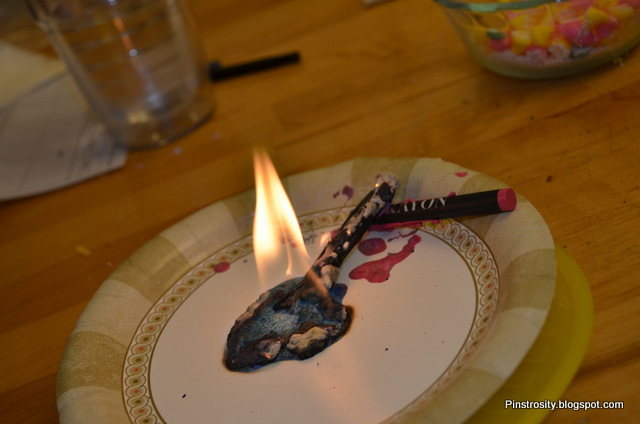
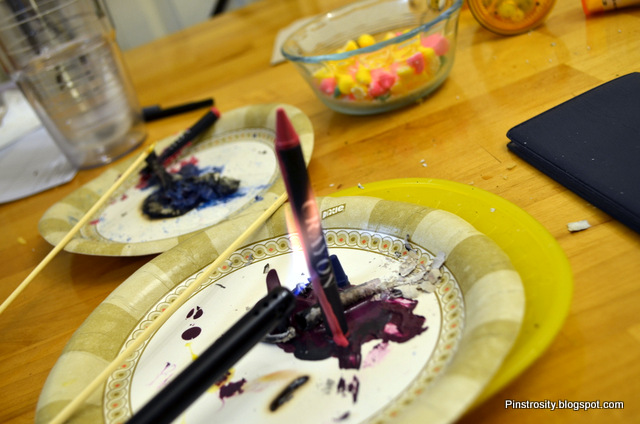
Bloody Candles: Pinspired Project (see next picture).
Dried Corn: WalMart
Troll (by the corn): Gift from my brother-in-law from his time in Norway.
Black and White Photos: Photos my Great-Grandfather (Em's Grandfather) took.
Quidditch Photo: Personal photo project.
Boots: From a local thrift/antique/consignment store.
Framed Leaf: Melted Crayon Project
Yucca Ball: DIY
Metal Kaleidoscope: Gift from a friend.
To make these we lit a red taper candle and let it drip on the white candle, turning the white candle as needed.
I found these boots at a local thrift/antique/consignment shop and had to have them as they were only $10. They are way to small for my feet but I knew they'd make a fun fall/Halloween centerpiece and/or decoration.
From left to right:
Witch's wreath (there hanging on the wall on the left of the piano...click the link to see it better...it was made from items we all usually throw away): DIY from previous year
Mummy head topiary and Ghost: DIY from previous year
Necktie Garland: DIY from previous year
Leaves: Walmart. I put them in an orange vase we found in the house when we moved in. The vase is being held up in a bowl we got for our wedding by 4 dried ears of corn.
Halloween Silhouettes hung on a ribbon with clothes pins: DIY from previous year. These always get comments from visitors and they were so much fun and so easy to make! We keep these in a folder during the year so they don't get munched in the Halloween box.
And then last year in the Dining Room was my Batmobile. Hehe...I'm so punny.
The previous year these bats hung from my porch roof.
Thanksgiving:
We actually haven't really done anything specific for Thanksgiving yet. I want to. Maybe this year? These are a few ideas I have on my Thanksgiving Pinterest board:
I love the look of the leaves and clothespins. This would work great for just regular fall/autumn decor as well. To make it Thanksgiving decor each leaf could have things we're thankful for written on them in gold or black ink.
I like the quote more than the decor in this one. This could be written on a table runner, a chalk board, done up in a cool font in Word and printed out, etc.
Christmas/Winter
I made about 10 of these for our 5th Anniversary dance that we held. I still have most of them kicking around. At the time I made them I used ribbons in our wedding colors to decorate the cans with, and I've just used them like that for Christmas decor, but I think this year I'm going to pull those off and use some Christmas ribbon, maybe some burlap (small amounts...I'm not a burlap-a-holic), maybe some mistletoe or pine clippings. We fill these with beans or rice for sturdiness and then add a candle (real or battery operated). We have a drawer in our kitchen where we store extra cans to use for projects like this.
We go and cut our own Christmas tree each year (we live where it's free to get a permit and the National Forest is just down the road), and it always needs a little bit of trimming up once we bring it home. Before we've just chucked the trimmed branches out in the yard but this year I think I'll save one or two and do something like this.
.JPG)
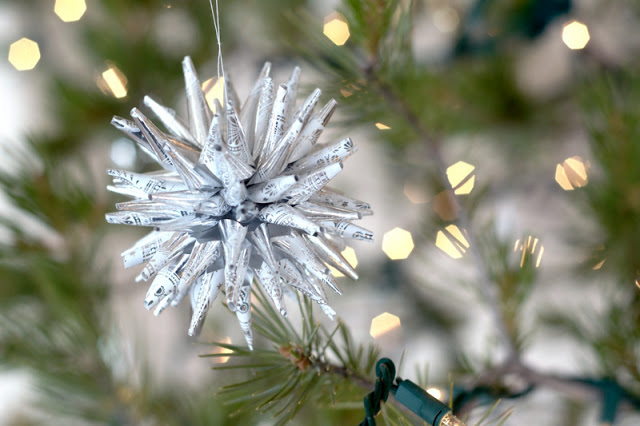
DIY paper ornaments:
We made these for New Years with metallic wrapping paper we bought in the after Christmas sales. But I remember making these as kids for our Christmas tree. My grandparents made these out of newspaper for their Christmas tree when they were newlyweds and broke. These look neat out of pretty paper, regular paper, newspaper, etc.
The Rest of the Year:
I'm really bad about doing any special decorations for the rest of the year. My house stays pretty much the same from when we take down the Christmas decor (anywhere from January to the end of March, lol) until we pull out the Autumn decor. I don't know why I don't decorate the rest of the year...it would be fun. I guess the rest of the year I usually just work on "regular" stuff for the house. Even during the "rest of the year" though, we keep our decorating as simple and cheap as we can. Most of what we have in our house are things that friends or family were giving away, things we found super cheap at the thrift store, and things we made. You don't have to spend a ton of money to be able to decorate. You don't have to be super artsy or crafty to create things for your living space. Don't know where to start? Start with pictures and photos. Hang them on your wall, put them on your book shelves, set them on your tables. Hang snapshots next to "formal" portraits. Find art pieces you like at your local thrift store (you can find gems amid the tigers painted on velvet, adorned with glitter and rabbit paws). Print photos your grandparents took. Write or print out a favorite quote or verse and frame it (we have some super cheap frames that I put around the house that we switch out contents when I find a new verse that inspires me, or something that I find beautiful). Don't worry about having the magazine or Pinterest perfect home. Use magazines and Pinterest as idea starters if you want, but don't think that your home has to look like that or it's not a home. Those rooms in those "manufactured" pictures were most likely only that way for as long as it took to take the picture. What makes a room feel light and loved is you. Live in it. Let it be yours. Let it have a pile of clutter...most of us do. Don't feel like you have to be Martha Stewart or a Kardashian in order to create or afford a beautiful home. It's your home, not theirs after all.

We actually haven't really done anything specific for Thanksgiving yet. I want to. Maybe this year? These are a few ideas I have on my Thanksgiving Pinterest board:
 |
| http://www.freshlychopped.blogspot.com/ |
 |
| http://www.flickr.com/photos/yourhomebasedmom/8173548067/in/photostream |
Christmas/Winter
Our Christmas and Winter decor is all the same thing in our house. I always feel like we have a ton of Christmas decor, but then when we go to pull it out I find that we don't. Most of it is from my single days and our first year of marriage...so most of it is kinda corny and cheap. I've been working on getting a few more items made, but I haven't gotten very far yet this year (my goal was to make 5 decorations by September...I have one last one to finish up today to reach that goal).
Tin Can Luminaries:
.JPG) |
| http://madebymarquette.blogspot.com/2011/08/tin-can-luminaries.html (this link shows step by step how I made these). |
Christmas/winter nature decor:
 |
| The blog this originated from is no longer online. |
Wood bucket Christmas Tree stand:
We happened on this tradition completely by accident (you can read about that here). We needed to improvise a tree stand and after looking around the yard found these wood planter buckets that previous tenants had left. With the help of bricks, a no. 10 tin can, and gravel, we were able to rig up our own free tree stand. It's now tradition to use that bucket. Okay...we've only done it for 2 years now, but as long as that bucket holds up...we're going to use it as our tree stand.
DIY paper ornaments:
 |
| http://madebymarquette.blogspot.com/2012/12/new-years-tree.html |
The Rest of the Year:
I'm really bad about doing any special decorations for the rest of the year. My house stays pretty much the same from when we take down the Christmas decor (anywhere from January to the end of March, lol) until we pull out the Autumn decor. I don't know why I don't decorate the rest of the year...it would be fun. I guess the rest of the year I usually just work on "regular" stuff for the house. Even during the "rest of the year" though, we keep our decorating as simple and cheap as we can. Most of what we have in our house are things that friends or family were giving away, things we found super cheap at the thrift store, and things we made. You don't have to spend a ton of money to be able to decorate. You don't have to be super artsy or crafty to create things for your living space. Don't know where to start? Start with pictures and photos. Hang them on your wall, put them on your book shelves, set them on your tables. Hang snapshots next to "formal" portraits. Find art pieces you like at your local thrift store (you can find gems amid the tigers painted on velvet, adorned with glitter and rabbit paws). Print photos your grandparents took. Write or print out a favorite quote or verse and frame it (we have some super cheap frames that I put around the house that we switch out contents when I find a new verse that inspires me, or something that I find beautiful). Don't worry about having the magazine or Pinterest perfect home. Use magazines and Pinterest as idea starters if you want, but don't think that your home has to look like that or it's not a home. Those rooms in those "manufactured" pictures were most likely only that way for as long as it took to take the picture. What makes a room feel light and loved is you. Live in it. Let it be yours. Let it have a pile of clutter...most of us do. Don't feel like you have to be Martha Stewart or a Kardashian in order to create or afford a beautiful home. It's your home, not theirs after all.