


My cousin's baby shower is today, so my sister and I spent yesterday getting her baby present all ready for both the shower and today's Show-and-Tell post (I'm hoping her and her mom are busy enough with the shower that they don't see this before hand...I'm gonna risk it). She's doing an all out Disney theme, so we thought it would be fun to try and follow along with that. I looked and looked and just wasn't sure what to do, so I started looking at Disney boards on Pinterest for inspiration and I found this awesome minimalist art set:
 |
| http://www.disneyeveryday.com/minimalist-disney-pixar-polyptych-poster-set/ |
I thought that was so cute and clever, so I started looking up other Disney minimalist posters and suddenly I had an idea: Disney minimalist art onesies. Cheap and fun and definitely doable.
I started by looking up Disney minimalist art online and made myself a Secret Board on Pinterest (so that my cousin and her mom didn't see what I was pinning) for all the designs I liked. I had quite the collection, but there were some characters that I wanted that I couldn't find, and some designs that I wanted to tweak some. Once we had finally picked the 11 designs we wanted to do (because I bought 11 onesies in varying sizes), I sat down in front of the computer and drew them out on blank paper, first in pencil, then going over them with Sharpie.

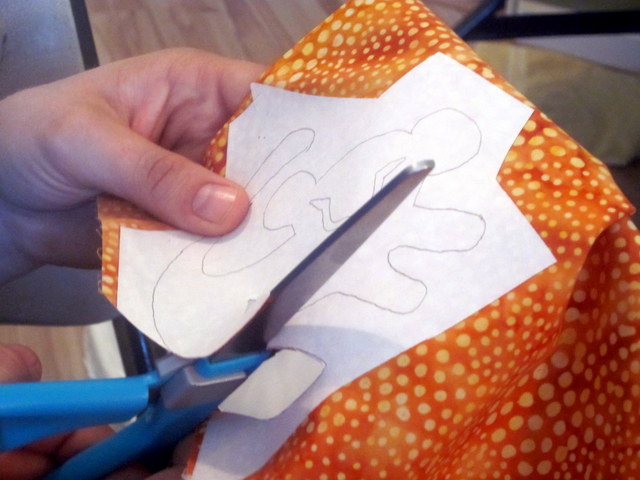
I used the Sharpie so that we could flip the paper over and still be able to see the design on the back. Why did I do this? Because we needed to be able to trace it onto Heat N' Bond (a double side fusible iron on...it lets you join two pieces of fabric together with the iron). When you trace a design onto Heat N' Bond you need to trace it on backwards so that when you iron the design onto your background fabric it is facing the right way. You can see what I mean below...I traced the Simba design on "backwards" so that when I cut out the design and turned it over it would be facing the right way.

We tried to trace each piece of each design by color, so that all the grays were together, all the reds, all the oranges, and so forth. To keep them straight we just wrote the character name inside the traced design (since we had quite a few circles and needed to know which one went to which character). We then cut blocks around the designs (you DON'T want to cut on the lines yet, just give a good border around like you see below). After all the pieces of the designs were traced onto the paper side of the Heat N' Bond, we dug through my fabric scrap stash to find just the right colors and textures.

Next up, it's ironing time! You need to place your fabric right side down and iron all the wrinkles out of it before you attach the Heat N' Bond. When you have your fabric prepped and ready, lay the Heat N' Bond plastic side down (paper side up), and iron it on (following the package directions).

After we had all the pieces ironed on, we then cut them out on the lines.
Here you see all our cut out design pieces. Some of them took a while with the details, but we finally got it.

Now it was finally time to attach them to the onesies. You want to lay your onesie out flat and smooth out the wrinkles so that the fabrics can stick together fully.

Then from there just follow the Heat N' Bond directions (removing the paper layer before you try to iron on the design pieces) to attach your designs.
Here are how all 11 of the onesies turned out and where I got the idea from for each:
The Lion King

Based on this poster I found:
 |
| http://neilelewis.blogspot.com/2012/09/minimalist-posters.html |
Jack Skellington

My cousin LOVES The Nightmare Before Christmas, so we had to do one of Jack Skellington.
We looked at a few different Jack Skellington faces and finally just made our own.
Up
We based our design off the poster below, only we knew we wanted multi-colored balloons. We found a polka dot fabric to use as the base and then added 8 balloons over the top to add color and fullness.
 |
| http://www.etsy.com/listing/112019296/up-minimalist-movie-print |
Finding Nemo
I loved the bubbles in the photo below. Just looking at ours, it doesn't scream Finding Nemo, but with the whole Disney set you get the idea.
 |
| http://hiconsumption.com/2012/10/disney-pixar-minimalist-posters/ |
Toy Story
For this one I looked up pictures of Buzz and Woody and we picked the main components to each of them to depict. Originally I didn't have the Sheriff star for Woody, but it made it pop a little better with it.
Ratatouille
This was another one that we loved right away and didn't tweak because it was already perfect for the onesie:
 |
| http://www.awwwards.com/minimalist-posters-of-pixar-s-movies.html |
Peter Pan

For this one I combined the following two pictures:
 |
| http://www.worth1000.com/entries/671782/peter-pan |
 |
| http://www.behance.net/gallery/Disney-Minimalist-Poster/5581699 |
Genie, from Aladdin
This is another one I fell in love with from the beginning that I didn't tweak because it was already just what I wanted.
 |
| http://www.splashnology.com/article/50-fresh-minimal-movie-posters/7918/ |
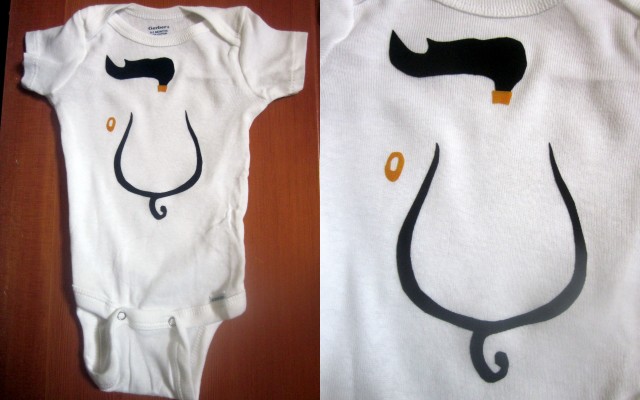
Mike Wazowski, from Monsters, Inc.
This one is based off a number of different minimalist designs I saw and combined (there are a ton of Mike Wazowski Minimalist designs out there).
Jack-Jack, from The Incredibles
I just realized that I ironed on his mask up-side-down. Oh well. It works I guess.
I got the design for Jack-Jack from this free downloadable wallpaper:
I got the design for Jack-Jack from this free downloadable wallpaper:
 |
| http://www.goodfon.com/wallpaper/397245.html |
The Emporer's New Groove

And then this one is based off of this poster:
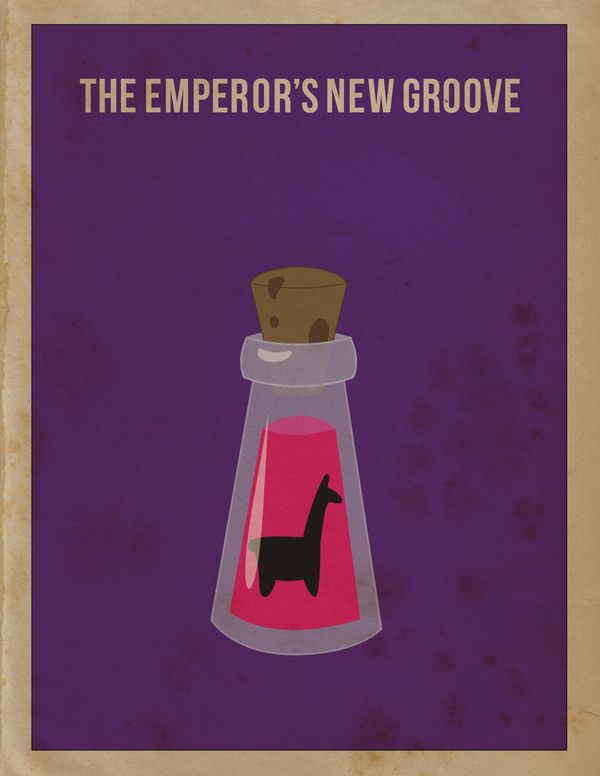 |
| http://www.behance.net/gallery/Minimalist-Movie-Poster/5137111 |
We're pretty excited with how they turned out. It ended up being pretty cheap for us as I already a good fabric stash and the Heat N' Bond. Doing DIY gifts is so much fun! It is way easier to personalize gifts that way and get just what you want. And, you always know that you are getting someone something unique.
I hope you all had a great 4th of July and that your weekend is awesome!

Those are darling! i'm sure they'll be treasured!
ReplyDeleteThese are awesome! I love the Toy Story and Rataouille ones :-)
ReplyDeleteIf you sold those in an etsy shop or something it would be really successful. I know I'd buy a set!
ReplyDeleteThese are super cute!
ReplyDeleteThose are fantanstic!!
ReplyDeleteThese are so amazing! Love them!
ReplyDeleteSo amazing! Great job.
ReplyDeleteHow cute!
ReplyDeleteSO CUTE!!!! Love Disney!
ReplyDeleteAbsolutely adorable.
ReplyDeleteHow wonderful! I wish I had the patience (and artistic talent) to make such a beautiful gift.
ReplyDeleteLove them!
ReplyDeleteThese are amazing. Brilliant job!
ReplyDeleteSuper cute! One question though - how does Heat N' Bond hold up to washing? It doesn't look like you stitched the pieces on, so will the edges pull away when they're washed?
ReplyDeleteThis was my question as well. I have often thought of using Heat N' Bond, but wasn't sure about the washing.
DeleteSuper cute! One question - how does Heat N' Bond hold up to washing? It doesn't look like you stitched anything, and I just wondered if the edges would fray or curl up when they're washed. (I have a friend who really wants a bunch of Dr. Who baby stuff, so this would be a great idea for making that)
ReplyDeleteThey have different "strength" heat and bond. Some have to be sewn, others not. I can't attest to how well the unsewn hold up though.
Deleteso awesome! i love personalized gifts and the time, effort, and creativity really mean a lot! definitely something to keep and remember even after baby grows out of them. i love disney and i think you picked great designs to use! the toy story one is super cute and so is the monsters, inc!
ReplyDeleteThose are ADORABLE!! Fantastic job!
ReplyDeleteFantastic job!
ReplyDeleteI can't even take how great these are!!!
ReplyDeleteWonderful!
ReplyDeleteThese are so super adorable!! I love all things Disney and can't wait to make these!
ReplyDelete