


We hosted our first ever Halloween party this past year and didn't see these little gems until a few months later, but they're on the docket for this year!
The Original Post
 We don't know where this collage came from, or the instructions, but we've done some searching and sleuthing and we found the original sources for the photos used. The image on the left is courtesy of Lemonberry Moon on their Flickr site (http://www.flickr.com/photos/50581003@N08/6462080439/in/set-72157628927431309) and the photo on the right comes from http://www.instructables.com/id/Bowl-of-Worms-Anyone/.
Now, I can see how if you were to follow the instructions shown above there could be trouble. Our submitter definitely ran into trouble.
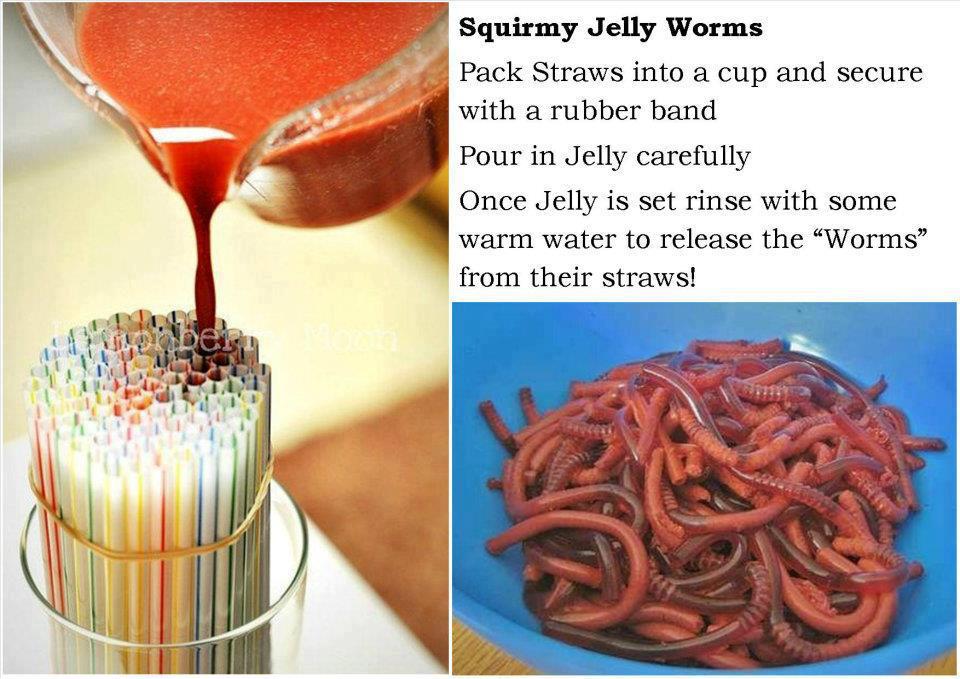
The Pinstrosity

Yummy yummy yummy. Melted brains?
We didn't get the process from our submitter, so we're not exactly sure what she did, but if they followed the instructions on the picture they sent, I'm sure they had plenty of issues. Jelly worms and Jello worms would be completely different. Jelly is not going to just set up. It stays jelly unless you add stuff to it. Jello is definitely more what you are looking for here.
**We had a comment come in that may explain the instructions to pour in jelly: "Just FYI when you run across the term 'jelly' - in the UK and I think Australia, the term 'jelly' refers to a dessert made with gelatin. It's called 'Jell-O' in the US because that's the brand-name most people are aware of (think 'Make Jell-O brand gelatin...and make some fun!')."** Thank you Meijhen!
I've seen this project pinned a number of times. Sometimes the pin just says "Pour jello in straws and let it set to get jello worms!". Well, there's more to it than just pouring jello in the straws. You need to add extra gelatin to make the jello set up firm enough, and adding cream will make them look more like worms and less like jello. When I emailed Lemonberry Moon to verify the ownership of the photo in the original pin, they laughed and responded, "Ha! This cracks me up because I know what a PAIN these were to make and how easily they could go horribly wrong :)"
Want to know how to make these? I've got a few great resources for you today. Rather than copy and paste all their hard work here, we'd love it if you went to their sites and checked them out.
First, the creative geniuses over at Lemonberry Moon have a whole bug themed party plan (with instructions for these jello worms, spider egg cookies, and other creepy crawly treats) on their etsy site. They have some really great ideas.
Second, over at instructables.com, instructions with pictures are posted to show how to make these creepy treats. http://www.instructables.com/id/Bowl-of-Worms-Anyone/.
Third, you can find instructions over at http://www.theidearoom.net/2009/09/jell-o-blood-worms.html?mid=5125903.
Well, anything that suggests pouring jello INTO straws is asking for trouble! Hello! And yet, I salute those who thought it was worth trying!
ReplyDeleteoh sorry i forgot to sent you my "process" with the picture. lol.
ReplyDeletewe followed the recipe exactly except that instead of adding extra gelatin I made the jell-o super concentrated by using less water than what a big box called for. we coudn't figure out how to keep the jello from just pouring out of the straws (we had 200 straws in a big bowl nice and tight but every time i poured it in the jello would creep up the sides of the bowl instead of saying in place.)
my 8 year old had the brilliant idea to tape the bottoms of the straws to keep the jello in place. that helped, some of the jello did stay put.
we let it set for 4 or 5 hours (probably should have been longer)
then we tried to get the jello out....it didn't want to come out. we tried running the straws under warm water and it just dissolved the jello cause no matter what we did either water would get inside the straw or the jello would suddenly slither out and plop out in the sink. putting a bowl under it didn't help as the water would still get into the bowl and dissolve the jello.
then we tried squishing them out...only they wouldn't come out.
my kids, ages 8, 6 and 5 started blowing them out of the straw with their mouth. very few of the worms came out intact and most of them splattered into the bowl pictured above. the few that did come out in tact melted in our hands or fell apart when we tried to pick them up.
the kids still ate the jello, at least most of it....and i had the wonderful (not) job of scrubbing jello splats off my kitchen.
I can't comment on the worms (other than the fact that I have them pinned, but haven't yet tried them), but I have to say that my first thought upon looking at the pinstrosity picture was "Hey! A breast pump!" :) Sitting here pumping as I browse, in fact!
DeleteJust FYI when you run across the term "jelly" - in the UK and I think Australia, the term "jelly" refers to a dessert made with gelatin. It's called "Jell-O" in the US because that's the brand-name most people are aware of (think "Make Jell-O brand gelatin...and make some fun!").
ReplyDeleteI should add -- I can't actually see the first picture, so my comment about "jelly vs jell-o" may be completely non-applicable :)
ReplyDeleteWhy not just buy Jelly worms? Same amount of sugar, waay less work....honestly, you granola types.....hahahhaa!
ReplyDeleteWord!
Deletei made these. They cream separated from the jello as they cooled so that you ended up with two tone worms that broke where the color changed. so I would suggest skipping that step. I saw another pin that suggested laying them down in the jello instead of trying to pour it in so that may be something to try. Squeezing them out by myself left me with tired fingers but i basically squeezed from the top slowly down and they came out just fine.
ReplyDeleteI've made these as well, they turned out great. As Anonymous noted, the cream separates making a 2-toned worm, but other than that, I had no breaking issues. A couple tips -
ReplyDelete1: make these in an empty cardboard milk or juice container. You want something disposible, since the easiest way to work with the chilled jello straws is to tear open the container and pull away some straws.
2: Stretch the straws out to "open" the flex joints up.
3: use a rubberband to hold all the straws together, then put them in the carton bendy joint down.
4: pour the jello mix down over the straws and carton, trying to pour as even as you can.
5: to release, tear open the carton and separate a few straws. Run it under warm water for 2-3 seconds, then holding one end, squeeze like a tube of toothpaste from one end to the other to force out the worm.
6: make sure you follow the last step - put the worms back into the fridge to finish setting after youve squeezed them out of the straws!
My 6 year old daughter and I did these to add to her Gross Cake for the fair. We used a giant pickle jar and made "dirt" and added the worms for a bait can for fishing. The only problem we encountered was the creme seperating otherwise they were great and very lifelike. The judge was leery of trying a bite of them - LOL and my daughter loved it.
ReplyDeleteWe tried these this summer according to directions. We had the problem of the jello coming out of the straws as we poured it in. Tape, saran wrap, everything we tried, nothing worked. No jello in the straws meant no worms to finagle out later. It was a total FAIL.
ReplyDeleteMy kids and I tried this and added two packs of non-flavored gelatin. It smelled funky so I added another small packet of rasberry gelatin. I did not add any extra water, just what was needed for the first packet of jello. It almost immediately set up. Yeah, we added the cream and it did separate, but it was a cool effect in the end. I think you would have to have the cardboard juice container and it worked perfectly. We pulled out about 10 straws at a time and quickly ran them under hot water. If too long, then they melt. We squeezed them out with our fingers, put them in a bowl and back in fridge to re-set. They didn't taste great because of unflavored gelatin, but they looked fabulous!
ReplyDeleteAnd yet another reason why people shouldn't just pin every picture they see! A lot of times if you follow the link to the project, you'll find that it's linked to someones Flickr account or something like that...which a lot of times is of a cool picture they found online. I always follow the link before repinning.
ReplyDeleteI made these too and they turned out fabulously... I used cherry jello instead of berry and added more green food coloring. They were a pain to squeeze out of the tubes but the final product was awesome!! And my 6yr old daughter LOVED them!!!
ReplyDeleteHere is a link to a pic of mine!
https://www.facebook.com/photo.php?fbid=10100145435717774&set=a.716542905434.2207318.32311038&type=3&theater
Those turned out great!
DeleteThose look really good!!
DeleteSeriously I am so glad that I am not the only one that ruined this one! It was a disaster.
ReplyDeleteMaybe I will try again soon!
Yes, in Australia we call it jelly. (which is why a peanut butter and jelly sandwich sounds so gross in Australia - your jelly is our jam) lol. Dont get me started on fanny..LOL
ReplyDeleteThanks so much for linking back to my Jello Worm recipe. I really appreciate it. I actually posted my recipe way back in 2009 before all the others. If you follow my recipe you should be able to recreate them. It is NOT just jello poured into straws. I have made these every year for Halloween without trouble. Sometimes the worms are hard to get out of the straws and it can be a bit time consuming. But if you use a larger bendy straw (skinny straws are NOT a good idea)...you will have better success. Good luck.
ReplyDeletehttp://www.theidearoom.net/2009/09/jell-o-blood-worms.html?mid=5125903
I made these for a Halloween party this year and they turned out great and very lifelike! My only issue was they really didn't have a taste to them. I followed the recipe exactly.
ReplyDeleteJust so you know, in Australia (and I assume other places too), what you call Jello, we call Jelly, so that could be where some of the confusion comes from.
ReplyDeleteI would warrant a guess that in additon to not using a high enough gelatin concentration, if they melted like that, it might because they were exposed to hot water for too long. The reason running the set-up straws through hot water helps you to squeeze the worms out is because the sides of the worms melt.
ReplyDeleteIf you leave them in the water too long, the entire worm will melt and just ooze out of the straw. All in all, even if you do everything right, I think still a third of your worms will break. :P It's a very tricky project, but the finished result can be awesome.
I did this this last Halloween. I followed the directions on the pin I found for it to a T. It ended up amazing and perfect! :) they were slimy and creepily real haha.
ReplyDeleteThat being said.... NO ONE SHOULD EVER DO THIS PROJECT!!!! (Unless you want hand cramps and have a ton of time...)
The tutorial I had, did not explain how to get the worms out of your straws...
So I thought hmm... 2 choices. 1. Cut the straws! (Yeah right with me being a clutz... yikes!) and 2. Squeeze them out!
Well I found out pretty quick they don't just squeeze out. So off to the internet. Discovered that you can warm them in hot water to kind of get them to start to "melt" around their edges... Can't hold them in too long though or they end up a gloopy mess.
I made well over 100 worms (closer to 200). My hands cramped up so bad and it took forever. I would only do this again once I have kids and I can just warm the straws and hand them over and say, "now just squeeze and pinch that out into the bowl" but only if there's more than one kid lol.
Another note was that they take longer to set than normal Jello. So make them far in advance (if you are going to make them) from whenever you need them by just to be sure.
I made them this Halloween as well, they were a big hit. Our trick was to dip each straw in a tall cup of hot water and roll it out with a small rolling pin. Of course, one at a time. My cream didn't separate, and I followed the recipe I with the large jello and the extra gelatin. Totally worth it!
ReplyDeleteI tried this, and had the completely opposite outcome. My worms wouldn't come out of the straws....
ReplyDeleteI too followed the directions precisely, added mine to a cleaned out cardboard milk container, rubberbanded the straws together gently, stretched the straws out, poured the jell-o into the straws, and let them set overnight. I had 2 worms turn out out of the entire bunch. They either didn't come out of the straw no matter what I did, or if I tried the warming under the water technique for a couple of seconds, they splashed out into a melty mess and looked exactly like the fail picture above. I SOOOOOOOO wanted these to turn out for a party I was throwing, so I tried again, this time using less liquid to make the gelatin hold up stronger. I thought, "Maybe I let them set TOO long", so I took a couple out after just 3 hours and again, could not get them out. Held them under warm water for 3 seconds, and again, they came out a mess. I tried the rest after they set overnight, and same thing. I GIVE UP! I have no idea how some of you actually got them to work out. Did you use Teflon straws? ;)
ReplyDeleteThis was a pin that actually turned out pretty good for me! They are rather time consuming to make and difficult to get out of the straws, but totally had the texture of a real worm. Mine were all one color though. I'm not sure how the original pinner got them to be two variations of color. Putting them under warm water was not a good idea. Those melted. I just held one end of the straw and sort of pushed them out. I didn't fill my straws up completely so there was a little bit on the end to get a grip and and then I just slid my fingers along the straw and pushed the worms out. Only problem was that I could only do a few at a time because my hands would cramp.
ReplyDeleteThey were a big hit at my daughter's How to Eat Fried Worms book club meeting. There's a picture of them on my blogpost: http://aimeesland.blogspot.com/2013/10/how-to-eat-fried-worms-book-club.html They don't look just like the pinterest ones, but everyone really thought they looked like real worms.