


Em here, finally recovered from the 4th, (mostly). Hope everyone had a safe and happy holiday! We came back from the mid-week festivities to some 40 or so projects that had been sent to our email! We love it! Keep sending and we will keep posting! This particular project interested me because I have been wanting to try this one out, and well it seems that it a very picky and specific about how it has to be done, here is today's Pinstrosity from Jennifer.
The Original Pin

This image is from: catchmyparty.com
NOTE: This is not the original picture, it wasn't working, but this is the closest I could find. For the website and the tutorial on the Tinted Mason Jars go here: http://www.joydevivre.net/Joy_de_Vivre/Blog/Entries/2010/5/18_DIY_Aqua_Mason_Jars.html
The Pinstrosity
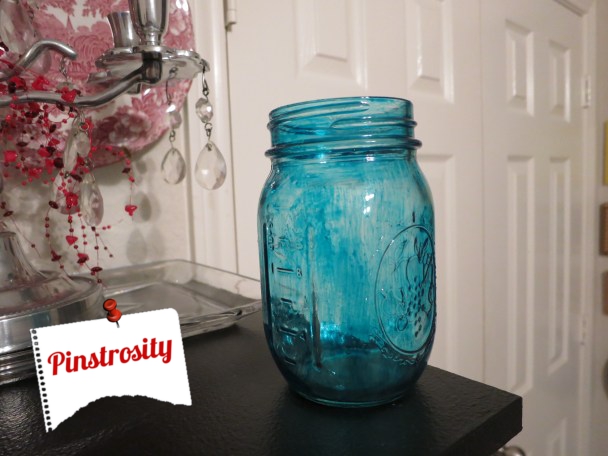
Not quite what Jennifer had hoped (it's for her wedding reception). The directions on the original website say to use Vitrea 160, I believe it is a glass paint, and then she used paint thinner from the same product line. Jennifer used both of these products, and followed the directions. However, on the website it says to use a fan brush:

brushes-manufacturers.
Like so.
Jennifer used a sponge brush, which I tend to use with mod-podge. The difference is, if you are using the fan brush it will keep the product light during application. The sponge brush on the other hand, is just as it sounds, a sponge, it soaks up the product and then say you push harder in one area than on another, more product comes out of the brush and then you have uneven distribution (or blotchy-ness). I'm not sure if that is a word, but it is now.
Make sure you don't use a ton of product either; the original pinner says to use a pinkie fingernail amount of blue, and a swipe of the brush of the thinner. Jennifer mentioned that she may not have had that part right either. Make sure after you paint your jar that you turn it upside down, and let it sit for 24 hours before baking it. The original blog said if there are streaks from the brush they will disappear during baking. Just a few tweaks, and you have some super fun vintage decor for any occasion! (I just sounded like Martha Stewart I need to reevaluate my life) ;)
-Emilee
Another great way to make jars is elmers glue and food color and then you paint it on for a frosted appearance. Only problem is the color washes right off! I covered mine with a clear acrylic spray and am hoping that keeps it on!
ReplyDeleteI used regular acrylic paint mixed with a generous amount of gel medium. I painted the outside because I want to use them as lanterns. I was very happy with the results, and I didn't have to find the glass paints.
ReplyDeleteI don't know. I kind of like the jar! I think the streaks and darker color in some spots give it character and uniqueness!
ReplyDeleteI made these for my wedding reception and they turned out much better after I did a second coat with a fan brush! Also, michaels in Canada no longer sells vitrea, I was lucky to get them on clearance but they're long gone now!
ReplyDeletestained glass paint on the OUTSIDE of the jar and put on with a sponge roller works fabulously. Also the straighter the jar the better. like the wide mouth pints.
ReplyDeleteI did the same thing for my wedding centerpieces, probably following the same directions. I actually found that it helped to get a lot of the glass paint and some primer on your brush and work quickly with the fan brush to even it out, because it dries quickly. If it gets goopy or you can see your brush strokes, you can wet your brush to get the paint to even out. My maid of honor helped me, and she had a bit of trouble with it, but we made it work :)
ReplyDeleteI made these and had great success with them using mod podge and food coloring. They cannot hold water, but they look really pretty! This is the blog I used- http://www.momtastic.com/diy/168908-diy-tinted-mason-jars-in-rainbow
ReplyDeleteI also wanted mine darker so I used more color - they turned out lovely!