


When I make a cheesecake I make the crust double thick because I LOVE the crust. Same goes with pies. So when I whip something up, pour it in the double thick crust, bake it, all the while anticipating the delectable goodness I am about to partake of (because everything I make turns out perfectly and scrumptious, bahahaha, yeah right) only to have the crust stick to the pan and crumble to sad little bits I get sad. Yeah, you can scoop up the crust and just make plop pie on your plate, and that still tastes good, but it's still disappointing. You can now buy these fancy little liners to help prevent that...but who wants to buy something you can make, right? Miranda found a pin for DIY pan liners with step by step instructions to get a circle that fits your round pan perfectly.
The Original Pin
 |
| http://www.goodeatsblog.com/2008/03/best-carrot-cake-and-helpful-tidbit.html |
Nifty! Miranda says, "I found a pin with directions on how to create a parchment cheesecake liner so that when baking a cheesecake the crust doesn't stick to the bottom of the pan. I figured it was easy enough to accomplish so I tried it! When I opened my "circle" up, I was very confused but thought it was so hilarious!
I guess geometry isn't quite my thing haha!"
The Pinstrosity

I'm not going to lie, I busted out laughing when I saw this. A little movie played in my head of the scene and I can just picture Miranda's face as she opens it up...the look of confusion, then hilarity. Oh Miranda, this is great.
Now before you get too incredulous at the outcome here...by a show of hands how many of us have read some set of directions quickly (and only once), thought "I got it", and jumped into something only to realize we didn't remember right or we skimmed too much. Yeah, I see a lot of hands. It happens to the best of us. It's one of those situations where we just laugh, look up what we were supposed to do, jump back on that horse and try again.
I stared at Miranda's picture hoping to be able to figure out what she did from the folds, but that wasn't working. So I pulled out my wax paper and cut a bunch of small squares out and spent 20 minutes folding and cutting the squares in various ways to try and figure out where Miranda went wrong. On my 2nd to last square I finally figured it out. I'll show you first what not to do if you want a circle (or I guess what to do if you want Miranda's awesome square shape), then I'll go over the steps from the site of what to do. I decided to use colored construction paper for this in hopes that it'd make it a little easier to see what's going on (since wax paper and parchment paper can be a little see through).
What Went Wrong:
I started with a full rectangular piece of paper...

and then folded the top corner down as per the instructions. To get a square I then cut off the excess paper below the triangle I'd just folded.

I then folded the triangle in half by folding the top corner down to meet the bottom right corner.

See, this is the triangle you get. Still on target with the instructions.

This is where things went wrong. Miranda then folded the bottom two corners up to meet the top corner...

...resulting in this shape:

She then cut the top corners off.

...making a superman symbol sort of shape.

And then when it's opened up we have the cool square shape that's not so circular and won't quite do the job.

How to get a Circle:
The instructions for this are really great, but it can be sorta hard to distinguish what fold was made because the parchment paper is slightly see through. Here are the exact same steps as on the original site, only with colored paper (Jaime on "Good Eats n' Sweet Treats" really does do a great job of explaining this...we're not knocking her instructions at all. Please check out her site and leave her some love).
Jaime's first step says, "First, tear out a piece of parchment paper that is a little bit larger than the diameter of your cake pan."
So I pulled out my orange piece of paper.

"Then take the top right corner and fold it down towards the left edge, making a triangle. There will be a little bit of excess along the bottom, don't worry about it."
Since I'm working with more of a rectangle than the original instructions intended, my excess ended up being on the left edge. Where your excess is doesn't really matter.

To make things clean cut and easy I went ahead and cut off the excess.

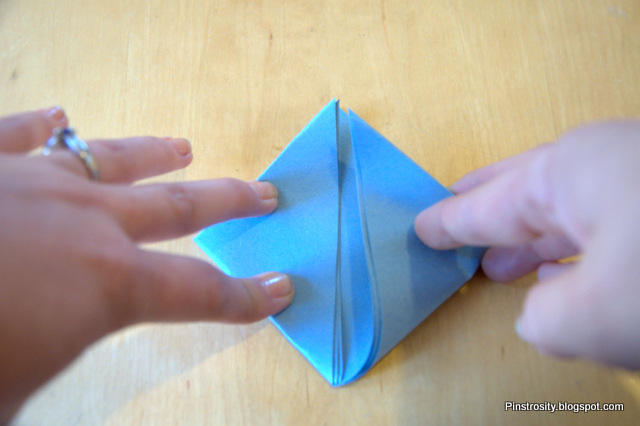
So now you've made your first fold. "Next take the top left corner of the triangle and fold it down towards the bottom right corner, creating another triangle."


"Now fold your triangle in half width-wise."
Now remember, this is where things went wrong earlier. You are folding the entire triangle in half, NOT folding the points up to the top.


"Fold the triangle in half again." Do this by taking the bottom left corner (the right angle if that helps) and folding it up so the edges align.

"Lastly, flip your cake pan over and place the tip of the triangle at the center of the pan. Cut the parchment paper where it hits the edge of the cake pan." You do NOT want to cut the point off, you want to cut the wide end off.


"Unfold the parchment paper and voila! You have a circle that fits perfectly within your cake pan!"

So there you have it. I hope this helped. Thanks for the chuckle Miranda! Go forth and conquer.
P.S...only minutes after posting this, it has been mentioned by Facebook, email, and comments to just put your pan down, trace the circle, and cut it out. Many people find this easier and faster. For many it will be easier and faster, but if you're like me tracing and cutting a circle is a painful experience. It takes me forever to cut out the circle, so this fold and one cut method will actually be faster for me than to trace and cut. Some even skip the cutting all the way around and use coffee filters. I just don't ever have coffee filters in the house and have so many different sizes of pans that it just wouldn't really be the best choice for me. Whichever way works for you, use it. It doesn't really matter what method you choose.
P.S...only minutes after posting this, it has been mentioned by Facebook, email, and comments to just put your pan down, trace the circle, and cut it out. Many people find this easier and faster. For many it will be easier and faster, but if you're like me tracing and cutting a circle is a painful experience. It takes me forever to cut out the circle, so this fold and one cut method will actually be faster for me than to trace and cut. Some even skip the cutting all the way around and use coffee filters. I just don't ever have coffee filters in the house and have so many different sizes of pans that it just wouldn't really be the best choice for me. Whichever way works for you, use it. It doesn't really matter what method you choose.

Thanks for clearing up the instructions! It's always hard to follow directions when the original tutorial is working with something transparent. I've messed up many a sewing pattern this way. I'm definitely going to try this now!
ReplyDeleteI gotta say...this seems like more work than necessary to me. I just place my pan on top of the paper and trace around the pan with a pencil, then cut out the circle just inside the line. Takes one minute and works perfectly!
ReplyDeleteWhen it comes to circles, I'm horrible at tracing and cutting. It's ridiculous how bad I am in fact. So folding and making one cut will probably work better and be faster for me. To each their own I guess! How funny.
DeleteDitto "Anonymous" trace and cut!
DeleteI trace with the tip of a sharp paring knife. That gets most of the cutting done, and then you can tear/cut the littler perforations that got missed.
ReplyDeleteI guess this is the advantage of having had a mother who baked with me - I think I was about 6 the first time I did this.
ReplyDeleteWow, this is freakin' genius! But if you hadn't broken down the instructions, I would have ended up in the same (holey) boat!
ReplyDeletePut the parchment paper and pan down on a cutting board and trace with a knife. I use this for all my cakes. Super easy.
ReplyDeleteOr, if you really like cheesecake, invest in a springform pan, then you pop off the sides and it is easy to get your pie cutter under the slice and lift it out.
ReplyDeleteI'm in the tracing camp. Takes mere seconds and fits like a second skin!
ReplyDelete