


Emilee and Marquette here! Duo post, yea!!! Earlier this month we got an awesome email inviting us to join in the first ever Pintester Movement. What is the Pintester Movement you ask? Sonja asked us each to find "a Pinterest pin or some kind of project you've had on your Someday list for a while. Maybe it's slightly beyond your skill level, or maybe it involves a power tool you're scared of, or maybe it's a recipe that uses the dreaded candy thermometer...", but the idea was to finally do something we've had pinned. We were all over that. Why? Because that's kinda what we're all about! We're always telling you to get out and try your pins...and now there's a movement you can join to do just that.
So we jumped on this right away. We knew it was going to be an adventure (any crafting/cooking experience in our lives turns into an adventure). We both turned to our Pinterest boards to find the project we each wanted to do. Emilee narrowed it down to 4 pins:
Marquette got it down to four as well...fourteen that is (making decisions isn't quite her forte):

Comparing boards we saw there were some similarish pins, so we thought we'd make an awesome girls day/crafting extravaganza. We'd each do our lamp shade pin, our panel painting pin, and then have a yummy Pinterest inspired meal to end the day. It was going to be epic, awesome, and uber productive. But, as Emilee describes it, "these escapades hardly go as planned". We spent the morning perusing thrift stores and Walmart for our final supplies, took our sweet time with a nice sit down lunch, and meandered back to Em's place to whip together our projects. We weren't in a hurry. How long could these take? Oh boy.
Em's Saga:
I decided to start with my lamp shade pin. You see the lampshade we currently have in our house is in desperate need of some help...

Water stained from when our house flooded, and cracked from the move...I LOVE the base (it was my grandmothers) and so I have just been waiting for the right opportunity to spruce it up, and this seemed like the perfect time!! Well Marquette and I took a trip to our good ole' local Wally World and I found absolutely NO fabric or paper that I liked to redo this lamp shade (which means a trip to Hobby Lobby and JoAnn's is inevitable in my future...oh darn). When I researched the original lampshade pin, I found out it was an art piece made solely of paper! No instructions or anything like that were included, so it was probably best that I didn't attempt that pin that day.
So I moved to the next project on my board that spoke to me, the peacock canvases! Love these!!

I did find what I needed at Wal-Mart, however they only had two canvases of the size I liked, but I was sure I had one of that size at home...I am a bit of a canvas hoarder.

These are only some of them...I have an addiction.
So I get to looking at the sizes and realize I don't have what I need. So Marquette and I start brainstorming, because another trip to Wal-Mart is out of the question and I had bought the last two of that size anyways. *le sigh*
I end up having three matching canvases of the XXL size but I'm not sure I want a single peacock feather to be 3 1/2 feet tall, I just don't have enough duct tape sheets for that!
If you are wondering what I mean by that let me explain my improvising. The original peacock canvases were made using a vinyl cutout machine, like a Cricut or a Silhouette. The vinyl sticker is laid on the canvas, painted over, then the sticker is removed and voila! But I unfortunately don't have one of those so I had to get creative. Fortunately Wal-Mart sells duct take sheets now which are 8x11 inches and which were perfect for this! I figured I would attach them together, draw my image on the back, cut it out and voila! My very own custom peacock feather!
I did not however have enough sheets to make a 3 1/2 foot tall peacock feather (although looking back now that would have been amazing!). So I decided to make three canvases, using the same peacock "stencil" on each and paint them each one of the following colors: dark purple, navy blue, then teal for a ombre effect. This way they all look cohesive, I only have to draw and cut out one stencil, and I don't have to worry about a gorilla sized peacock feather.
But this meant I would have to salvage a board I had used for another project.

(The above picture was a project I did around Christmas, with the two below being my inspiration for the project. We ended up updating the room with a giant map tapestry and I haven't decided what to do with all the canvases yet, so they have been stuck in a corner for six months till now!!)
I used my large center canvas ( the C G E one), repainted over it white, and got down to the nitty gritty. I gathered my materials, and combined my duct tape sheets...

Next I painstakingly happily drew my peacock on the back of my combined duct tape sheets...

...and cut it out on a cutting board using an Ex-Acto Knife.

Here is what it looked like all cut out! Remember whatever you draw on the back will be backwards when you flip and stick!! At this point I had already put my base glitter gold spray paint (a shout out to my sweet husband who ran to Wal-Mart after work to get me more glitter spray paint!)on the canvases and had let it dry. This will be the color that the actual feather will be when it was all said and done.
I placed the stencil on the glitterific canvas after pulling the paper backing off my cut out stencil:

And then sprayed my over color on top!

Then when it is all dry you slowly peel the sticker off. Looking back I would have split the sticker into three or four sections and then pieced them together on the canvas. Getting the original backing from the duct tape off was a nightmare and I spent a good hour un-sticking the duct tape from itself. By the time I got to the third canvas I had split the sticker into four pieces, and upon removal from the previous canvas I put the pieces on wax paper to keep it flat and untangled. I HIGHLY recommend this from the get go! See below!

Here is the final result!:

All three just finished. Hello toes!
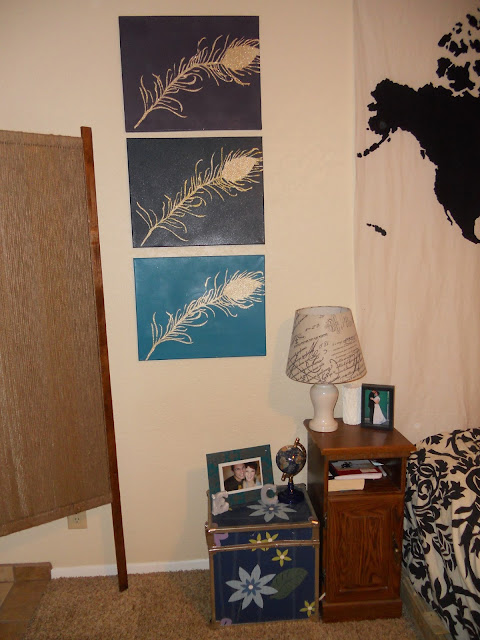
In their final place! I love them!! They match the style of our room perfect and were just the right size for the space!
And here is what I looked like after 8+ hours of Pinterest Crafting...

So there you have it! I stared off needing a new lampshade and ended up with three peacock canvases that look nothing like the original pin. Such is the story of Pinterest!
Marquette's Saga:
For my first project that day (oh I had grand and deluded plans for the day) I decided I wanted to tackle the lamp shade pin from mymistermischief.blogspot.com that I have had on my board for forever (I figured I'd have time to whip this out and then start on my panel painting idea, as well as try the new recipe):

Before, I didn't really have anywhere in the house to put a lamp shade like this (even though I love it!), but now that I get to set up a kid's room I knew this would be perfect!
I already have a bag of orange and blue fabrics and fabric remnants, all I needed was a lamp shade. Unfortunately, all the lampshades I have are round and only have 2 or 3 support rods, which would make for a really weird looking rag lamp shade. So I knew I'd have to find something else. Rats...that means a trip to the thrift shops and antique stores down town. Oh it's a rough life. The first store we came to had the perfect lampshade..and it was only $5. Major score!

I almost felt bad when the lady at the register said, "Isn't that beautiful?! That'll make any room elegant." I didn't have the heart to tell her I was taking it home to tear it up. I think the most fun part of the whole project was the 5 minutes it took me to go from the above picture, to the one below:

Little did I know I still had roughly 7 hours to go on this project. Although the original pin had the fabric scraps in no particular order, I knew I wanted to have alternating "panels" of orange and blue. I thought it would look cool to have the fabric strips running vertically instead of horizontally, but then I knew I'd lose some of the shape. So I tied a horizontal framework of fabric to hold the vertical strips in shape...

And it looked awful. I didn't take into account that the top section is way smaller than the bottom section and that I'd have to either super crowd the top or way space out the bottom. Not to mention I didn't realize I'd have to weave some of the strips to get the shape I wanted. I wasn't happy. So I cut the framework off and went on to plan B: doing the pin how the original tutorial suggested.
But I didn't like that either. I didn't get a picture of this...but because there are so many "sides" to this lamp shade, as opposed to the 4 in the original pin, the tied ends ended up dominating the lamp shade and making it look way more messy than I wanted. It just wasn't it. So I had to come up with plan C, and this one finally worked.
I wrapped the top wire in an orange fabric strip to hide the metal, and then I attached a fabric strip to the top of each wire post (alternating between orange and blue).

The idea of the project here is to wrap the fabric strips back and forth, zig zagging down the side of the lamp shade. I found it was easiest to work in rows, rather than columns. If you want your fabric to look like it's all interwoven, here's the easiest way I found (but this isn't easy to figure out how to describe it...I hope this makes sense). Take your first fabric strip and wrap it once around the wire post to the right of it, going from back to front, and secure it to the top wire with a clip. Do the same with the next fabric strip to the right of the one you just wrapped. Continue until you have done your first wrap with each fabric strip. Then, you start with your first fabric strip and wrap it back around the post to the left (the first post it was attached to), and clip it to the top. Do the same with each fabric strip. Continue zig-zagging the fabric strips back and forth. Tie on extra strips as more length is needed.

Clear as mud? Yeah...it was kinda a pain in the butt to figure out, but that's how it ended up working the best.
So I sat there and wrapped fabric strips over and over and over again, while Emilee sat and peeled duct tape off of everything:

Finally though...after nearly 8 hours of working and reworking the project I ended up with this:


I wasn't sure I liked it at first...but never judge a project at 11 o'clock at night. It looked way better in the morning and it's really come to grow on me. I love the huge splash of color it adds to the room. I did try putting the shade on a white base, but the orange base truly does look better. Good thing I LOVE orange!
Needless to say that was the end of the day. While we only got 2 of the 5 intended projects for the day done, we still see it as a huge success. These projects took FOR-E-VER, and we had to struggle through them, and even though they didn't turn out like the originals, we love them. Best of all...we now each get to move a pin off our regular boards and onto our "Pin There, Done That" boards...and that was the whole point of this!
So now it's your turn! Get out there pinners! Try something you have been putting off! We finally got off our butts and we LOVE the results of the projects. When you finish your projects send them our way and we can do a compilation post! Good or bad, finish your pin and let us know how it went!
Be sure to head over to Pintester.com to see all the great projects linked up for the Pintester Movement!
 |
I tried the fabric strip lampshade a few months ago and I just could not tie them to the metal at all. How'd you do it? It came out great!
ReplyDeleteWhen I was tying each individual strips and leaving the ends loose, I used really long strips and then did a double not to secure it (trimming the ends later). The method I finally landed on only meant I only had to tie the strip to the top wire, wind it around the vertical wires, and then tie it at the very bottom when I was done...so there was MUCH less tying and frustration.
DeleteWow, you two are DEDICATED! Awesome job tackling projects! And I absolutely love how they both turned out!
ReplyDeleteKnowing we had to post our results gave us some motivation to see the projects through, lol. When it was time to go home neither of us were finished, so we kept checking up on each other making sure we finished that night. Otherwise...the projects probably wouldn't have gotten done.
DeleteI love the orange lamp and lampshade, but I don't think I would have the patience to spend 8 hours on a project! Both projects are very impressive!
ReplyDeleteHow on EARTH did you cut out that peacock feather so perfectly? You are brilliant and I'm guessing very patient as well. Bravo to the lampshade as well.
ReplyDeleteI love the lampshade, and how the light glows through the fabric! Onto my DIY board!
ReplyDeleteThat orange base for the lampshade really stands out. Great job all around.
ReplyDeleteI love peacock feathers. Although, I don't think my patience would hold out for unsticking duct tape.
Those are awesome! Great job! (Oh BTW, I saw on Marquette's board that you have a pin for homemade taco seasoning. I don't know if I used that same pin but you will LOVE it and never go back to taco seasoning packets again!)
ReplyDeleteThey're definitely both wins!
ReplyDeleteWow, I'm impressed with how both projects turned out...they may have been time consuming, but the results are really pretty! :)
ReplyDeleteBoth projects turned out great! I'm impressed and definitely going to try something similar. (I went out checked out the pintester blog, too, but I don't think I'll be following. There was a bit too much language & reference to male body parts than I like. And I only opened maybe 4 posts!)
ReplyDeleteCute lamp! I'm not an orange person, but orange and blue look really good together (even if you're not a Broncos fan) and the scraps you had ended up turning out really well. Well done!
ReplyDeleteI love the lamp! So fun!
ReplyDeleteGotta admit that I was not so sure about the lampshade project but you really pulled it off. It looks amazing! I also love the peacock feather art, especially the ombre blues (such a sucker for that) and the glittery gold paint. Awesome job, ladies!
ReplyDeleteOh my goodness so pretty!!!! Orange is my favorite! I was wandering though...what is the puffy quilt/rug on the floor? Did you make it?
ReplyDeletewww.dressupnotdown.blogspot.com
Thank you! Orange has always been my favorite.
DeleteThat is a puff quilt on the floor there. They are really fun to make! You can see an aerial view of that particular quilt and get the links to where I learned to make them through this post: http://madebymarquette.blogspot.com/2013/05/chevron-puff-quilt.html
Thanks for the link Marquette!
Deletewww.dressupnotdown.blogspot.com
I think for the peacock feathers, I would buy some cheap craft foam sheets (I bought some at Walmart for around $.25 each for another project) or some poster board and some low-tack spray glue (like Scotch Spray Mount repositionable). Cut the shape out of the foam, spray the adhesive and let it tacky up, press it down, paint around it, peel it off, done! Maybe touch up edges with a small art brush if there's bleeding, but I think it would be less of a pain than the duct tape sheets turned out to be.
ReplyDeleteI also wonder, if you cut out several of the feather shapes from the foam and glued them together so they were rigid, if you could then stamp the feather onto the canvases.
Way to go! I'm not a pintrest person, but I love that you persevered and finished this project! And I agree, the awesome new lampshade looks amazing with the orange base.
ReplyDeleteYou did great!! That was a time consuming project for me too. I love the shape of the shade you used!! Thanks for doing my project. :)
ReplyDeleteWow- I think your lampshade turned out great! I actually love it better than the Pinspiration because of the shape. Good job!
ReplyDelete