


**For 1 Week (and only one week, thank goodness!) Emilee and Marquette attempted to live a life that matched up to Social Media Standards, mostly just to show what that could look like in real life and how ridiculous the idea is. Click Day 1, Day 2, Day 3, Day 4, Day 5, or Day 6 to see how the week went so far.**
It's the final day!! I can't tell you what a relief that thought was when I went to sleep on Day 6. The guilt I have felt each day as I haven't accomplished what I planned on has been dumb. It's just guilt I feel towards myself and Emilee. I'm not letting anyone down. This was an experiment. And yet I feel anxiety and guilt I didn't expect.
However, with it being the last day, I was bound and determined to make it good! We'd all wake up happy and ready to go!
Darrow woke up at 5:15 ready to be awake for the day.
So we were all up and dressed (not beautifully, but I wasn't embarrassed to be seen in what we were wearing) by 6:15ish. I knew today could be long or it could be okay. Eek.
Darrow and I took Cameron to work so I could have the car. We were out of milk, eggs, and I wanted supplies to make something for the front door (trying to designate it as the front door). And we needed a new phone. Darrow takes after me in his love of donuts and knows that if he's really good in Walmart that a donut is a possibility. We were there for nearly 40 minute while I went up and down the very limited craft aisle (there's only 1 here for the non fabric/yarn craft supplies...I'm used to 3 in Silver City!), and went back and forth on the phones. But Darrow got his donut (and I did too...I was good and happy in Walmart too!), and we headed back home to do our cleaning chores for the day and get started.
My littler sister and her family (her husband/Cameron's brother, and their two kids) were coming that evening, so I knew we had to get things done early. We got the kitchen cleaned up, the floors swept, and the house put in order. I skipped over the squat challenge. I'd only done it two days, what was the point now I figured (gee...why exercise, hmmm...because it's good for you?! I'm a dork.). I wanted to wait until Darrow was down for his nap to do laundry and get my DIY projects done, but it was another battle day to keep him in bed. Finally around noon (after refusing lunch), he fell asleep. I started scrambling! I didn't have much time left!
This wasn't a project I planned on doing, but I saw the stuff in Walmart and decided it would make the front door look

I pulled out the hot glue gun and just started gluing them on with no rhyme or reason.

And, I found a great use for the Bumbo (Darrow still loves this thing and it comes in handy when we have two toddlers in the house needing somewhere to sit during mealtime). It makes quite the handy little holder for the glue gun between leaves!

I got all the leaves on and decided I did want to put the items from the floral bunch on, so I clipped those off and glued them on as well. I love how it turned out! I probably could have only bought one bunch of oak leaves as I had a ton left over, but I didn't know that before.

I've had a pin saved for forever about using a command hook to hang wreaths (especially on cabinet doors, or if you just don't like the metal over the door hangers). I didn't have a wreath hanger (and didn't want to buy one), but I did remember that pin. So I used some twine out of the craft drawer and secured the wreath to the back of the screen door, only I did this redneck style. You know the little hydraulic thing on top of screen doors that keeps the door from flinging open or slamming shut? This door is missing that I discovered. I was going to use a command hook, but using that bracket meant that there wouldn't be the back of the command hook visible through the glass. So I tied the twine to that and hung the wreath. At least this way I know the command hook isn't going to give out.

It adds some cheer and color to the front. This picture made me realize just how badly the house is in need of a paint trim job. I'll put that on the list. Sigh.


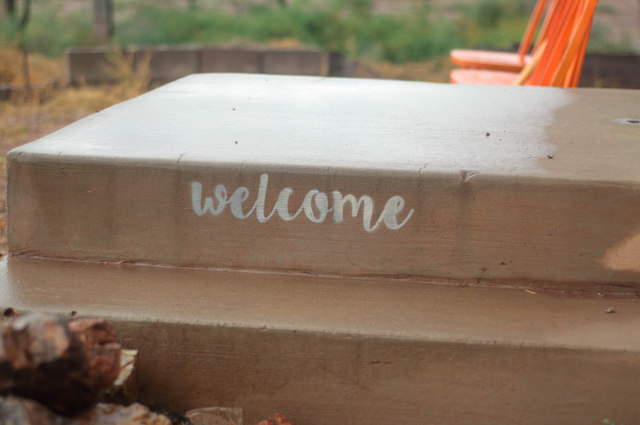
But now I wanted to get to the other project I actually had planned, which coincidently also was for the front porch to try and dress it up and designate the front door as the door to come to. The other door opens into my kitchen...which inst' always clean. Neither is the living room, but the living room is usually just Darrow's toys, not dishes or food. Anyway. I saw an idea for spray painting welcome onto the porch in front of the door. I definitely wanted to do that here! I almost pulled out my coral spray paint but decided to go with something more neutral for whoever moves in after us.
But first I had to figure out stencils. I didn't have time nor the inclination to part with the money to order a stencil, so I knew I had to make my own. I almost decided to draw it by hand until I realized the printer would be way easier. I pulled up Microsoft Publisher (but Word would work great as well!) and found a font I liked that would work well to turn into a stencil. I put each letter on a separate page and printed them out. This next bit was the slow part (but not horribly slow, just more than I wanted). I cut the letters out with an exacto knife, saving the little pieces to go in the inner parts of some of the letters (like the e). Next, I gathered my paint, some boxes to use to protect the rest of the porch, spray adhesive, and went to work.
I used my quilting basting spray as my adhesive because it would be gentle and not leave a residue for dirt to stick to on the porch step. I sprayed the back of the paper and stuck it to the step (lining up the bottom of the paper on the bottom of the step so the letters would all be the same height).

I then did a quick coat of gray, and a quick coat of nickel to make it shiny and stand out better. I was nervous when I pulled off the paper, but it worked great!

On to the next letters. This font has the letters all connected (cursive), so I made sure the e overlapped a little onto the edge of the w when I stuck it to the step.

That worked great. I followed the same steps with each letter, being careful to not get paint beyond the edge of the paper. It turned out just right!

It doesn't stick out huge, but it's a fun little touch on the steps. I might try doing another layer maybe with gold, I think that'd stick out just a little better. But for now I love how this looks!

(update: It rained a week later and man the words stuck out so pretty on the wet concrete! Now...how to get it to look like this all the time..."
And since I was already on a spray paint kick, I decided to give the table from days 1 & 2 it's final coat. I LOVE how it turned out! It's the perfect color pop in the living room.

Here's the before and after:


Doesn't that make that table much more fun and happy?! I love it!
It was shortly after putting everything away from these projects that Darrow woke up from his nap. I got my craft projects done, but not the laundry. Oh well. It wasn't too long after that that our siblings showed up. I had a new recipe planned to try out on them, but in the end we decided to take them to our favorite Mexian place here in town (their Horchata is amazing, and the Mole Enchiladas are my favorite!). It sits right on the airport runway, so the kids were pretty excited to get to see 2 planes while we were there.
Beyond that we spent the evening visiting (minus the short time I took to transfer all the new design from the "fake" blog to the real one for the relaunch in the morning). I felt like I'd been productive with the day! I love how the projects all turned out, the blog relaunch was set and ready to go live in the morning, and we were there with family. The end of the Keeping Up Appearances week was so much better and happier than the beginning!
And there's my "Pinterest Perfect" week! I can't believe I survived! I didn't know if I would after that first day.
Come back to the blog tomorrow for our recap of what we learned, what we liked, what we didn't like, and if we'll ever do this again (bahaha...right).

Wow I love your wreath! It is gorgeous!
ReplyDeleteThank you! It turned out way better than I saw in my head, lol.
DeleteMaybe you can put varnish on that side of the step? I wonder if it would preserve a wet look.
ReplyDeleteOoh, that's a good idea! I'll have to look into that. Thanks!
DeleteI am def gonna do the "welcome" on the step = LOVE IT!!
ReplyDeleteYea! Let me know how it goes! I want to see!
Delete