


There is just something about the arrival of Fall and the coming of the holiday season that brings out the creativity in people. I haven't felt crafty for months and now all the sudden I have projects all over my house in various stages of finish. Cooking projects, sewing projects, glass bottle projects, crochet projects, plant projects, wood projects, etc. I guess perhaps I should start a "cleaning project". Nah. I love watching as other people post up projects they've done. It always amazes me how simple but cute some of these projects are. We were sent one of these cute and creative projects a while back that is just perfect for Halloween here in a few weeks.
The Original Pin
 |
| http://www.momendeavors.com/2010/10/spider-web-snacks.html |
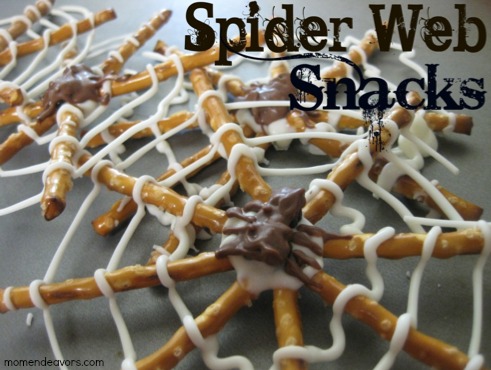
Simple, cute, and fun! I love it. Amber, who submitted these, told us, "Since Halloween is on the way I thought I would send in one of my 'fails' from last Halloween. I tried to make these cool spider webs I attempted for our Boo Bash last October. I used almond bark, that usually melts better then the Wilton candy melts. I melted it in a bowl in the microwave, then spooned it into a plastic baggie and cut one tip off. I made the cut small, but the white chocolate wouldn't come out so I made the cut a little bigger."
The Pinstrosity

"I could see that the white chocolate was too thick, but I couldn’t get the stream thin like the example. I ended up making a few and letting the kids eat them and moved onto another project for our Boo Bash. I didn't even bother making the spiders in the middle."
First off...I think this is still cute even with the thick web. Don't give up on a project too soon even if it doesn't look exactly like the original. I think the spider would have finished it off just fine and cute.
Okay, let's address the thick chocolate issue. There are a number of methods you can use to thin the chocolate, but my favorite (and personally the easiest in my opinion) is to had a finger-scoop or two (yes...that's a very precise measurement, lol) of shortening to the melted chocolate and stirring/mixing until it's all melted and mixed into the chocolate. This will thin down the chocolate without causing clumping, curdling, or weirdness. Obviously if you add way too much shortening you'll have issues, but if you just add one average finger-scoop at a time you should be fine.
 Have fun while making all your goodies for the holidays and don't panic or give up if they don't turn out exactly like the originals. A big part of the holidays is making memories and being with friends and family. And, don't forget to do a good turn for those around you. Need ideas for how you can do something nice for someone during the Halloween season? I was asked to be a guest writer for the blog "The S.I.P. Project (Service is Painless)" where I talked about my experience with serving around Halloween. Check out the post and the blog (she really has a neat idea going on there...service projects as payment for photography shoots) and leave her a little blog love before you leave.

Have fun while making all your goodies for the holidays and don't panic or give up if they don't turn out exactly like the originals. A big part of the holidays is making memories and being with friends and family. And, don't forget to do a good turn for those around you. Need ideas for how you can do something nice for someone during the Halloween season? I was asked to be a guest writer for the blog "The S.I.P. Project (Service is Painless)" where I talked about my experience with serving around Halloween. Check out the post and the blog (she really has a neat idea going on there...service projects as payment for photography shoots) and leave her a little blog love before you leave. 
I agree that her attempt looked good, I wish I could have seen how she would have made the spiders!
ReplyDeleteI actually think the pinstrocity version is cuter. :)
ReplyDeleteIs there something wrong with more chocolate? :)
ReplyDeletexo
NEVER!!!
DeleteThe pinstrosity came up before the original pin and it looked so good I thought it was the original pin!
ReplyDeleteI work with chocolate a lot at home and I find the easiest way to get thin ribbons of chocolate is to buy Wilton's Candy Melts instead of regular chocolate. It already has the right amount of 'fat' in it to stay smooth. Heat the Candy Melts in a double boiler or just throw it in the microwave and stir every 10-12 seconds depending on your microwave settings. Place the melted chocolate into a disposable pipping bag and twist the bag close (or to save $ just use a plastic sandwitch bag) cut the smallest hole at the tip as possible with a pair of scissors and squeez! Get comfortable with it and do a few practice ribbons until you get the right speed and thickness. The longer you let the bag cool the thicker and harder the chocolate will be as Wilton Candy Melts will set hard at room temp. but you also have to be careful not to burn yourself with hot chocolate right out of the pot/microwave. Hope this helps!
ReplyDelete