


Homemade Pop Tarts
I can't see Pop Tarts without thinking of Brian Regan. "Yeah, my doctor told me to eat more fruit, so, what better source than a thin layer in a strawberry frosted Pop-Tart....You can microwave a Pop-Tart that just blew me away, that you could do that. How long does it take to toast a Pop-Tart? A minute-and-a-half if you want it dark? People don't have that kind of time? Listen, if you need to zap fry your Pop-Tarts before you head out the door, you might wanna loosen up your schedule."
If you haven't heard his whole pop tart routine, you should go check it out. It's funny stuff.
Anyway, I loved pop tarts as a kid and I still love pop tarts as an "adult" (I still feel weird calling myself an adult, I don't know why). I'd never even thought about making my own though. Christina emailed in her Pinstrosity when she followed a recipe she found for homemade Pop Tarts.
The Original Pin
 |
| http://bakememore.com/2009/02/15/sorry-kelloggs-these-pop-tarts-will-make-you-crumble/ |
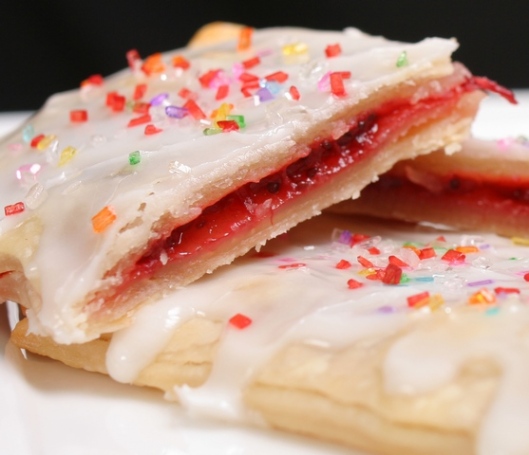
Christina says, "Simple enough, right? Pie crust, jelly, fold over and bake. WRONG."
The Pinstrosity


Christina tells us, "I followed the directions! I swear! My glaze tasted like SOAP. I felt bad for making my kids try it. ha! It was better after being ON the pop tart. But all the goods oozed out of them.:/ The kids still liked them but they sure weren't pretty and only had a slight taste of jelly. Yes, my kids love dough."
I'm so glad to see there are other kids that love dough. I grew up on dough. I love dough.
Just from reading the original blog post and looking at these pictures I have a few ideas for improvements, but I haven't had the chance to try them yet. I'll repost when I do test them out. But here's what I'll do in my first test:
- I love my pie crust recipe (ok, so it's really my mother's recipe), so I'd use it rather than a store bought refrigerated crust (some of them are good, but some of those taste like cardboard).
- I've just had better luck with pies and such when I roll the dough out a little thicker than the recipe normally calls for. It makes the crust stronger and gives more substance. Maybe it'd help hold in the jelly better?
- I'd probably crimp/pinch the dough edges together rather than use the fork method, just in an effort to seal the edges better. I don't know if that'd make a difference or not. I'll have to report back on that.
- I'd probably stick with the 1 tsp of jelly/jam to start out with, but by Christina's results, that may be too much. That's just going to have to be trial and error.
- Then for the glaze: I'd add a little bit of vanilla extract to help with the flavor. Then I'd make the glaze really thick, so that as it baked and spread out, it wouldn't all run off the tart.
So...without testing it yet, those are my first thoughts. Perhaps I can test this out tomorrow and report back, but today my time is way over booked. If any of you have any suggestions or tried and true methods, let us know!

I made these, from this pin. I used cherry jam, homemade pie crust, and thicker "frosting." They did leak, so I agree that they need to be sealed better but I thought they tasted great!
ReplyDeleteGlad to know this worked for you! Did you use the frosting recipe listed or did you use something else (as you said you used thicker "frosting")?
DeleteI did these. Turned out great. I used my own crust, pinched them closed, (I have never really had good luck using a fork to close something up ) Marionberry jam, and my own homemade glaze. YUM.
DeleteI noticed the original pin said to glaze them when they are cool. This would prevent it from forming a big puddle of glaze on your pan. I have made these and they are delicious, I used my own pie dough and cinched the edges (rather than the fork). I added a bit of lemon juice and lemon zest to my glaze. YUM!
ReplyDeleteOoh, the lemon glaze sounds amazing. Maybe I need these for lunch today.
DeleteI was going to mention glazing them while cooling also just like you would with a cinnabun
ReplyDeleteI never saw this pin, but I did see another one for homemade pop tarts. In that one, the original pinner said to thicken the jam/jelly by heating it on the stove with cornstarch so that it wasn't runny. You know, since sugary things tend to be runny when they get heated. You also need to put vent holes in the top for steam. If the steam can't escape through the top it'll open the crimped edges you just worked so hard on. These two things combined probably accounted for most of the problems she encountered.
ReplyDeleteI haven't tried these yet but as my dad is diabetic and L O V E S pop tarts... I fully plan on it. I have it pinned under Delighting Tastebuds Is A Full Time Job board and my screenname is notalwayshere if anyone wants to see this other pin that is a bit more in depth on her instructions. She even lists other things to try in it! (Nutella is on my to do list.)
I made these and they were really good. They looked somewhere in between the original pin and the second pin. We loved them though.
ReplyDeleteMy sister in law makes these. They never leak and taste great. I'm not sure what recipe she uses, but I know it is possible to make good looking, good tasting homemade poptarts.
ReplyDeleteI have gotten a 'soapy' flavored glaze by using vanilla flavoring, not extract. This could have been the problem.
ReplyDeleteThe icing should be put on after they are baked, not before. Now I really want homemade pop tarts!
ReplyDeleteAs the anonymous user posted above, you HAVE to use cornstarch or it will be way too runny. I use this recipe and never have a problem! http://www.foodnetwork.com/recipes/claire-robinson/homemade-toaster-pastry-recipe/index.html
ReplyDeleteI agree about the cornstarch but you may want to use an egg wash to seal the sides and as another poster stated it should be vent. Also, as stated before the glaze should go on after it has cooled but if you wanted something clear you could use a brush to put on the pop tarts after you finish baking them just not immediately after you take them out. Lemon juice or zest is common for standard glazes and should help in the taste.
ReplyDeleteI've made homemade poptarts from Pinterest several times, but I used this recipe/post instead:
ReplyDeletehttp://www.thekitchn.com/strawberrynutella-pop-tarts-fr-143478
Mine weren't perfect rectangles, but they were still tasty!
A few things I found that helped: this recipe has you cut an individual rectangle for the top and bottom, instead of doing the "fold-over" method. I found that if you make your top rectangle bigger than the bottom, you can fit a little more filling in, since it gives you more room. Cinching the edges with a fork worked just fine for me -- the only time I had any leaks was if I accidentally squished part of the filling with the fork as I was cinching. She also has you freeze them before baking; I'm not quite sure what that accomplishes except that it's much easier to handle them after freezing and before baking. You may be able to get away with skipping that step, though I wouldn't on your first attempt. The best way to make something you've never done before is to make it exactly as the recipe says, then tweak it on a second or third try, after you've seen what the original does! Also she doesn't use a glaze, she just dusts them with powdered sugar. They're delicious that way, but also good without any toppings at all! They're more like mini-handheld pies, which I guess is sort of what the concept of a poptart is!
The pie dough recipe she uses is great though; it's simple and makes for a flaky, flavorful crust.