Showing posts with label Iron Craft. Show all posts

Tuesday, May 24, 2016

Tried it Tuesday, Ep. 2: Beach Painting

Hi everyone! I'm excited to show you this week's Tried it Tuesday project! Missed last week's introduction of the Tried it Tuesday series? Click here!

Every other Tuesday is reveal day for the Iron Craft Challenge, so every other Tried it Tuesday post will go along with the theme for each challenge. This week I needed to have my project fall into the theme of Summertime.

I looked at recipes, at wreaths, at hair dos, at outfits, and just wasn't finding anything. And then yesterday I found a pin and it sparked an idea!


 (The picture went to a blank link, so I have no idea who to credit for this photo sadly!)

Tuesday, April 26, 2016

Kett Files: Strawberry Jams

Over the weekend the community has been inundated with flats of strawberries from a truck that wrecked. So many strawberries!! 


My cousin's wife and I decided to take advantage of the free fruit and had a canning day together yesterday. We figured between the two of us, and with our kids having each other to play with, we could get through 5 flats. That seemed doable. 

10 hours later....we were beat, the kids were going crazy, we'd had take and bake pizza for dinner, and every single jar both houses were used up. 


And, we only got through 3 of the 5 flats. Whew! 

But we're super excited for what we were able to get done! We did tried and true strawberry jam but decided we didn't want 5 flats worth of just plain strawberry jam and wanted to try some different variations. Some worked, some didn't. 


Batches 1 & 2: Strawberry Jam. 

These did did pretty straightforward, following the instructions out of the Sure Jell packet. They turned out great, sealed, and set up beautifully. 

Batch 3: Strawberry Blueberry Jam

For this batch we followed the directions for Mixed Berry Jam off the Sure Jell packet. These turned out, sealed, and set up! 

Batch 4: Strawberry Raspberry Jam.

Same as Batch 3. But oh boy this one smells heavenly!! I can't wait to crack into it! 


At this point I went home and grabbed my Victorio Strainer and some Prickly Pear Juice. We were done cutting the strawberries into little pieces and mashing them by hand. We thought we'd try the strainer, even though I don't have the berry filter for it. Mashing the strawberries went SO much faster! But then we realized...we didn't know whether to treat the strawberry pulp as juice or as mashed berries. So for the first few recipes we treated it as mashed berries, and now we're thinking we should have treated it more like juice. 


Batch 5: Strawberry Lemon Marmalade

We got this recipe out of the Ball Blue Book for canning. It wasn't hard to put together, but somewhere we did something wrong (maybe the strawberry pulp?) because these didn't set up at all. So we have strawberry lemon marmalade syrup! 

Batch 6: Strawberry Prickly Pear Jam

I have Prickly Pear juice that I canned on my shelves at home. I LOVE prickly pear jelly and thought it would be fun to try seeing if we could make Prickly Pear Strawberry jelly work. A quick search online didn't yield a recipe so we decided to just wing it. For this batch we decided to try doing half of the original Prickly Pear Jelly recipe and half of the Strawberry Jelly recipe. It didn't work. Well, at least it didn't turn into jelly or jam. It's syrup. But it's really yummy! 

Batch 7: Strawberry Syrup

This one was the most involved recipe of all of them! This recipe was also out of the Ball Blue Book. We were sure glad that the husbands were home by then and they could field the kids because it took both of us working to get this done in any decent time. Jackie stirred the syrup concoction trying to get it to the right temperature while I worked on squeezing the cooked strawberry pulp through a flour sack (we get the Blue Bird Flour sacks specifically for the cloth sack it comes in) to get the juice out. It took forever on both ends! Finally we got it done, but it was an ordeal! It tastes good, but not as flavorful as we hoped. 

Batch 8: Strawberry Jam

This batch was with the strawberry pulp and we treated it as mashed fruit and tried to make jam. We're thinking we should have treated it like juice again and made jelly, as none of these jars set up either. 

Batch 9: Strawberry Prickly Pear Jelly


Finally we were down to the last bit of strawberry pulp. It wasn't enough to make plain strawberry jelly or jam, and we were just done. So I decided to try one more experimental batch. And this one worked!! 

1 3/4 c. strawberry pulp (it was slightly more than 3/4 but not quite a full cup either)
2 1/4 c. prickly pear juice
1/4 c. lemon juice
1 pkg sure jell pectin
6 1/2 c. sugar
1 tsp butter

Combine the pulp, cactus juice, and lemon juice. Stir in the pectin. Heat to a rolling boil. Add sugar. Heat to a rolling boil (adding butter if the mixture becomes foamy), and boil for 3 minutes exactly. Pour into prepared jars and seal.

This one set up beautifully and is SO yummy! I love the combination of the flavors. 

So lessons learned:
  • Use pulp as juice, not mashed fruit. 
  • 1 flat of strawberries yielded about 3 batches of jam. 
  • Syrup isn't worth the time and energy, lol. 
  • Canning is WAY more fun and easy with a canning buddy. Especially if they have kids and you have kids and the kids can help keep each other company. 
  • The crockpot was perfect for keeping the seals/lids warm and ready! Jackie was a genius!! 
  • Being a domestic goddess is so totally not my thing, bahaha. But I already knew that. 
So today I'm going to slice up my remaining strawberries and put them in the dehydrator, and Jackie is working on individually freezing a flat of strawberries for smoothies. And then we think we're done. We thought we did a lot, and then I saw people who had 20-30 flats of strawberries that they are working through. Holy cow! I'm happy with our work though and can't wait to taste each variety. 


Wednesday, February 17, 2016

G is for Girl.

After blogging at least 3 times a week on here past month, the blog has been a little quiet for about a week. Have we "relapsed"? Are we just being lazy? Nope. We ran away, and then life ran away with us upon our return!

Over the weekend Cameron and I decided to make a quick trip down to my sister's house for their Baby Blessing (similar to a Christening)/2nd Birthday party combo. They were blessing their new baby girl in church and then having a friends and family potluck (NOT illegal in New Mexico, unlike AZ apparently) in celebration of the baby blessing and to celebrate Sharli (their oldest daughter) for her 2nd birthday. We loved being around some of the friends and family we love and miss so much! We ate way way way too much, laughed hard, slept little, and visited long. Everyone there was surprised to see us as my due date was starting to approach, but we figured we weren't too far away and there was still a month left until the due date arrived. No worries! Monday we drove home, visiting more family along the way.

Monday night, 3 hours after getting home, I was sitting on the couch making our new budget, filling out my bullet journal page for Tuesday, and writing me "Things to get done before the Baby comes" list when "adventure" struck. My water was breaking. At 12:30 in the morning. At 35 weeks.

I laugh that one of my first thoughts, after thinking "This baby needs a little more time!" was, "No! This can't happen now! The house is a disaster and people will see it!"

Cameron likes to tell people that when I woke him up (I've been sleeping on the couch as it is more comfortable while I'm pregnant. Those memory foam mattresses just hurt my pregnant hips!) that he calmly got out of bed and gathered things up without panicking. I tell it a little different, but we'll let him have his moment. We grabbed my wallet and a towel, pulled Darrow out of bed, and headed out. My cousins (who have already saved our bacon so many times!) were so gracious to take Darrow at a quarter to one in the morning. I felt so bad, Darrow knew something was up and was bawling as we handed him off in the dark and drove off.

To make a long story short (and very not gory, don't worry!!) after the Winslow hospital confirmed that yes indeed my water had prematurely ruptured, they made arrangements to get me to the Flagstaff hospital, as they cannot deliver babies before 36 weeks. So I got to ride in a helicopter for the first time. I think it would have been more fun had I not been strapped to a board, flat on my back, in a space about the size of a metal driveway culvert. It's definitely way more fun to say I rode in a chopper than the actual chopper ride was.

Flagstaff got and started me on Pitocin at 8am to get contractions going. Since my water had broke, they couldn't delay labor without risking extra infection and problems. So this baby was coming early. Full labor hit around 9am, and at 12:37pm on Tuesday the 16th (that was only yesterday?!) we became a family of four. Baby Girl (finalizing the name decision today!) was born with the cord wrapped around her neck twice and quite purple, but started crying and working to breathe as soon as they got her untangled.

After making sure she was okay, getting her initial measurements (5lbs 7 oz, and 18 inches long) they let me hold her for a minute or two, but then took her down to the ICU to get her on some oxygen (she was breathing but having to work extra hard at it and wanted to get her completely stable as soon as they could) and to give her a full check to see how everything was functioning. With the cause of the premature water rupture unknown, and with the fever I ran through labor, they also wanted to get She-Who-Shall-Soon-Be-Named on 48 hours of IV antibiotics to counter act any infection that might have been in our systems.

We have full access to her "cubby" in the ICU and can spend whatever time we want down there, day or night.


The nurses have all taken such good care of us and have been so sweet. We are sure grateful for the good care we have received! I was down with her last night just before I went to bed and while holding her she started throwing up and choking, dropping her heart rate and oxygen low. They worked fast (and so calm!) and got her airway cleared and stomach pumped and she quickly stabilized again. For a newborn who's supposed to have a marble sized stomach, she had a TON of amniotic fluid in her stomach. The doctors were even surprised.

Once they had her pumped and breathing well on her own again she perked up more than she had yet, looked around for a while, and started showing the first hunger cues. Up until then she'd shown no interest in eating and didn't respond when offered anything (so they were giving her some nutrition in her IV as well), but after getting her stomach all cleared out and waking up she was starting to act like maybe eating could be a good thing. They were going to watch her for a little bit more that night and then try feeding her a bottle and bathing her. After only 36 hours of being awake, I was literally falling asleep in the rocking chair next to her bed, so I took myself back up to my room rather than staying for the feeding and bathing. I'll have plenty more chances to do that and few chances for a good nights sleep in the near future. Here in just a minute I'll get up, get showered, and head down to the ICU to see how everything went through the night and to hold this sweet little girl.

We're feeling so very blessed that everything has gone as well as it has. So much more could have happened that didn't and we are so grateful for that! We're grateful we made it back home before my water broke, grateful for my cousins and their sweetness in taking Darrow on the spot, grateful for my Mom who packed up and drove up 7 hours upon getting the news, grateful for technology, grateful for such amazing delivery nurses, grateful for this baby to be as healthy as she is, and grateful for all the love, prayers, well wishes, thoughts, messages, texts, comments, and kindnesses that have been sent our way already. I feel overwhelmed with gratitude to God and to everyone who has in some shape or from sent us their love and support.

Later today I get to introduce my Mom and Darrow to this sweet girl and I can't wait to see Darrow's reaction. I don't know that he'll get it fully, but this boy is smart...he may surprise me!

So this made me laugh a little. Yesterday was reveal day for Iron Craft Challenge #3, "G is for...". For my project, I made a Girl. I totally think that counts. ;) (I did make a Green and white hat on Monday to count as my project, but I'm totally using Girl as my project instead!)

Tuesday, February 2, 2016

Iron Craft 2016: Flowers, Hearts, and PIGS!

It's Reveal day for Challenge #2 of Iron Craft 2016! The theme for this challenge was "Hearts and Flowers".

I'm not a big hearts and flowers kind of girl...so at first I was stumped (as I usually am the first day or two of each new challenge). After a few days I still kept coming up blank, until I decided to integrate the challenge theme into my decorations for the Baby's Corner (with Darrow I got to decorate his own room, but now that we're all in one room, I'm just decorating the corner where the baby bassinet lives). I turned to my Pinterest boards and found two adorable pins that suddenly gave me an idea!

The pig mobile Created by Eleni and the wedding photo is via The Amy and Jordan Blog, from a fabulous workshop wedding! 

I LOVE the hanging embroidery hoops with flowers and knew that could be the flowers part of the challenge. And while I wasn't making a mobile, I wanted pigs and flying pigs incorporated into the theme, so I set off to look for ideas and printables and found some great ones (and one that incorporated the heart part of the theme!)

This color scheme is my obsession right now, so I decided to run with it for the colors for the corner as much as I could (these are hard colors to find in the crafting supply world!). 


My inspiration for incorporating the hearts into the whole project was this find on etsy:

I'd already had a similar free pattern pinned (I'm guessing this is what the creator of the above photo used too, but who knows).
by mausimom


I got this adorable free Pride and Prejudice movie quote printable from Kendra (a long time Pinstrosipeep!). It's so cute and it makes me giggle. At some point in March I will be producing a "piglet" and we'll have to chase it.
Get the full size printable on Kendra's Blog. 

And then through Pinterest I found this adorable pattern on Etsy, but was sad to find that the shop is on break and I couldn't order it. But I still used it as inspiration.


http://thelittlefrenchbullblog.tumblr.com/post/22300535484

This quote was all over Hobby Lobby when I went for supplies and I knew it had to go up in the mix. I couldn't find a design I liked online to order (or one that I thought was a reasonable price), so I made my own.

And then I found this adorable cutie by Elizabeth Rose Stanton on The Whatsits. .
by Elizabeth Rose Stanton

So I spent a furious few days cross-stitching, flower arranging, and trying out different printing methods. But finally it all came together and I LOVE it! 


Putting it together was the part I was nervous about. I wanted to be able to arrange it first and then hang it up exactly in position without having to move things around and poke new holes in the wall. So I got freezer paper out, laid it on the floor, and then arranged the items on the papers. Once I had two arrangements I liked (for the two walls), I traced the circles onto the paper, took pictures with my phone and then took everything into the bedroom to hang.

I taped the freezer paper up onto the wall, and then tapped the nails in through the paper exactly where I would need them.

The paper pulled off the wall easy and left the nails intact and in place. All I had to do then was just hang the items on their nails!

For the flower hoops I had 6 bundles of florals (hooray for 50% off days at Hobby Lobby!) and I cut the flowers and greenery off and mixed and matched until I got what I liked, using the Amy & Jordan photo as my general guide and inspiration for arranging.

I did two cross-stitch pig designs, one in a 4" hoop (the hello pigs) and one in a 6" hoop (the print pig).


I planned on doing the rest of the designs printed on muslin fabric and stuck in the hoops, but I had a hard time getting everything to work just right. I found a great tutorial for printing on fabric that I decided to try, and it works!  The polka dot dress pig was printed using that tutorial.


After that though I kept fighting with my computer to print them the way I wanted to and by the time I figured it out I'd used all my muslin. So, I just decided to print the rest on cardstock and glue it to the hoop. It worked!


Finally at the end I had left over florals that I just couldn't throw away, so I tied them in a bundle and included them in the decor!


I'm pretty tickled with how it all came together. I wasn't sure if it would or if it would look weird, but I like it! And, I got flowers and hearts into the project in a way that I LOVE and that fits me. Hooray!

And, since I worked on this all day Monday (I did the cross stitches earlier, but everything else was Monday)...NOTHING else got done. Nothing. Darrow's toys were everywhere. We ate just Mac and Cheese for lunch and snack. I stayed in sweats until 4pm. So the corner was cute by the end of the day...but that was the only space in the house that looked good! But, it's done and today I can hit the house. 

To see Challenge #1 of the 2016 Iron Craft Challenge click here.


Tuesday, January 19, 2016

Iron Craft 2016: Fork Art for the 5th Anniversary

Nearly 2 years ago Kilani, a fabulous Pinstrosity reader and submitter, introduced us to the Iron Craft challenge. I was instantly intrigued. It sounded like something right up my alley! 

It's a challenge where the only competition is against yourself. Every two weeks a new prompt is given and then you have that time frame to create something that fits the prompt. Be still my heart. It was perfect! I joined up right away. 

Since then I think I have been able to hit between 1/3 and half of the challenges. This year though my goal is at least 10! I thought it would be great accountability to post up my attempts here on the blog. See, now you all know what my goal is, I've got to follow through. And, I know there will be Pinstrosities along the way. There have been a number of them in my past Iron Craft challenge attempts! 

The first challenge of the year ends today with the very first 2016 Reveal Day where we all get to share our projects. This round's theme was centered around the 5th anniversary gifts of wood, silverware, or daisies.

Let me tell you, I was stumped. I couldn't think of anything to do that I just really loved! I wandered the craft aisle (singular here...sigh) and found a wood cut out in the shape of Arizona and bought that for $3, thinking I could do something fun with it. And came up with nothing until three days ago. But by that time I was out of time to get the other supplies for it (we're going to turn it into a fun clock for Cameron's biology classroom, which desperately needs some happiness and cheer in that dark brick room).

So I thought, "Well, I'll just scrap this first one and join in next round." But my head wouldn't let me truly give up. While browsing Pinterest I came across a really cute idea...and it was one I knew I could at least attempt without spending much. 

via
Supplies I used: 
2 four-packs of dinner forks (well...1 and a half...but by accident...read on...)
Needle nose pliers
Pliers
Wooden drawing board (to protect my counter/kitchen island)
Propane Stove Burner
Hammer
Canvas (from stash)
Upholstery Fabric Sample (from stash)
E-6000 Glue

As I didn't know really if this would turn out or not, I decided to go with the cheapest forks Walmart had (as it was past closing time run and see if the thrift store had what I wanted) and picked up a pack of the $0.88 four-pack of forks during my grocery run last night. I totally went against my own advice from 2 1/2 years ago and bought stainless steel. But hey...when it's $0.88 it's worth a shot. 


As soon as I got home and the groceries were put away, I dove into the project. I read a tutorial online for the general idea of making fork art and then just ran with it from there crossing my fingers that this would work.

Step one: Flatten the forks. I held the forks with the pliers and then held the top end in the burner flame until it was hot. How long? maybe 30 seconds?

The first one I didn't hold in real long, but the others I held in till they were glowing because it was must faster and easier to flatten that way. As soon as the fork was hot (and glowing) I removed it from the flame and, still holding the end with the pliers (DO NOT TOUCH THE FORK!!!) and laid the pronged end on the wooden art board. It burned the art board. This is why I used the art board...I didn't want tine marks on my island top. I then used the hammer to pound the tines and the head of the fork flat.  The fire did darken the fork (as you can see below with the fork on the right), but I figured I could worry about that later if I didn't like the look).


Step 2: Bend the tines into shape. Easier said than done. With the first one I started on the outside and worked inwards, holding the pliers perpendicular to the tines (making a T). That didn't work so well and I ended up with various heights of bent tines. Cameron tried to help me fix it and even them out and one of the tines snapped off.


Without looking at the picture to see what I was going for he picked up the next fork to try and help and make up for breaking the other tine and started bending the tines down, but started bending at the bottom of the tine rather than the middle and we ended up with a weird fork. Poor guy. He just wanted to help, and I appreciated that! But, now we were down two forks as bending the tines back would weaken them and we'd probably have another broken fork. 

So, since Walmart isn't that far away and I wanted this done that night I flew back down for another pack of $0.88 forks. If you want to try this and your end result needs 4 forks, you might just get you a 2nd pack as your just-in-case back up plan. 

But anyway. We found the best way to get consistent bends and heights was to bend the tines from the top. So, (holding the fork with the pliers, not in your hand!!) heat up the tines of the fork again, and then with the needle nose pliers held parallel to the tine, bend it down pivoting at the point of the pliers. This gives you an even bend and you can control where each tine bends much easier!  


And, if you want the design on the handle of the fork to show when you curve it around, make sure to bend the tines to the back of the fork!

The hardest one was the curved heart fork. That took some patience. Don't rush the curves! Heat as needed and just work it slowly. I found it worked best to start from the bottom up, that way I could get the curves starting at roughly the same height on either side.


Step 3: Bend the handle of the fork.

This was probably the hardest step of creating the fork art. It is thicker and doesn't bend as uniformly. Again, start by heating it up (I didn't ever get it glowing, but I know it was plenty hot because I accidently brushed my knuckle against one and have a nice blister now). Hold the fork with the needlenose pliers where you want the curve to start. Lay the head/tined end of the fork down on the board and then with the regular pliers bend the handle up. Often I would twist the two pliers in opposite directions to give more force to the bend. As it slowly bent and curved I would have to move the needlenose pliers further down the handle to get more of a curve and not just a V shaped bend.


And then I had my forks done! I really would have loved the look of them against a piece of barn wood, but by now it was dark and I didn't care to dig through the pile in the back yard for the right piece, clean it off, cut it to size with a hack saw, and then figure out how to mount the forks. So I went with plan B: dig through the craft supplies and see what I could come up with.

I found a narrow canvas I'd gotten at Walmart over a year ago and knew that would be great! It would be easy to hang on the wall and I could attach the forks with relative ease. Done.

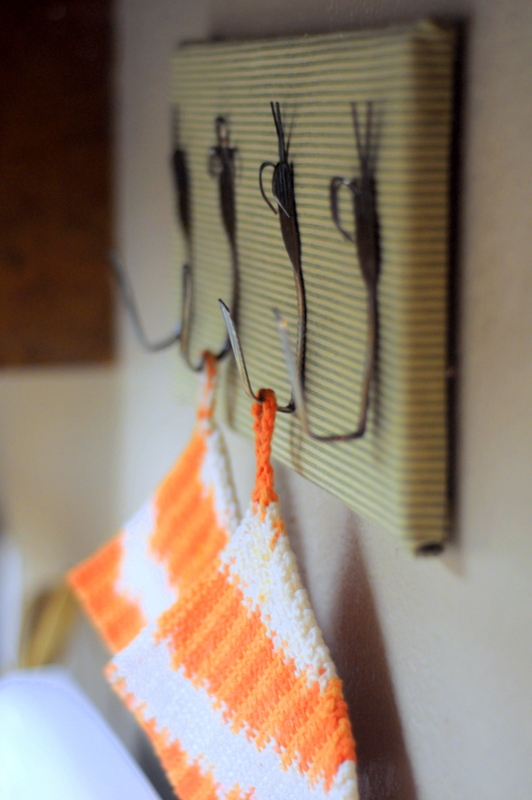
Next I dug through my fabric stash to find something to color the canvas. I'm way into sage green and orange right now and trying to get more of that combo up in my house. As I got the cutest orange pot holders and dish cloths from my Mother in Law for Christmas, I dug until I found a sage green piece of upholstery fabric that was the perfect color and size to wrap around the canvas. It was like it was planned for this. I glued the fabric to the canvas and let it dry. Then I used E6000 glue to attach the forks to the fabric/canvas. I don't want those forks going anywhere and wasn't sure how hot glue would do.

And that was it! I hung up the canvas over my stove to hold my hot pads and I love it!


Visible in the background is Bernie the Bread Machine (a new favorite kitchen appliance!) and The Cookie Hog. Not visible just barely out of frame is the stack of pots and dishes from dinner. Trust me, they are there! Now, to see if we have the guts to try and paint those cabinets...they sure need something!


I really like how these turned out! They aren't completely uniform, but they aren't glaringly off either. Not too bad for last minute and running on the cheap. Even if I had needed to buy the canvas and a fat quarter of fabric this project would be less than $10! Hit the right store and it could be less than $5! 

Want to see everyone else's 5th Anniversary Gift inspired projects? Check out the Flickr group here