


Anyone else still recovering from Thanksgiving? Yeah, me too. And I even was careful not to over-stuff myself. It probably didn't help that I went to a wedding yesterday with a buffet of pasta and Chicken Parmesan from one of the best chef's in town. Happy tummy. Weddings send me home in a lovey dovey mood, I just love them. So what better way to continue that than a cute couples photo Pinstrosity this morning? I like that plan.
Anyone who's been on Pinterest has probably seen some variation of this idea:
The Original Pin
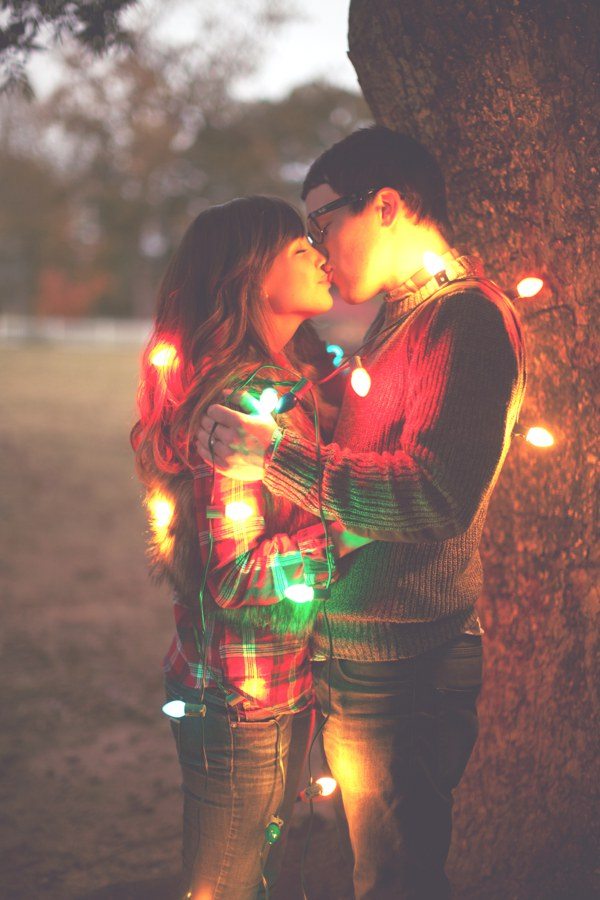 |
| http://www.haleysheffield.com/2011/11/newly-wed-christmas-kaylee-bobby.html |
Couples wrapped in lights, babies wrapped in lights, kids wrapping their parents in lights, etc. It's a cute idea that went viral last Christmas. Looks so easy...wrap up in Christmas lights, take a picture...but as Blair found out...it's not quite that simple.
The Pinstrosity


Blair said, "My husband and I wanted a cute pic for our first Christmas card. I found this adorable idea on Pinterest and decided to try it out... It didn't go so well. We used an iPhone to take the pic because my digital camera kept blurring the lights. Also, half of the lights were already nailed to the house for decoration and I just tried using what was still hanging loose. We had just small lights and the couple in the picture had the big ones. Anyways, here is our epic fail. At least we had some good laughs."
This kind of picture is tricky. Any pictures taken at night are tricky (did my first night time wedding shoot last night...I was so nervous my hands were shaking!), but it can be done. Here's a few tips and tricks on how to get this photo Christmas-card worthy:
- Don't shoot at full-on-night darkness. I know...that seems counter-intuitive because don't you need darkness for the Christmas lights to shine? Not completely. Take a look at the original pin photo. The sky is still a little light. Try taking these in the evening just after the last sliver of sun has gone down, or even a shady side of a building during the day. How does this help? Your camera won't have to take such a long exposure if there is more light. The longer the exposure on the camera, the more chance there is of blurring in the picture. That's one thing that happened with Blair's photos. The movement of Blair and her husband and the lights blurred the image.
- If you are shooting in low light conditions, try to shine a lamp or some form of light at least on your faces. If you're outside, park your car a little ways away and turn on the headlights.
- If you are shooting in low light conditions, see if you can find access to a higher end camera (or a friend who'll come with their higher end camera). For the most part, iphones and low end point and shoots won't do so hot in low light; you often end up with a grainy look (called digital noise) and color distortions as the camera tries to compensate for the lack of light. Some point and shoots will do fine, but not all. Just be sure to test your camera out before getting tangled up in the lights so you know what you'll need as far as light goes.
- While this can definitely be done with just two people and a timer or remote, grabbing a third person to help run the camera will be highly helpful. This way you don't have to set the timer, push the button, run tangle up in the lights and hold the pose in time for the picture. It'll make the whole process more smooth, quick, and fun.
- Even if you have a third person, set the camera on a tripod (or the counter, or a stump, or the fence, or somewhere stable where it will not move). This will also help to minimize any blurring.
- If you are shooting at night (or dusk), and even if you have a third person, set the camera's timer. This way your third person can push the shutter button and then let go so they are sure not to be moving the camera at all while it is taking the picture. You'd be surprised just how much your hand can move the camera by just pushing down the shutter button.
I love seeing what people come up with for Christmas cards. I love the classy photos, the funny photos, the "whoops" photos, and the clever photos. It's just fun. I'm excited to get ours finished up so we can send them out! I guess I better go get working on those. Catch ya on Tuesday! Have a great rest of your Holiday weekend!

It's true about shooting at 'blue hour'. I have never been able to get a decent pic of the moon unless I shoot it at blue hour.
ReplyDeleteI've been experimenting with this one too. I have a simple point & shoot camera, and I've had success by using "night mode" and using a tripod. The tripod by far made the most difference. By the way, I've just discovered your blog and think it is great!!
ReplyDeleteI did this years ago and was successful, but you don't actually shoot in total darkness.In fact, my picture was kind of an accident. Basically we shot pictures of our little girl holding the lights while we were decorating our tree indoors. It was normal indoor evening lamp light but when taken without flash you get the right effect.
ReplyDeleteOr use a photographer that actually knows what they are doing...
ReplyDeleteMy photography instructor said that to shoot the moon at night the best way is to take two photos and shop them together. The first you shoot at "sunny 16" basically you set the exposure as if you were shooting in the middle of a sunny day since the moon reflects the sunlight. In that picture all the details on the moon should be clear, but the surroundings will probably come out pretty dark. Then you shoot a long exposure shot, with a tripod to get all the details you missed with the short exposure of the first shot. Shop your perfectly exposed moon into your perfectly exposed background, and viola.
ReplyDeleteWith this shot, some cameras have a night shot portrait mode, which will do a long exposure and then a quick flash to fill in the faces. Something like that might work when shooting in lower light conditions.
I can believe how naive people are, those things work with electricity! They carry electricity and you could get electrocuted in order to get a cute photo. A friend of mine received an electric shock and was stuck to the cable, luckily her boyfriend heard the cry and he could save her, here power works with 220V but 120V can still hurt you and even kill you. My advice will be not to do it specially with babies, kids and pets.
ReplyDelete