Friday, August 31, 2012

Tin Foil Curls, Myth Foiled or Fantastic?

Em here, so this is one of our own, I saw this pin and was instantly skeptical. I am a cosmetologist, and while I can see how one might say "Hey that would probably work", I really didn't expect the results I got when I tested this pin out on my good buddy Camille (and a total babe, seriously check her out, great hair, simply fabulous...you rock, thanks Mille!). Here is our adventure!

The Original

Sweet right? A little time intensive but the results are stunning, and well this girl must have hair for miles because even after the ringlets are finished her hair is down to the mid almost bottom of her back, gorgeous. So seeing this I thought there is no way this wasn't touched up, and well let's see how ours turned out!

The Pinstrosity Test

Here's where we started, it's a little dark and hard to tell (I am NOT tech savvy enough to lighten this, so sorry), but her hair has a little wave, and it to the middle of her back, pretty thick and has some layers, just so we all know where we are starting from.


I started at the bottom and made sections about and inch wide across the entire bottom. This is where you coil the one inch by one inch squares around two fingers (the picture shows one finger but just stick with me here I'll get to that), and fold nice and tight into it's own little tin foil packet. I  just worked my way up, in a horse shoe as I got to the top, if that makes sense. I chose to do a side part so I worked around that once I got to the top.


Here is her head all wrapped, it took me about half an hour. This is where you then take each tin foil piece and press it with a flat iron (be careful the packets get REALLY hot), I pressed each packet for about 5-7 seconds each.

When they are all finished make sure they are all cooled, and start unwrapping from the bottom and work your way up.

Here is what Camille's hair looked like RIGHT out of the foil, no touch ups, no combing, nothin'.

 I know it's not the greatest picture, but you get the idea, it is VOLUPTUOUS! I love this method now! There were a few pieces that I either missed or didn't heat long enough, so I touched those up and here is the final result!


Beautiful! I will mention one thing to make sure your curls are all the same size, use two fingers when wrapping on ALL pieces. I made the mistake of using one finger for a few (and she would have looked like Shirley Temple with bouncing curls up to her chin if I had done that all the way around) and it was WAY too curly, so keep that in mind (unless that is the look you are going for of course). With that said, you would probably be able to use three fingers for a looser curl as well, I will have to experiment!

So Pinterest Myth Busted! This look is totally feasible without touch ups with a little practice. I love this method, while a little time consuming the results are breath taking, a new take on an old look! Happy Labor Day Weekend everyone!

**Update**
Here is her hair the next day, after sleeping on it, and running, no touch ups here, this still looks fantastic! Thanks Mille!
                                          -Emilee 

Thursday, August 30, 2012

Wax On. Wax Off.

Good Morning! Well...I guess it's not morning everywhere, but it is here. So, Good Morning! 

Have you voted to help determine the winner of the Pinstrosity Challenge yet? If not, go do it!

This whole Upcylce and Reuse movement that's going on has led to some pretty fun ideas and crafts. Sometimes it reminds me of the Depression verse "Use it up, Wear it out, Make it do, or Do without" (can you imagine how much money everyone would save if we all lived by that). I have a box of things that normally would have gone in the trash but now they're waiting to be used for some grand new idea (I really do make things from that box...the proof is here). This Pinstrosity submission gave me more ideas of Upcycle projects to do...only I have to finish burning the candles I have.

The Original Pin
The cold temperature will cause the wax to shrink and loosen from the sides of the jar. Get a dull knife and carefully stab the wax to break it apart.
http://snapguide.com/guides/remove-residual-candle-wax-from-candle-jars/
How many of us have burned a candle down to the bottom and have a lovely little jar with a small layer of wax at the bottom (and on the sides-not because fingers have been dipped in the melted wax of course)? Okay, I currently don't but that's because I was given quite a few candles all at once and I haven't gotten to the bottom of any of them. But I will before too long. Lizzy had  a few lying around and saw a pin on how to get the residue wax out and decided to give it a try. 

"I'm not really into manual labor, so I very rarely DIY. But i saw this pin and thought it was a no-brainer, plus I have several candle jars with like 2 mm of wax left, and it felt like a waste not to try this one out. Directions were easy: pop into the freezer, pull out, scrape, peel label, voila! I planned on turning my jar into a mini flower vase." 


"So I put mine in the freezer, I take a dull knife out, and as I begin to scrape out the wax, I see that it's frozen solid and ready to slide out. Easiest. Pin. Ever. "


The Pinstrosity

"But apparently, I squeezed the glass a little too hard, and the glass shattered in my hands. Something so simple, a toddler could have done it, and I end up almost slicing my hand open."

"The problem: Perhaps it was too frozen? The directions said to leave the jar in for an hour and than jokingly, the author notes that s/he left in for days by accident. So did I because I totally forgot about it for about 4 days."

The glass being really cold could definitely have been the cause of it's breaking. As things get colder their particles contract and pull closer together causing a high level of brittleness in some cases (like with glass). I don't think it's terribly common to be able to squeeze a cold glass and have a break, but if there was already some structural damage (a chip, a small fracture, or sometimes even an air bubble) the glass can be weakened enough where it will shatter easy. 

The idea of the pin sounds plausible and easy enough. It's a new method to me, but I know chipping away at a frozen glass would make me a little nervous (I'm a little clumsy sometimes). Let me share a few other ways to get rid of the candle remains from those pretty little jars. At the end I'll tell you how to get the thin residue layer of wax off the sides. 

1. Microwave Method: Put the jar in the microwave and nuke it for about 30 seconds. The wax should melt enough that it can be popped out with a butter knife. I've nuked a jar longer than that so the wax is melted all the way and then I pull the jar out (with hot pads of course...DON'T just grab it with your bare hand) and I stuff napkins in to absorb the melted wax. 

2. Place the jar in a pot of boiling water (make sure the jar is room temp) or in an oven at 200F. Let the wax melt either to wear it is easy to pry out or allow to melt completely and then remove the jar with hot pads. Either pour out the wax (in a paper cup or the trash, NOT the drain as it will make instant clogs) or soak/wipe it out.  

3. Wikihow suggests to "Pour boiling water into the jar. The wax will melt and float to the top. Leave the jar for a few hours, and when you come back the water will have cooled and the solid wax will be floating on top."

After removing the main chunk(s) of wax, there will likely still be a residual sheen of wax on the jar. This can be removed with hot soap water, baby oil, or olive oil. If there is still a strong smell leftover from the candle that you want to get rid of pour baking soda OR vinegar (NOT both) in the jar and let it sit overnight and wash it well in the morning. 

And one final method I recently discovered to rid the jar of the extra wax: leave a candle up-side-down in your car on a hot summer day and the wax will melt out of the jar. Yeah...don't try that one actually.


Wednesday, August 29, 2012

Nutella Cookies- An Unfortunate Event, and A Christmas Adventure

Last Christmas a friend of mine held a cookie exchange, I had recently been on a Nutella kick (when am I not on a Nutella kick?), and decided to make the Nutella  cookies I had seen on Pinterest, they turned out oh so delightful! I also remember from that day that they were the easiest cookie recipe I had  made to date. Madison sent us her version of Nutella cookies that didn't turn out like she had hoped (what a waste of Nutella, I feel for you Madison). Here is her sad tale.

The Original

Now to me, these look more like cookie crisps than anything else. The original site says they "taste like the edge of a brownie", that isn't quite the "cookie" that Madison was looking for.
 unfortunately.

The Pinstrosity

So this is just a big brownie edge. No cookie involved here. Whatsoever. Poor thing, wasting all the wonderful Nutella. I'm so sorry for your loss Madison, Nutella is a staple at my house. Here is the problem:
This is called "Three Ingredient Nutella Cookies", you have your 1c. sugar, your 1 egg, and your 1 c. Nutella. No flour. Not even a little bit. This would explain why the "cookie" is more of a giant brownie edge. As for why Madison's turned into a giant blob, I would guess she had her cookie balls too big, and too close together.

Back to last Christmas, so I made these 4 ingredient cookies and they turned out fantastic! I followed the directions exactly, and had no problems with them at all. Here is the link and recipe:

Preheat oven to 350 F.

 Ingredients:
1 Cup Nutella
1/2 Cup Sugar
1 Whole Egg
1 Cup All Purpose Flour

Blend all ingredients together well. Form into 1″ balls. Place on a cookie sheet. Press down firmly (you can use the bottom of a glass if you want, I just used the palm of my hand). Bake 7-8 minutes or until set. Let cool.

The Original (From My Christmas Adventures)

The Pin-Win (From My Christmas Adventures)

They were delicious,and SO easy! They were a huge hit, and I love that I already had everything that I needed!

Does anyone else have any fool proof great Nutella cookie recipes?! Please share! Happy Wednesday!

                                              -Emilee

Tuesday, August 28, 2012

DIY Laundry Soap

Sometimes there are pins out there that just work great for most people...and then the Pinterest Pixies decide they hate you and you get to be the unfortunate soul they are spitting upon. Poor Jolene ran into the wrath of the Pinterest Pixies as she was trying to save her family a little money by making her own Laundry soap. 

The Original Pin
http://beingcreativetokeepmysanity.blogspot.com/2010/11/homemade-laundry-soap.html 
Now this pin has some really great reviews in the comments; it does work for many people. We're not saying this is a bad pin at all...we're just saying the Pixies had it in for Jolene.  Here's her story:

The Pinstrosity
Jolene says, "Sorry I have no pictures of our unfortunate incident but I'm sure this story is appropriate regardless." 

"One day I decided to save myself some money by making the laundry soap mentioned above.  My husband and I purchased all the ingredients, mixed it all up in a huge bucket and thought to ourselves that should save us a few dollars.  Boy, were we ever wrong... The soap cleans well, however... about 2 weeks after we started using the detergent our plumbing backed up so we called a plumber who ran a snake down the drain and cleared it at the cost of $265, a few days later it backed up again, then again and again, and again... You get the point. We eventually bought our own auger at the cost of $375. This happened so many times I am sure I could quite comfortably take any job with any masterplumber and I know I would be a proficient employee, not that I have any aspirations to do so.  Finally we called another plumber who ran a camera down the drain (another $175) which showed a build up of white gritty material that he initially thought was grease but upon closer inspection was determined to be the homemade laundry soap...$815 later... I still have almost a full tub of this laundry soap that nobody wants."


The problem here is the laundry soap not dissolving all the way (obviously, or it wouldn't be clogging the plumbing). Not everyone is getting clogged pipes, so we know it works somewhere where the Pixies aren't mad. 

Sifting through the comments people said that at first they were worried that they didn't add enough soap because this laundry soap didn't produce suds like they thought. This won't produce suds...it just doesn't. If you put in too much soap it can have a hard time dissolving thoroughly. Because this laundry soap is more concentrated that the normal stuff you buy in the store, you don't have to use anywhere near as much. 

The author of the original post and some of the comments suggest double grating the soap and/or using a food processor after the initial grating to get a finer mix. This will help the soap to dissolve better. 

And then sometimes washers just get old and have an incontinence problem and they just can't hold everything in like they used to. 

So when you're trying out all of these marvelous DIY soaps and detergents...do take them with a grain of salt and remember to set out a peace offering to the Pinterest Pixies. Obviously some DIY soaps work for someone, but they may not work for everyone and with every contraption/machine. 


Monday, August 27, 2012

DIY 1/2 Gallon Body Wash From 1 Bar of Soap, Too Good To Be True?!

Em here, so Debra sent us this project in two parts, part one, the epic failure. So then Debra decided to do some research and find out what went wrong and then fixed her own Pinstrosity, part two total success, you go girl! So many times we see on Pinterest how to "Make Your Own Soap", "Make Your Own Laundry Detergent For 10 Cents A Gallon!", make your own everything is the new way to be super frugal, however sometimes these projects just turn out to be a waste of time, money, and high hopes for a money conscience household. Debra did the footwork here, and will definitely be reaping the reward!

The Original

Debra uses Dove, so she went ahead and followed the directions for the "Girly Body Wash", and added lavender essential oils, I am a TOTAL essential oils junkie and can I tell you I am sure her soap smells FANTASTIC! The directions (if you are going to try this at home please visit the original site and follow the directions to a T, I am only giving a synopsis of what to do here) say to use three soap bars and 6 cups of water, bringing the water to a boil and then microwaving each bar for 90 seconds and then stirring it in the hot water immediately.
  Debra decided to get her husband on the DIY body wash band wagon since her first try went so well, he is an Irish Springs man she said, so she tried with this new soap brand. He suggested using only one bar of soap so if it doesn't work they are only wasting one bar, not three. So she adjusted the proportions of water to the one bar she was using and here is what happened...
The Pinstrosity

**This picture is for added dramatic effect, she didn't check to see if the container was microwave safe. Soap 1-Debra 0, remember to check first! The soap will be HOT when you get it out of the microwave, Debra burned and blistered herself during the process so please be careful**

Here is the actual Pinstrosity. Debra added the soap to the water, and it turned to complete solid mass. No good.


Here however is where she went the extra mile, she did some research and after finding a forum about homemade soap ( http://www.hotcouponworld.com/forums/household-tips-tricks/473954-diy-homemade-flop-not-such-flop-after-all.html) she found someone who had made Irish Spring Body Wash! Win! So the problem was that she didn't use enough water, so on try two she added the complete 6 cups, and then added some glycerin and coconut oil (apparently this soap is REALLY thick once it turns into body wash, this was to help the mixture thin out a bit). She made the concoction, let it sit for 24 hours, came back to check on it...and success! She says it is VERY thick still, but is in body wash form none-the-less.

The trick to this is the amount of water, for some reason the makeup of the Irish Spring just needs more water, so when doing this project try to shy away from changing up the water to soap ratios, and stick with the tried and true, here is Debra's Pin Win, this is the original Dove that she did first:

According to the original site, she says after calculating everything out you save about 75% on soap if you use the DIY recipe, pretty great right!? So there you have it, a Pinstrosity, a Pinvestigation, and a Pin-Win all in one! Thanks so much Debra! Happy Monday everyone!

                                              -Emilee

Friday, August 24, 2012

And Then There Were Two...Competion Finalists!!!

Hello Pinstrosi-peeps!! So today is the weekly meeting of the Pinstrosity Brain Trust, and we have been reviewing all of the competition entries, only to find that there are in fact TWO who scored exactly the same! We scored based on how well the pin was tested and how well they wrote up their story. Remember...this wasn't about who had the best/worst fail, or who came closest to achieving perfection. 

So now you may wonder what is a blogger to do? Ask their readers of course! So yes, we are leaving it up to you! Here is how to help us out:
-We have put both entries on the blog labeled "Competition Finalist #1"
and "Competition Finalist #2".
-To vote for your favorite post, go to the link found here:

(voting closed, no link available)

-You will have until Friday August 31st, at 11:59 P.M. to vote.
**The winner will be decided based upon how whoever has more votes**
Just a reminder, the winner will recieve a $50 Gift Card to Amazon!
Thanks so much for your help, we will post the winner on Saturday, Septemeber 1st!
Happy Friday Everyone!

Competition Finalist #1


Perfectly Round, Opaque, Bouncing polymer ball


Hi!  My name is Kristen.  I am a wanna be crafty, stay at home mom to 2 beautiful girls ages 4 and 1.  I was so excited to see the homemade bouncy ball on the "to test" board! This was one of my 1st pins. I am always looking for fun things to do with my girls (aren't we all?), so here was my excuse to finally try it out!!  I so badly want to be "that mom" whose kids are always clean, in freshly pressed clothes, and have the coolest mom who knows how to make fun things at the drop of a hat.  Sadly I seem to fall short and this pin is an example of how I try, yet never really quite get there :) But the love is there and hopefully my girls will grow to see that instead of the dozens of failed Pinterest experiments LOL!
 
So Pinterest... Love it, I'm an addict. But as we all come to find out sadly, not all pins are what they seem to be.  I have gotten quite tired of finding the "ultimate pin" to do with my oldest, only for it to end up with her in tears because is was a "Pinstrosity".  So I decided to do this one on my own while she was asleep, just to make sure it would turn out how it says before I got her all excited about it. 
 
 I chose this link, because these looked to be a little more realistic of an outcome than the other link with the obviously store bought marbleized pretty rubber bouncy balls
Looked simple enough, and surprisingly I had ALL the ingredients. Thank you previous failed experiments...

 
So I gathered my supplies (minus the ruler and the timer with a second hand. I'm low tech and had to use my phone...) 
In the directions they said that white glue would produce an opaque ball, and clear glue would be... well clear.  Just my luck I had pink sparkly clear glue (no real shock, everything I own is pink and sparkly)(whether it was bought that way to start with or not...)!  What a pretty ball this will be!!!

 
 I mixed the Borax and water in 1 cup and added the glue and cornstarch to the 2nd cup. Next you take a little of the borax solution and add it to the glue and cornstarch. It said do not mix for 15 seconds, so I waited... 
 I am not good at waiting. Good thing the instructions call for a timer. It took longer to get the timer function up on my phone than the 15 seconds. I'll call that Problem 1/2. More like operator error than an experimental problem.
 
FINALLY 15 agonizing seconds later I could mix!
 
Once it becomes "impossible to mix" you pull out the glob and start forming your ball.
 
So pretty much it feels like a giant booger...
but they said to just keep kneading it, and once the stickiness goes away you can then bounce your ball. This is where I really hit my first "problem." 
A huge hole formed on the inside, the cornstarch prevented the insides from being sticky. Well there were no directions on how to fix this and the outside was still sticky so I turned it inside out, and kneaded again.  All sides stuck together success!!! 
Problem #2 was noticed here, it looked NOTHING like the picture AND it was opaque despite my using clear glue.  Me thinks white or clear makes no difference.
 
On to the bounce test... 
Enter the FAIL portion to the test. I am SO glad I decided to try this while she was asleep, there would certainly have been tears.  O don't get me wrong, the "ball" bounces.  About an inch MAYBE. Problem #3 (and kind of a funny) trying to take a picture of yourself bouncing a ball is a little awkward. ESPECIALLY when said ball is NOT round. Right after I took this picture it bounced right into the garbage disposal. A fitting place I think.
 
 Now I don't consider ALL experiments that don't turn out like they say they do a FAIL. My daughter and I usually have fun in the process and that is what matters. But this pin is a FAIL! The only correction I see that could have been made (besides having the timer ready and have an extra pair of hand to take pictures) was to make sure all the cornstarch was mixed up in order to prevent the hole in the middle.  The chemical reaction takes place pretty fast, and mixing does almost become impossible. But no matter what, I do not see any way of the ball turning out like any of the pictures posted.
 
So there she is my "perfectly round, clear, home made bouncing polymer ball"
   
On a side note: I just so happen to have 1 oddly formed, opaque, made with love, sideways bouncing (slightly covered in garbage disposal debris) Polymer ball if anyone wants one <3

Competition Finalist #2


Apple of my Eye

Hi!  I’m Becky.  I live in the midwest with my husband and yorkie, Sophie.  I love to cook, bake and do crafts, so Pinterest has  a wealth of ideas for me to try.  Sometimes they come out great, other times we end up ordering pizza.

Fall is my favorite season.  I waste my entire summer waiting for the cooler temperatures, fall leaves, and pumpkin picking.  It’s also the only season where it’s socially acceptable to have my entire house smell like apples and cinnamon.  Almost all of my favorite desserts involve some sort of apples and cinnamon combo, so I tested out the baked apples pin from http://skinnychef.com/recipes/baked-apples.  If it worked out well, it would be a healthy, delicious treat that I could make easily, and it would make my house smell like fall.  An added bonus: I already had all of the ingredients except for the apples and apple juice, so it was a relatively inexpensive test and I wouldn’t be out too much if it failed miserably (as many of my experiments do).

I started out by getting out all of my ingredients.  The recipe calls for Gala or Macintosh apples.  I chose Gala.  I left out the optional orange liquor.

I had forgotten how hard it is to core apples.  Maybe I just don’t have very much upper body strength, but I had to really push to get my corer through.   The worst part was that once I got the core out of the apple, it would get stuck in the corer and I would have to pry it out with a spoon.  Someone should invent an apple corer-clearer outer.  On the up side, Sophie created a new doggy game called “how much apple can I eat off the floor before the woman can clean it up?” so at least the floor was clean.
 
Once I got the apples cored, it was time to fill them.  After figuring out that the best way to get the filling in was with my ½ teaspoon measuring spoon, it was pretty smooth.  If you have a baby spoon in the house, I bet that would work too.  I don’t know if my apple corer makes exceptionally large holes, but I definitely did not have enough filling from following the recipe.  The original amount of filling only got me through four apples.  I did some quick math and make a half batch of filling to finish out the other two apples.  Brain to the rescue!
 
I put them in the crockpot for 2.5 hours (the conservative end of what the recipe calls for) and crossed my fingers.

Two and a half hours later, my house smelled amazing.  Win!  Then I looked at the apples…and they looked nothing like I expected.  They were dark, shriveled, and barely had any filling left. 

They tasted ok, but kind of bland.  And I like things bland.  We’re talking plain pasta, no dressing on salad, no syrup on pancakes.  But these were too bland for me.

I did get some amazing smelling liquid out of the crockpot, which I’ve pictured below.  I’m not going to lie, I tasted it.  It was greasy, but tasted amazing.  I spooned some of it over the apples, and it made them taste much better.

I would probably classify this as a level 2 on the GCT Fail Scale.  It was ok- they’re edible.  But it’s definitely not as delicious as the description made it sound, and the picture on the pin is definitely of the apples pre-baking when they still look pretty.  I think the biggest problem was that when the butter and brown sugar melted, they just seeped out of the bottom of the apples.  If there was some way to keep the filling in while it was cooking, I think it would soak into the apples more and all of that flavor that ended up in the apple juice would be in the apples instead. 

I saw people commenting on the original pin that they were considering using oatmeal instead of walnuts.  I wanted to follow the pin exactly, but I wonder if oatmeal would hold the filling together better.  The walnuts might not have been able to hold it in the apple.  If I try this again, I might go that route and see what happens.  

Thursday, August 23, 2012

Leaning Tower of Kids-a

I've just been waiting for a photography Pinstrosity to be emailed in! I knew they had to be out there somewhere. Being interested in photography myself (I know...who isn't these days...but I'm okay with it) I've poked around some photography boards on Pinterest and this photo is pinned all over the place:

The Original Pin
Photobucket
http://freshfromgod.blogspot.com/2011/02/gift-of-sisterbig-bear-lake-arrowhead.html
Cute, no? That's what Laura thought, but her "little models weren't quite as cooperative."

The Pinstrosity

Although this didn't turn out like the original, I love it and think it's a keeper.  No, it may not be one you hang on the wall, but this needs to go in an album Laura. Your kids' future spouses need to see this (isn't that the point of family albums...one of the "how devoted are you" tests for boyfriends/girlfriends). 

Taking pictures with children is challenging; their interest is very short and doing official poses can be a little tough. That doesn't make it impossible though, whether you're a professional photographer, a hobbyist, a snapshotter, an iphoner, etc. I have a few tips from my experiences and then I'll give you a great professional resource. 
  • With babies, it is easiest to photograph them when they are dead asleep. I know every baby sleeps differently, but often if you are slow and gentle (not that you're never not gentle with a baby) you can usually move them around. With this picture it might be easiest to have a sleeping baby because then you can position the arms and legs like you want them without the baby flailing around. 
  • Sometimes I show the children a photo of what I'm wanting to do. Sometimes they jump to it right away, and other times a little reverse psychology helps out ("I bet you guys can't do that. Let me see."), and then sometimes they just won't and you have to roll with that too. 
  • Sometimes I'll use a child's love for their mom or dad to help get a photo, telling them that we're getting a really special picture for their mom/dad and that you need their help to make it awesome. Kids like the word awesome and they like "helping". 

Those are my tips...worth everything you just paid for. Take them for what you will. If you do want a more in-depth resource and some really great tips check out How to Photograph Children by the Digital Photography School. They have great tips on the settings for your camera and tricks to getting better children's photos.

But...my biggest tip...don't do this:


Wednesday, August 22, 2012

No Go Glow Bath

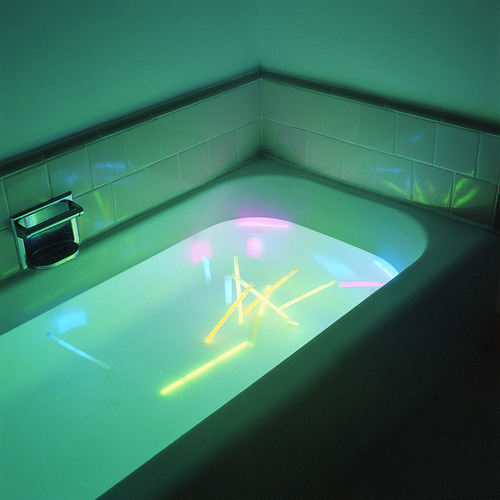
Glow sticks have made a huge comeback lately with all sorts of DIY projects and fun. Victoria found a pin for putting glow sticks in the tub for her children, but things didn't quite go right. 

The Original Pin
it&#8217;s been a while since i&#8217;ve visited julia galdo&#8217;s flickr and she&#8217;s definitely been busy taking lots of great pictures.

The source Victoria followed led her to this page: http://happyhomefairy.com/tag/glow-sticks/
but this photo was taken by Julia Galdo and can be found on her website http://www.juliagaldo.com/photography.html and is photo number 22 in her personal gallery (went through all 93 of her tumblr pages looking for this...I should have just gone straight to her site. And...her photography is lovely, but it does contain nudity, just warning you if you click over to her site). 

Victoria said, "I wanted to do something fun for my 5 year old since we had been going through a lot as a family.  [We] had a bunch of glow sticks from a party, and I thought she would love this."
She filled up the tub, bent the glow sticks to get them glowing and then she cut them open and dumped the glow liquid into the tub. While it didn't mix with the water like she had hoped, rather it just stayed where it splattered, her daughter was still excited to hop in the tub. 

The Pinstrosity
We actually don't have a picture for this...and while we normally always ask for a photo, we thought this one was worth posting sans photo. 

Victoria shared the following: "As soon as she stepped into the tub and sat down she started crying.  Said it hurt.  I was worried there was a chemical or something in it.  I washed her off and got her out and she had these little nicks and cuts on her legs.  I couldn't understand it.  It wasn't until a few weeks later after our drain started backing up that my husband got down and found little broken pieces of a hollow glass tube in the drain.  Now I realize that the crunch noise to activate the glowing is a small glass tube within the plastic tube being broken.  That was what had cut my baby girls leg.  Utter fail and worst of all dangerous.  I never knew those even had glass in them.  I dunno, maybe we used the wrong ones.  But, we used the glow sticks that can be used as bracelets.  I think this is important to let others know because it's not safe."

I discovered the glass tubing during my attempt to make the glowing bubbles and cringed a little as I read Victoria's email as I knew right where this was going. Most of the glow sticks have those glass tubes in them. The glass tubes keep the chemicals separate, and bending the glow stick breaks the glass and allows the two chemicals to mix producing the glow. 

The post Victoria found doesn't actually suggest opening up the glow sticks into the tub. It says, "Glow Stick Baths!  Fill up the tub, pile all your Happy Buddies in, turn out the lights, and throw in some Glow Sticks. You will not believe how cool this is!"

So...if you're using glow sticks DO NOT cut them open. 

**Some glow sticks are toxic and others aren't...we don't know which kind Victoria used. But that is something to think about with glow stick projects in the future. Also, everyone has different views and feelings on the varying levels of chemicals in their lives. While putting glow liquind straight into the bath may seem like a bad idea to some, it would be pretty run of the mill with others. So, please be kind in your comments regardless of whether you are on the "Chemicals are the devils tools" side or the "Who cares?" side (or even someone in the middle).**
Other ideas on how to make bath water glow can be found here: http://chemistry.about.com/od/glowinthedarkprojects/a/glowingbubbles.htm
I know that's a link for bubbles, but it could be adapted to the bath.

You can also check out this idea (using highlighters and a black light bulb) http://www.growingajeweledrose.com/2012/03/outer-space-themed-bath.html.


Tuesday, August 21, 2012

Arum num num num

Hey there, it's Marquette. I've got a cute Pinstrosity for you today. We get a lot of submission from people who tried to do the original pin and had something go wrong, but we haven't had many submission from people who used a pin as inspiration to make their own creative project. Personally, I love those. I think inspiration and not just replication is partly what Pinterest is all about. So a huge props to Ariel for her creativity and her try with this project. 

Now I'm a huge Cookie Monster fan. He was always my favorite Muppet (and Cookie Monster is actually a Muppet. Go to  http://www.sesamestreet.org/ and on the main toolbar you'll see the 2nd button from the right says "Muppets"-a Muppet is a term coined by Jim Henson to describe a marionette puppet combination). I'm glad the whole "Fruit and Veggie Monster" thing was all a hoax..."V is for Veggie" just isn't quite as catchy. I've really enjoyed seeing all the cookie monster cupcakes and cakes that have flown around Pinterest. I've seen some great ones and I've seen some Level 5 cupcakes too. Ariel found these cupcakes and decided to take her own spin off of them. 

The Original Pin
Cookie Monster cupcakes
http://www.bbcgoodfood.com/recipes/873655/cookie-monster-cupcakes
Cute, no? Well instead of cupcakes Ariel decided to try making Cookie Monster Cake Balls. 

The Pinstrosity

Ok, so they don't quite look like Cookie Monster, but you can see where she was going with these. I say A+ for awesome effort with adapting what she saw to the cake balls. I love the little mini cookies. So what to do so that these guys morph from bug-eyed heads into Cookie Monster? I have a few ideas. 

Idea #1: If available, blue dipping chocolate would help these guys out. I know blue isn't the easiest color to find with food decorating supplies...especially in chocolate, but I have seen it in the cake decorating aisle in our local Walmart. Now I know every Walmart is different and some of you may not have a Walmart accessible. If you plan ahead enough you can order them online (Wilton has many different colors). 

Idea #2: Can't find blue candy melts and don't want to order them? You can try dying white chocolate blue. We've listed this link before but I'll give it again...here's a great tutorial on how to dye white chocolate: http://www.wikihow.com/Dye-Chocolate

Idea #3: Don't want to dye white chocolate? Use white chocolate and then very thoroughly roll the cake balls in large blue sugar crystals. The large the sugar crystals the better; the little sugar crystals will get extra smooshed and hidden in the white chocolate muting the color and effect. The large crystals will also help to make it look like monster fur. 

Idea #4: I think a large part of the look with many creations like this is the eyes. Eye placement can make such a huge difference. If you look at the original cupcakes, or even a real picture of Cookie Monster, you can see how the eyes are centered high on the head and placed right next to each other. See?
The little eyes Ariel used were great, but if we moved them higher up on the cake balls and set them right next to each other it would give more of the Cookie Monster effect. Additionally, you can set the little eyeballs so they aren't looking in the same direction...Cookie Monsters eyes never both seem to be pointing in the same direction. 

Idea #5: I love love love the little cookies. While I do think they work, if you are wanting a less bulky cookie for the cake balls try Cookie Crisp as they are more thin. I think Ariel has her cookie placement about right; you definitely don't want it any higher up...even after moving the eyes higher on the head you need some good space between the eyes and the cookie. 

So there are my ideas to help bring Cookie Monster out of hiding with these yummy little guys. And then you can eat them Cookie Monster style, "Arum num num num num". I think that would be fitting.


Hedgehoggin'

Em here, so this pin pulled at my "Holy freaking adorable batman" heart strings the second I opened it. Meghann sent us her attempt at a Hedgehog Watermelon, and well I just happen to have a hedgehog...some of you may be wondering what a hedgehog is...well here is my little darling Gypsy.


So now you know what a hedgehog is ( I have a lot of friends who had never even heard of such a thing, so I am covering my bases, and well showing her off. She is pretty cute!)

So Meghann found a pin to make a hedgehog watermelon (people are crazy creative). Here is today's Pinstrosity!

The Original

Cute right! And what better way to serve watermelon than to have an easy and cute presentation! It took some tracking down to find the original site but when I did I found a treasure! The website www.watermelon.org has a ton a carving ideas, instructions, pretty much everything watermelon, it is really cool! I know it is getting to be the end of the summer, but this wouldn't be a bad idea for a end of the summer shebang. Ok enough of the chit chat, here is Meghann's version:

The Pinstrosity

So, like many of our submissions, this one isn't all that awful. There are a few tips to make this a Pin-Win though...
1.The watermelon needs to be oblong not round, something that Meghann also brought up.

2.The original website says to use a green dry erase marker to help you see where you are going to cut, then it wipes off after they said, genius!

3.Meghann used "cocktail sticks", I'm not sure if that is code for toothpicks, but the original used toothpicks, and they seemed to be the just right size.

4. Meghann went a little big for the feet, she tried to make toes and such, which is anatomically correct, but ends up looking a little funny. If she had cut them down a little they would have looked a little proportionate to the rest of the melon. The original cut out rectangles, and made one side of the rectangle smaller than the other, this is the part that will attach to the body of the melon.

5. The face on Meghann's version is spot on (props to you Meghann). Using a small triangle for the nose, they inserted it with two toothpicks, and grapes for the eyes and end of the nose, you now have a cute little face(they used blueberries, but I think you could totally get away with small grapes).

6.Before doing any carving though ( I should have mentioned this first), the original says to shave off a small section on the bottom so that it will lay flat, don't go to crazy though because if you cut too much into the white section, juice will leak out and you will surely have a mess.

7.It's hard to tell in the picture, but the original had ears, they are about half the size of the nose, and are also triangles.

8. For added detail, they used a paring knife to make little triangles at the top of the hedgehogs head for added spikes. But I think Meghann's still has the right idea even without it.

9.Meghann said her cubes didn't fit inside the hollow space very well. That could be because her's was much rounder and smaller, but her chunks might also have been a little too big, so remember to take that into account when dicing up the remaining melon.

And as with our last melon Pinstrosity, practice will no doubt help. Meghann's turned out great I think, and with a few minor adjustments this would look just like the original. Stay tuned for Marquette's post later this afternoon! Happy Tuesday!

                                            -Emilee