Thursday, August 9, 2012

Oatmeal-to-Go....in the Trash

I do have to say that Oatmeal is my least favorite breakfast food ever. Okay, no I lied...creamed eggs are my least favorite...but oatmeal comes in 2nd. But I know it's good for you, so now that I'm an adult I eat it when it's served. But getting me to eat it as a kid? World War III. Moms try to spruce up oatmeal anyway they can to get that cheap (but nutritious) goop down. We were sent in this Pinstrosity of one way to try and get the goop gobbled up.

The Original Pin
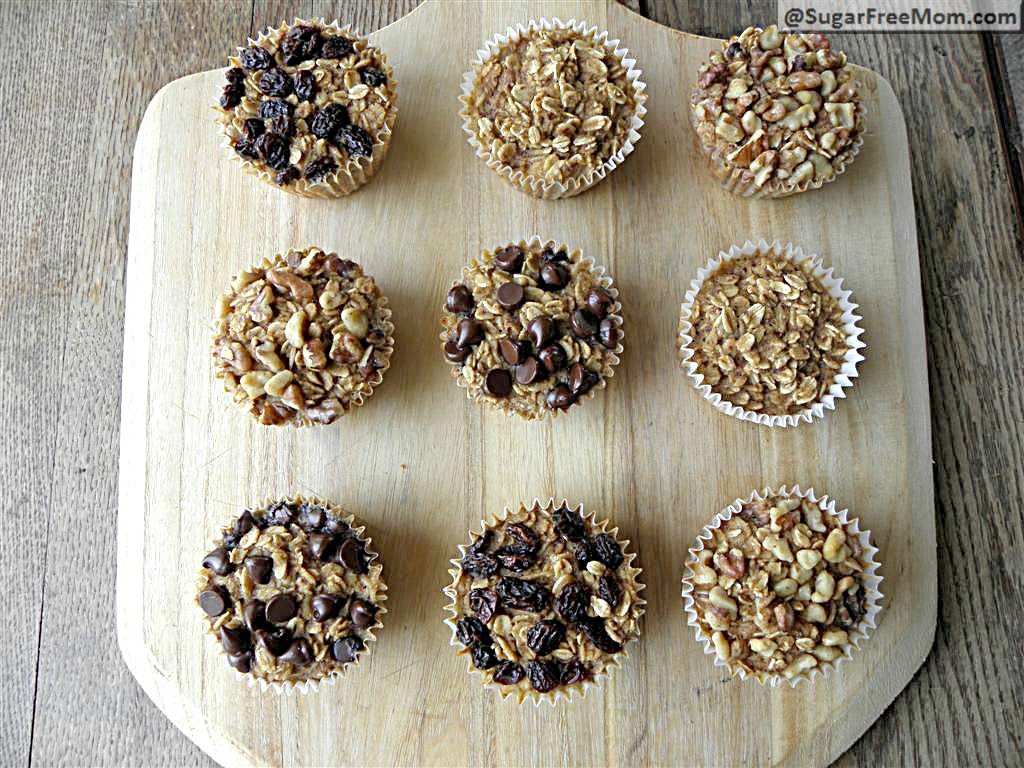
http://www.sugarfreemom.com/recipes/personal-sized-baked-oatmeal-with-individual-toppings-gluten-free-diabetic-friendly/ 

And here are Becci's Oatmeal Cups. 

The Pinstrosity

Becci says, "Actually, they LOOK really cute but my kids both tried one and thought they were AWFUL and would not eat them! I think the problem is that kids think they will be like muffins and they are super dense and overly moist.... like oatmeal to go I guess. I gave away as many as I could to friends and the rest were oatmeal-to-go-in-the-trash." 

So actually, this pin produced what it said it would...oatmeal to go, but the Pinstrosity part of this was that it was still not kid approved. Honestly, my mind has a hard time not looking at those and imagining muffin taste and texture, I can imagine the kids' reactions. It's just oatmeal in a paper liner. If you like oatmeal though, these are great to make to have on hand for a busy day! 


Wednesday, August 8, 2012

11:30

It's 11:30 here which means The Pinstrosity Challenge is over. Thank you so much for all who sent us entries. We are so excited with the response we got and we can't wait to get through all of them and let you know the results.

Set Fire to the Spoon

I'm sure that was an early version of the song... "But I set fire, to the spoon, Watched it melt as I touched the flame. Let it burn while I cry, 'Cause I heard it screaming out your name, your name." Ok, maybe not. 

Marquette here...sniffles, bad jokes, and all. Good thing germs don't pass through the monitor, this is nasty gunk I've got. Thanks to Em for doing my post yesterday, I was dead. 

We've got a fun Pinstrosity for you today...melting plastic spoons over a candle to make a necklace. The idea is awesome. 

The Original Pin
As far as I can tell, the pictures originated from this website:  http://www.cutoutandkeep.net/projects/plastic-spoon-rose. 
Again, the idea is awesome. The logistics of it though aren't quite as easy as the picture suggests (isn't that always that case?), just as Emily and Hannah found out. Here's what they ended up with:

The Pinstrosity

Poor girls. Poor spoons. I laugh, but only because I've been there...fire crafts usually end up in me just burning whatever I was trying to make, and then I go around the house looking for more things I can burn and melt. But at least I have fun, right? With all those failures and mini-bonfires though I have learned a few things that might help out when you're doing this project, and I found a more detailed tutorial than just the picture from above. 

My tips:
  • With each candle there is that ideal height above the flame for doing melting projects like this. While there's probably better ways to find it, this is how I do it: 
    • I place my hand flat, palm down, high high above the candle, and then I move it down towards the flame (just at a medium-slow pace). There is always that spot where it goes from "nicely warm" to "holy-cow that's hot". You want to hold your spoons just above that "holy-cow that's hot" spot, not at that spot or below or your items will burn, rather than melt. It looks to me like Emily and Hannah held their spoons a little too close to the flame. I know there is the urge to do that to speed the process up, but you will end up with blackening and over melting. 
    • Definitely use pliers or some form of holding device (NOT your fingers) to hold the items above the flame. 
    • It may take longer than you think for the item to heat up enough to start melting. Be patient...it's worth it. 
The original tutorial for this project can be found here: http://www.cutoutandkeep.net/projects/plastic-spoon-rose. This crafter starts with the outer petals of the flower and builds inward. 

Another tutorial I found, which can be found at http://www.cantstopmakingthings.com/2010/04/rose-is-rose.html starts at the center of the flower (which honestly makes more sense to me, but I know it makes more sense to others to start on the outside first). 

If you're wanting to try this project out, definitely look at both tutorials, they have great tips and instructions. But definitely read the instructions and don't just go off the picture montage someone put together (like in the "Original Pin").


Tuesday, August 7, 2012

Pretty Sad Paper Trees

Em here, after a (short) weekend away for a baptism and a wedding in my home town, and then a trip cut short cause The Mr. Chips caught what I had two weeks ago, go figure right, Marquette caught it! And on her birthday no less, so send her happy thoughts, and get well soon wishes, and for now you are stuck with me! Muahahahaha ;) Anyways back to business, today's Pinstrosity is from Holly. Check it out:

The Original


This cute little project is fun for the little ones, and seems simple enough, a major bonus is that you probably have all the supplies you need for this one, but one of our readers had problems with it, lets see her results.

The Pinstrosity

As you can see Holly's version didn't quite go as planned, sometimes (as we have said before) we get a super awesome reader who tells the story best themselves, this is one of those times, here is what Holly had to say:

"I help run a day camp for kids at my church and everyday we show a movie and kind of use that as our theme for the day. We showed Mirror Mirror so we went on the Snow White, fight for what you believe in, apple theme. I know, kind of stretching it thin with connecting that to paper bag tree's, but they're 9-year-olds so they don't care. So anyway, we found this paper bag tree on Pinterest and were like oh that'll be easy. We'll just buy some bags, cut little green pieces for leaves, and use a hole punch on red paper for apples. Simple right? No need to try it the day before or anything. About an hour before craft time, we decided to try it out. We really tried it just did not work.
It wasn't a complete failure. It just didn't look decent enough for us to send home with the kids to the parents. "Look what I made Mom! A crumpled up paper bag!"
Here's what I think went wrong: First, we cut the strips in the bottom of the bag way to big. They should've been much skinnier. Second, we cut the leaves in chunks to big as well. They wouldn't stay glued to the tree, hence why they aren't in the picture. Third, the actual bags we used should have been the larger lunch bags. Ours were just to short for this.
What I decided to do in the end was to cut four big strips in the bottom of the bag. I still twisted it to form the trunk, and then I twisted the larger branches to hold the green part that made it look like a happier apple tree."

Here is the "Happy Apple Tree"


Much better eh? So the moral of this story is that you need to use the right size bag, and cut the pieces the right size. As with most project we feature on the blog, it is all about the supplies and following the directions to a "T". A cute craft to do with your kids, has anyone else tried this and have any tried and true advice for this? Let us know! Have a happy Wednesday everyone!

                                                                                                                                  -Emilee

Monday, August 6, 2012

Natural Amplifiers

Today is a great day. Why is it great? I woke up to a beautiful morning here, the light is perfect, the   temperature is cool, and the birds are singing. I have the best view off my front porch. Best Birthday morning ever. And...I work up before 8am all by myself with no alarm clock (and let me tell you, that's not normal), and I'm even showered and dressed already! What a red letter day. 
Told you I have a great view. 
I was already feeling chipper and happy, and then I sat down and opened up our email and the day got better. You guys are seriously awesome...we have some great Pinstrosities coming for you. First off though, I found this last night (on Pinterest, where else?) and had to share it with you. 

http://www.quickmeme.com/meme/3pbour/ 
I love quick thinkers. Bravo. 

So...we were sent a Pinstrosity that is a little out of the ordinary from what we normally get. Check this out. 

The Original Pin
I'm not quite sure which site this originated from because it's all over the humor sites. Pretty much if you Google Image search "Instant Speakers" it'll be there. 
Our submitter claims boredom for trying this one out. "It doesn't work, as far as I can tell.  However it would be useful if you like your music really loud.  And your Mom/Dad/Friend/etc. gets after you for blowing out your ear drums, you can try this.  The music is still really loud, and no one can complain of your ear drums being blown..."

So no, it doesn't really work like you expect at first. There is some amplification, but not like a stereo. But it's funny.

While sticking ear buds in your nose won't naturally amplify your music there are some things you can do to naturally amplify your music. 

http://lifehacker.com/5443923/from-the-tips-box-smartphone-speakers-wallet-holes-and-fire-starting/gallery/1 
http://www.realsimple.com/new-uses-for-old-things/iphone-speaker-00000000054283/index.html 
That actually works. My brother does it all the time. I would too if I had an iPhone or other such device...but I still live in the stone age...my phone doesn't even take pictures. 

http://zounz.com/bone-horn-speaker-amplifiers-for-ipad2
Ooh, that's handy. Hahahaha, I'm so funny. 

And then there's this cool little gizmo.
http://www.aetherapparel.com/blog/2012/06/27/eco-amp-by-eco-made/
So there you go. Headphones up the nose...no go...but these work!