


Nearly 2 years ago Kilani, a fabulous Pinstrosity reader and submitter, introduced us to the Iron Craft challenge. I was instantly intrigued. It sounded like something right up my alley!
It's a challenge where the only competition is against yourself. Every two weeks a new prompt is given and then you have that time frame to create something that fits the prompt. Be still my heart. It was perfect! I joined up right away.
Since then I think I have been able to hit between 1/3 and half of the challenges. This year though my goal is at least 10! I thought it would be great accountability to post up my attempts here on the blog. See, now you all know what my goal is, I've got to follow through. And, I know there will be Pinstrosities along the way. There have been a number of them in my past Iron Craft challenge attempts!
The first challenge of the year ends today with the very first 2016 Reveal Day where we all get to share our projects. This round's theme was centered around the 5th anniversary gifts of wood, silverware, or daisies.
Let me tell you, I was stumped. I couldn't think of anything to do that I just really loved! I wandered the craft aisle (singular here...sigh) and found a wood cut out in the shape of Arizona and bought that for $3, thinking I could do something fun with it. And came up with nothing until three days ago. But by that time I was out of time to get the other supplies for it (we're going to turn it into a fun clock for Cameron's biology classroom, which desperately needs some happiness and cheer in that dark brick room).
So I thought, "Well, I'll just scrap this first one and join in next round." But my head wouldn't let me truly give up. While browsing Pinterest I came across a really cute idea...and it was one I knew I could at least attempt without spending much.
 |
| via |
Supplies I used:
2 four-packs of dinner forks (well...1 and a half...but by accident...read on...)
Needle nose pliers
Pliers
Wooden drawing board (to protect my counter/kitchen island)
Propane Stove Burner
Hammer
Canvas (from stash)
Upholstery Fabric Sample (from stash)
E-6000 Glue
As I didn't know really if this would turn out or not, I decided to go with the cheapest forks Walmart had (as it was past closing time run and see if the thrift store had what I wanted) and picked up a pack of the $0.88 four-pack of forks during my grocery run last night. I totally went against my own advice from 2 1/2 years ago and bought stainless steel. But hey...when it's $0.88 it's worth a shot.

As soon as I got home and the groceries were put away, I dove into the project. I read a tutorial online for the general idea of making fork art and then just ran with it from there crossing my fingers that this would work.
Step one: Flatten the forks. I held the forks with the pliers and then held the top end in the burner flame until it was hot. How long? maybe 30 seconds?

The first one I didn't hold in real long, but the others I held in till they were glowing because it was must faster and easier to flatten that way. As soon as the fork was hot (and glowing) I removed it from the flame and, still holding the end with the pliers (DO NOT TOUCH THE FORK!!!) and laid the pronged end on the wooden art board. It burned the art board. This is why I used the art board...I didn't want tine marks on my island top. I then used the hammer to pound the tines and the head of the fork flat. The fire did darken the fork (as you can see below with the fork on the right), but I figured I could worry about that later if I didn't like the look).

Step 2: Bend the tines into shape. Easier said than done. With the first one I started on the outside and worked inwards, holding the pliers perpendicular to the tines (making a T). That didn't work so well and I ended up with various heights of bent tines. Cameron tried to help me fix it and even them out and one of the tines snapped off.

Without looking at the picture to see what I was going for he picked up the next fork to try and help and make up for breaking the other tine and started bending the tines down, but started bending at the bottom of the tine rather than the middle and we ended up with a weird fork. Poor guy. He just wanted to help, and I appreciated that! But, now we were down two forks as bending the tines back would weaken them and we'd probably have another broken fork.
So, since Walmart isn't that far away and I wanted this done that night I flew back down for another pack of $0.88 forks. If you want to try this and your end result needs 4 forks, you might just get you a 2nd pack as your just-in-case back up plan.
But anyway. We found the best way to get consistent bends and heights was to bend the tines from the top. So, (holding the fork with the pliers, not in your hand!!) heat up the tines of the fork again, and then with the needle nose pliers held parallel to the tine, bend it down pivoting at the point of the pliers. This gives you an even bend and you can control where each tine bends much easier!

And, if you want the design on the handle of the fork to show when you curve it around, make sure to bend the tines to the back of the fork!
The hardest one was the curved heart fork. That took some patience. Don't rush the curves! Heat as needed and just work it slowly. I found it worked best to start from the bottom up, that way I could get the curves starting at roughly the same height on either side.

Step 3: Bend the handle of the fork.
This was probably the hardest step of creating the fork art. It is thicker and doesn't bend as uniformly. Again, start by heating it up (I didn't ever get it glowing, but I know it was plenty hot because I accidently brushed my knuckle against one and have a nice blister now). Hold the fork with the needlenose pliers where you want the curve to start. Lay the head/tined end of the fork down on the board and then with the regular pliers bend the handle up. Often I would twist the two pliers in opposite directions to give more force to the bend. As it slowly bent and curved I would have to move the needlenose pliers further down the handle to get more of a curve and not just a V shaped bend.

And then I had my forks done! I really would have loved the look of them against a piece of barn wood, but by now it was dark and I didn't care to dig through the pile in the back yard for the right piece, clean it off, cut it to size with a hack saw, and then figure out how to mount the forks. So I went with plan B: dig through the craft supplies and see what I could come up with.
I found a narrow canvas I'd gotten at Walmart over a year ago and knew that would be great! It would be easy to hang on the wall and I could attach the forks with relative ease. Done.
Next I dug through my fabric stash to find something to color the canvas. I'm way into sage green and orange right now and trying to get more of that combo up in my house. As I got the cutest orange pot holders and dish cloths from my Mother in Law for Christmas, I dug until I found a sage green piece of upholstery fabric that was the perfect color and size to wrap around the canvas. It was like it was planned for this. I glued the fabric to the canvas and let it dry. Then I used E6000 glue to attach the forks to the fabric/canvas. I don't want those forks going anywhere and wasn't sure how hot glue would do.
And that was it! I hung up the canvas over my stove to hold my hot pads and I love it!


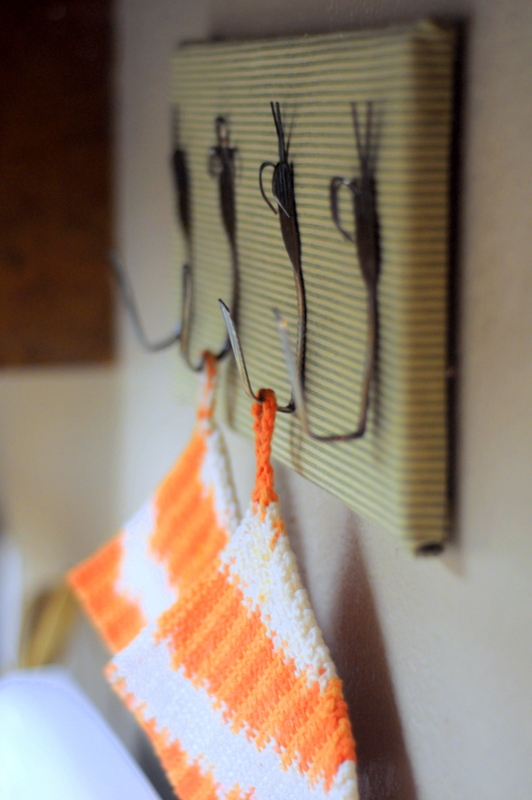
I really like how these turned out! They aren't completely uniform, but they aren't glaringly off either. Not too bad for last minute and running on the cheap. Even if I had needed to buy the canvas and a fat quarter of fabric this project would be less than $10! Hit the right store and it could be less than $5!
Want to see everyone else's 5th Anniversary Gift inspired projects? Check out the Flickr group here!

No comments:
Post a Comment
Note: Only a member of this blog may post a comment.