


I love Halloween. Okay, I know...I say that with every holiday. I just love holidays. So let me be more "pacific". I love creating costumes for Halloween. I get such a kick out of it. As Merle is due Nov. 1st, I have no idea if I'll be super duper pregnant on Halloween, or if I'll have a baby on Halloween. If I have Merle by Halloween, I'm pretty sure Halloween is going to slip by pretty unnoticed this year. If I'm still pregnant, maybe I'll go sit at the trunk-or-treat as Violet Beauregard (from Charlie and the Chocolate Factory) or something like that. Or Darth Pregger. We'll see what happens. But I'm not too worried about it at this point. Years past though we've tried to make our costumes ourselves and to even help out my siblings one year when my parents had to be out of town. For those of you already thinking on ideas and trying to figure out how to do costumes on the cheap, let me show you a few of the costumes we've come up with over the past few years (there is a Pinstrosity associated with all of this, I promise):

Wind blown and a Scandinavian Troll.
Mine didn't turn out so great...I tried to slick my hair straight back and it just ended up looking like a greasy mess. But I did have a scarf that I threaded a wire through so it would stick out straight behind me. For the trunk or treat I also had a newspaper wrapped around my leg.
Cameron's costume that year is still one of my favorites. We used an old shirt and an old pair of pants that were worn out (but you could find some at the thrift store). We shredded the edges, rubbed them in dirt and ashes in spots, and then added patches. You can't see it in the picture, but I made an awesome tail (wire wrapped in layers of fabric so that the tail stuck out) that pokes out of a patch in the back;it's my favorite part of that whole costume. The vest is just gunny-sacks from the local feed store (they just gave them too him). We did have to buy the wig and the nose (it's a witch's nose technically), but those were our entire purchases for that costume).

Captain Cam the Pirate
For this he just wore the troll pants (and tucked the tail in a pocket so it didn't show) and shirt, and then we added the rest. I found the jacket robe thing at the thrift store for $2 (it had rips in it, which we were fine with) and then found pirate buttons at one of the local fabric stores. I found the red fabric for the sash in my stash, and then we found a tutorial online to make the hat (it called for felt, but I had this faux cheapo leather stuff someone gave me so I used that). Simple, cheap, but way fun!

Em and Quorra
Last year I decided to go as Emilee for Halloween. While at her house one afternoon I quietly stashed some of her clothes and jewelry in my bag, hehehe. Then I just bought a can of that temporary hair color spray and the costume was complete. Cheap and super super fun. Emilee was Quorra that year and pulled it off great. You can see how she put the costume together in one of our previous Show-and-Tell Saturday posts.

The Girl With the Pearl Earring
I know...it's not exact. But a number of people where able to tell what I was going for (most were art students). I just rummaged through both mine and my mom's closet and fabric stashes and sorta pieced my outfit together, and then the frame was one I had bought at a thrift store for $4 a few years before.
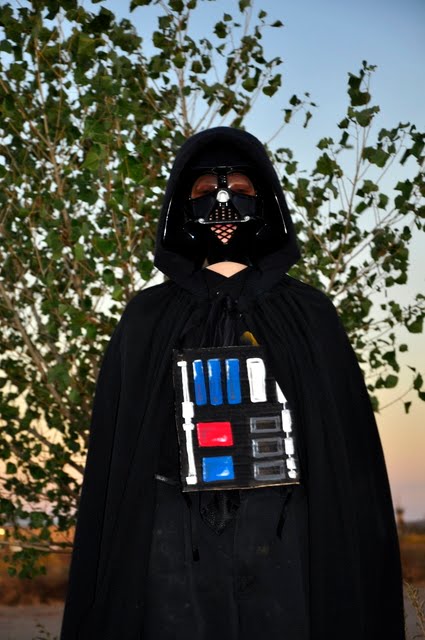
Darth Vader
He already had the mask, but I helped him get a cape put together and we painted cardboard to look like the panel on Darth Vader's suit.

Sir Bedevere from Monty Python and the Holy Grail
This costume for my brother took a black shirt and pants, a black belt, a sheet, a paper grocery bag, and a large piece of cardboard. We pulled up pictures online and painted the sheet and cardboard shield to look like Sir Bedevere's coat of arms, and then tried to fashion a helmet out of the paper bag to match Sir Bedevere's. He pulled this off awesomely and even talked and walked like him all night, it was hilarious.

Cartoon Character
This was my first attempt at anything like this. We didn't have a specific cartoon character in mind...just an anime sort of character I guess. I didn't have face paint, so we just used craft acrylics (which worked great and washed off with no problems). I'd do the eyes a little different if I did it again, but that wasn't bad for a first try. One thing though that would have helped to make her look more cartoonish would have been painting her lips, but I didn't think of that at the time. So...if you're wanting to be a cartoon character of some sort...don't forget the lips. In fact, there's a great pin about painting good cartoon lips floating around out there on Pinterest.
The Original Pin:
 |
| http://beautifyandcreatify.blogspot.com/2013/06/cartoon-lips.html |
Those really would have been perfect for my sister's cartoon costume. And it looks so easy! It is easy...but there are a few tricks and things to remember when doing this. Chelsee and her sister decided to try making these comic lips and sent us their results.
The Pinstrosity

Still not bad, but they don't quite have that comic book/cartoon character look they were going for. A few small tweaks though and they would have it spot on.
- First, exaggerate the shape of the lips. Most girls and women don't have the "perfectly" shaped cupid's bow (or tubercle). That's the center of your upper lip with the two points and the curve. I had to look up the "official" names for it. Most of us (including most of the women in magazines...they just have makeup artists and photoshop to enhance their features) have super defined peaks on our lips, but if you exaggerate the shape with both the base color and the black lip liner you can get that look. If you look in the original instructable, you can see that when they added the black liner they made the two peaks look closer together and more defined than they really are.
- Second, go thin on the black crease lines in the center of the lips. You do need the black crease lines there, but you'll want them to be thin and for there to be around 5 main lines on both the upper and lower lip. This can be hard if your pencil or paintbrush isn't very thin, I know. But if possible go for thin lines and at least 5 major lines on each lip.
- Third: make the white stand out. This is really what is going to make the lips pop. Add layer upon layer if you need to to get the white to show up really well.
- Fourth: Go Bold. Bright lip color. Dark black lines. Bright white lines.
Don't let yourself get frustrated with this. It may take a time or two to get it just right, but you can do it! Just don't rush it and don't fudge on the details...they are what make any painting pop.
So I hope this helped jump start your Halloween ideas...and if not, I hope it at least entertained you. Give DIY a try this Halloween. You don't have to go super fancy and be sewing for days...you can get a fun and super cheap costume with supplies you have on hand and cheap add-ons from the thrift store. And going that route you know you or your kid/spouse/sister/brother/dog/etc. will have a unique costume, rather than the same store bought one as the kid down the street (not that it's a competition...it's just super fun!).

Your Girl with the Pearl Earrings is my favorite! Your brother's Knight is my fav. for him. Great costumes!
ReplyDeleteThanks for the tip on cartoony lips. I've been seeing those on Pinterest.
Love all your ideas! I finally finished my daughter's birthday dress (from April!), now it's time to start working on Halloween =) Aurora this year. I sew her a costume every year, we're expecting another princess in December, so we'll see if I can keep up with that with two little girls!
ReplyDeleteI love all your costumes, they are fantastic! My mom always made our costumes growing up and I've kept up that tradition with my son, both for Halloween and when we occasionally go to conventions. Last year my son was Mario and I just bought jean overalls, a red turtle neck, brown work boots, white gloves and an official Mario hat since I didn't have time to make one myself. We even had a stuffed Yoshi backpack laying around that he wore on his back, it was super cute and he got so many compliments on it. Much better and cheaper than the store bought version I had seen and he had asked for. :D Most of what I bought was from thrift stores and I agree that they are one of the best resources for costuming.
ReplyDeleteGreat costumes! I too love halloween dress up. When you said "more white" in step three of the pinstrosity, I couldn't figure out what you were talking about. In the lip tutorial the white makes the lips look like gloss and that's what I thought it was. Amazing!!
ReplyDeleteHere is a great you tube video about creating anime eyes. This gal does an awesome job.
http://www.youtube.com/watch?v=dLvSSyTgmsM
Hint for the wind-blown hair... Back in the 80's we had "big Hair" and the hairspray had to keep up with it. Next time you want to do that look,lay down on a table, on your back, with your head off the edge. Have someone brush your hair toward the floor, and then use the strongest hair spray you can find, and spray it to within a HALF inch of its' life.
ReplyDeleteNope, NOT HAIR SPRAY! Had two girls in dance. Knox gelatin on the hair is like gluing it down, our out. Washes out! LOL
ReplyDelete