


So...those of you who have been with us from the beginning might remember Emilee's post about making the yarn balls. Let me give you a refresher:
Em and Chip had craft night...and this was what happened:
 |
| http://pinstrosity.blogspot.com/2012/02/bunch-of-hot-air.html |
This was one of the projects that got us started with this site, and now we have an awesome submission from Amy with tips on what to do and what NOT to do. These yarn balloons can be tricky and tedious, but they can be done. Let us give you Amy's story:
"I hate yarn balls now. But since we moved into a new home where my girls each got their own room, I was determined to make their room awesome. Enter in my youngest 11 year old seeing these huge yarn balls and wanting them for her room."
"Long story short .. I will NEVER make these again! They turned out fine -- but took SO stinking long to make and was a complete, utter headache! I used two different recipes to make two batches (at different times). The recipe calling just for glue & water did not work. After 12 hours, I knew my so called yarn ball would deflate as soon as I popped the balloon inside. So, I had to resort to using cornstarch, glue & water to make it work (hint.... paint the stuff onto my yarn balloon and wait for it to harden)."
"While my daughter & her friends LOVE the outcome -- I was determined to show everyone what NOT to do when making yarn balls!"

"I saw this idea at a friend's house while doing their newborn shoot. She said it was so easy, and it looked so amazing! I thought "ooh! I could do this to Maddie's room!" So I scoured Pinterest, blogs and figured out what formula I should use. For example, liquid starch .. elmer's glue ... cornstarch .. and the list goes on."
"Here is my list of what not to do when making yarn balls."
"1) First of all .... don't make them. I'm not kidding. They may look incredibly easy, but they're not. Sure yarn is cheap, balloons are cheap, and so is glue. Do not be swayed! Stay away from these balls! Go buy japanese lanterns instead!"
"2) If you decide you have to make these yarn balls, then don't use just elmer's glue & water. I tried this on my last three balls I made, and it did not work. The first three balls I made (I ran out of mixture), I used a combination of Elmer's glue, cornstarch & water. I think the ratio is like 4 oz glue, 1/2 c cornstarch and 1/4 c of water. When I realized that my yarn was not hardening up like the first batch did -- I had to run out to get even MORE glue, and did my mixture and paint it on while it was wrapped around the balloon. It did the trick, and hardened up after drying. Also note that you'll use even more glue than you think you will use. Stock up for this project."
"3) Two people really need to be doing this -- one to dip the yarn in the mixture and one to wrap it around the balloon. I read somewhere someone said to place vaseline around the balloon, but I didn't do this. If I did, maybe it would have prevented a lot of frustration after I popped the balloon. I'll show you why in a second.... If it doesn't prevent what I'm about to show you, then I have no clue why they put vaseline around the balloons?"
"4) Again, don't make these yarn balls. They are a headache, I'll tell you! I'm totally doing ya a favor!"
"5) After you pop the balloons -- they will still stick to the yarn, and there will be lots of dried mixture that stays on the yarn. What a pain in the butt. I gave up after a few hours of scraping this off with a skewer -- I'm hoping no one take a close look when it's in her room."

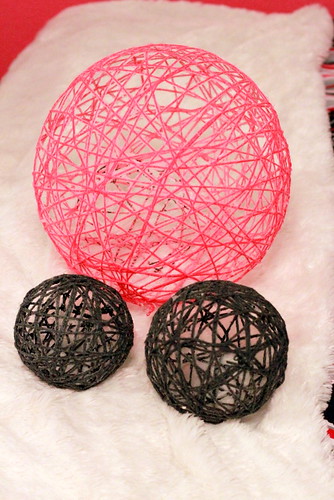
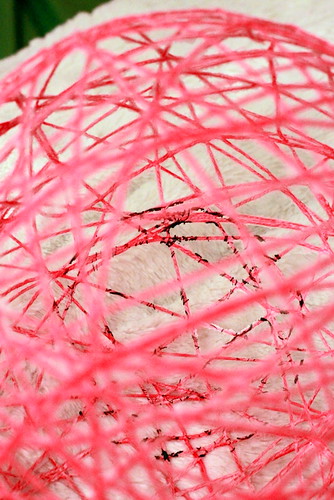
"6) I used a punch balloon for my large pink balloon -- however, do not buy a punch balloon that has ink on it ... like a princess. That transferred onto my yarn. *%#)@#!"
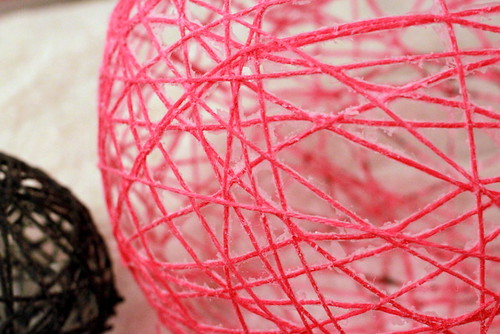
"7) I bought two different types of yarn. The thicker yarn was cheaper -- and it was harder to deal with and it doesn't look as nice as the thinner yard does (the pink). So, splurge a bit more and get the thinner yarn."

"ouch ... sorry for the noise in that picture! High ISO = noise in my pictures!"
"8) When hanging the yarn balls in the ceiling over your daughter's bed, don't drop a tack on her bed. 'Nuf said. :/"
"and finally"
"9) Are you really sure you want to make these yarn balls??"

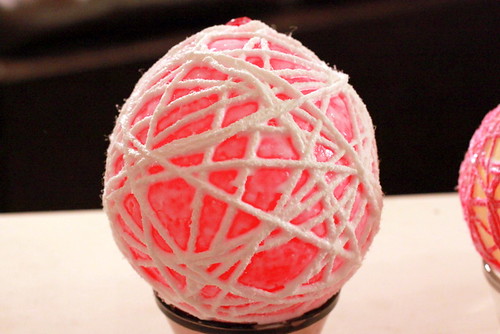
"My daughter is totally worth it -- but man alive I wish I did something else! (can you see the black ink in my large pink ball?!! FAIL!)"
So...I don't think Amy enjoyed making these...just an inkling. ;) But, she does give some great tips on how to get good results when making these for those of us who will end up disregarding her instructions of not making these. Thanks Amy for the tips and the humor!

I was lured in by the yarn balls too. They were a decoration for my sister's wedding shower. There were MANY fails before I had enough to complete the centerpiece.
ReplyDeleteThe cornstarch is essential. Also the vaseline helps the dried yarn not stick to the balloon BUT, when the yarn is wet doesn't stick either, which makes wrapping the balloon super difficult.
Check out my blog for the whole story and finished product.
Tell Amy I'm good, I'm definitely not making those balls! She convinced me!
ReplyDeleteThe only balloon craft I have attempted is the button bowl. It took literally days to adhere each new row b/c they kept sliding down the edge of the balloon which I had to hold for like 2 hours and keep sliding the button into place till the glued dried enough to stick it. I wanted to try this but now maybe I won't bother!
ReplyDeleteWe use to make these back when I was in Cub Scouts. I thought we just used liquid starch, like the kind you would use to iron clothes. The biggest difference though was that we used string instead of yarn. To me, while yarn would be in pretty colors, it would be so fuzzy. I think that is why there was all the excess glue around the "edges" on the pinner. Of course when we made these they were more like the size of a soft ball, they were used as Christmas ornaments. They lasted for years, but finally got squished over time. We might have made some out of green and red crochet thread too, that seems familiar.
ReplyDeleteI've done this with a mixture of book paste (heated flour, water and salt) and white glue and had very little problem. Letting the air out of the balloons slowly helps quite a bit as does using thick crochet thread (you still get the pretty colors, but don't get the weird excess fuzziness). I've always thought it might be fun to do with baker's twine.
ReplyDeleteFirst up: I love this colour scheme! Awesome!
ReplyDeleteSecondly, I made these for my wedding to go on the tables as center pieces. They were a BIG project, but I didn't find them terrible difficult. I must have found a good tutorial to follow :)
- I used glue, cornstarch and water.
- I also used vaseline.
- When winding the string around the balloon, don't wrap it tightly as the string will slide off.
- Put down paper/plastic bags to keep the mess contained.
- After stringing up a ball, I used more string to hang them from my clothes horse and left them to dry a full 24hrs.
- After they'd dried, the white ones weren't white enough and the yellow ones weren't yellow enough, so we spray painted them. This was a very good idea as the colours were bolder and there was no off-white-string peeking through.
Despite curious people wondering if the balls could be crushed (which they could), they held up well and were reused for a pink + yellow themed baby shower the following year. But it drizzled, they got wet and collapsed.
I really like the big one! I've been thinking about what to do for decorating on the cheap around the house. I might need to bust out my supplies again! :)
I totally did this same exact one last year for my sons easter party......yeah..took forever...horribly messy...don't even try it!! mine looked a lot like your first pic. As Taylor Swift would say...NEVER EVER!
ReplyDeleteWe made these for my goddaughter's room when she was a baby.. instead of yarn we used string, and also used liquid starch.. It took us a few hours one afternoon to make the 13-ish in different sizes... Once the balloons were popped and we let them dry for a day, we spray painted them in pink, purple, and teal. They were actually really easy and fun.. we even did it again a few years later and she got to make her own home made Christmas ornaments (we sprayed them with glitter paint, which was a total riot with a 4 year old!)
ReplyDeleteActually, they're really easy. Messy, but easy. You got *bad* instructions. :( The trick is gallon ziplocks, and Stiffy. Yep, there's a craft product called Stiffy (it's a fabric stiffener).
ReplyDelete1. Unwind desired length of yarn/string into ziplock.
2. Pour an entire (large)bottle of Stiffy in with yarn.
3. Googe it around so the yarn is totally totally saturated.
4. Blow up balloon. You are correct- unimprinted is best.
5. Wrap string around balloon as seen, removing as much excess Stiffy as you can as you go (this eliminates the weird edges)
6. Let dry completely.
7. Pop balloon and remove with whatever means necessisay!!
Good luck!!
I agree!! I made these for my daughter's first birthday party, thinking, those look so easy, but they were the biggest pain in the butt, and it took forever for them to dry. They sure did look pretty, like yours do, but I agree with the recommendation not to bother! There are so many other things you could do that would give you more bang for your precious time.
ReplyDeleteI made one of these last spring, and while it did take an afternoon, it did turn out just fine. I used Elmer's and water (I did have to make up a lot), and I didn't just wind the yarn from the ball, but I cut it into varied lengths. I let much of the adhesive run off the yarn strands before applying them to the balloon, and I tried to make it so each piece anchored another onto it and so forth. I rotated the balloon, so as to allow one spot to start drying while I worked on another. At the end, for extra measure because I worried it would collapse, I sprayed some hair spray all over to help it stay together. it worked!
ReplyDeleteI made a few of these, and it took some trial and error, but I managed to get them to form just fine. I used the cheapest elmers-type glue I could find, as well as water. I soaked the yarn in the glue mix, and then squeezed off the excess as I applied it to the balloon. After I formed the yarn balls, I hung them on my porch to dry. I mixed diluted some glue with enough water to make it go through a spray bottle, and i sprayed the balloons with this mix every few hours, and let them dry again. Before I popped the balloon, I poked the balloon away from the strings so that I could see if it was sticking anywhere. The key is to let them dry completely, otherwise they will collapse when you pop the balloon. Mine hold up just fine - you can crush them a little bit ,and then pop them out into the right shape again.
ReplyDeleteYou can also make these using the same simple syrup that bakers use to keep cakes moist. I made an Easter egg-shaped yarn ball when I was little, and it lasted for years with just sugar and water. No glue.
ReplyDeleteI tried this last Fall. I used Mod Podge. Horrible! I would never do it again. Another yarn one is the wrap a vase/ball etc in jute. You know how long that takes?
ReplyDeleteI have done this a couple of times now. Don't use cornstarch or glue- pain in the ass! Instead use epsom salts and water. Boil any amount of water, and gradually add the same amount of salt until it has all dissolved. Pour it into a bowl or container and wait until it is not so hot it destroys your hands, lay out a towel, and ring out your yarn before laying in on the balloon. After 24 hours pop the balloon- no need to use vasoline or anything, it will just shrivel away. You can use any shape for this project as along as you wrap parchment paper around your object.
ReplyDeleteMy mom used to have us make these with sugar water and string. Problem: they drip so we had to hang them to dry and put a pan underneath to catch the sugary drippings. It worked though and I don't remember any sticking to the balloon. We just popped them and hung some mistletoe in the middle.
ReplyDeleteI tried these balls.But when i popped the balloons after keeping them to dry with the yarn on for 24 hours.But the entire lantern shrivelled up and lost its shape.The threads had stuck to the balloon so much that the balloon on popping did not pop completely and was still stuck to many parts of the lanterns from inside.It has become like a birds nest and lost its shape.Can you suggest me something so that i can successfully complete my lantern and so that it does not lose its round shape even after popping the balloon.Please as fast as possible.It is urgent
ReplyDelete