Saturday, August 4, 2012

Dishwasher Throw-Up

One day in our second little apartment I heard a weird gurgling noise coming from the kitchen. I ran in and found my dishwasher had thrown up all over my kitchen floor. This was the first run through with the new dishwasher detergent, but I had added the amount the instructions directed so I figured something was up with the machine. The apartment manager thought my description of the dishwasher throwing up was hilarious and called the maintenance guys in right away (I guess humor gets you good service?). After reassuring them multiple times that I didn't add more soap than needed (or the wrong soap) to the dishwasher, they pulled it apart to see what was up. Apparently the tenants before us tried to hold a Barbie sauna party in the dishwasher because they found a barbie arm and scalp lodged in the drain, and it had caught enough soap during previous runs that the new soap was able to react with it and produce the bubbly spew of dishwasher throw-up. 

Why do I tell you all this? Because it's still funny to me and to let Ellen know, "I feel your pain." How did Ellen's come about? Well let's start at the beginning. A very good place to start. When we read we begin with A-B-C, when we Pinterest we begin with "That's for me!" Ok, enough Sound of Music. We've all seen this pin, right? 

The Original Pin
http://www.onegoodthingbyjillee.com/2012/02/how-to-clean-your-dishwasher.html 
Cleaning the dishwasher with vinegar (and a later cycle of baking soda). I tried it once upon a time...made the surfaces pretty but it didn't make the machine quit spitting food chunks on the dishes (which I didn't figure it would as it's only really a surface cleaner, but it was worth a shot). 
http://www.onegoodthingbyjillee.com/2012/02/how-to-clean-your-dishwasher.html 

Ellen told us, "I'm not sure what happened - I think maybe my (admittedly crappy) dishwasher just hates vinegar, because when I tried the vinegar as Jet Dry trick a while back it caused a stain. Anyway, I tried cleaning the dishwasher with vinegar as instructed in this pin and when I happened to walk back into the kitchen about 15 minutes into the wash cycle, this is what I found. Oops."

The Pinstrosity

See, her dishwasher threw up too! But if you look on the bright side, mopping the floor was easy. 

Vinegar doesn't foam up like that by itself, so I have a few ideas as to what went wrong but having not been there and without getting into the dishwasher I can't be certain. So here are some theories, and they're worth everything you're paying for them. 

  • The original instructions say to run the vinegar through first, and then the baking soda. When I tried it I almost missed the line that says to run them through separately, but luckily I caught it in time. Vinegar and Baking Soda will react in foam, and if you run the two cycles through together you will get foam throw-up. That's is NOT what happened here, Ellen ran them through separately following the directions. I'm just saying it could happen. 
  • This may be a similar case to mine...not necessarily the Barbie arm and scalp, but if there was enough residual detergent in the dishwasher the vinegar could have reacted with it causing the spew. 
Other than that, I honestly am stumped. There was something in the dishwasher that the vinegar reacted with, but all I can do at this point is guess. 

To make the original pin work, make sure to try and clean out any chunks from the drain (as the directions suggest) and to run the vinegar and baking soda cycles through separately. This isn't the best pin for getting chunks out of the dishwasher's system (we still had chunks of food being thrown up on our dishes...sometimes the dishes were dirtier coming out than they were going in), but it is a great pin for those of us who don't really want to get on our hands and knees and climb into the dishwasher to try and scrub it down by hand. We tried a number of specific dishwasher cleaners and we even tried taking the machine apart and had no luck until we tried the Lemon Shine Machine Cleaner. If you're having troubles, this stuff is awesome and comes at a great price. 

And don't forget to join The Pinstrosity Challenge!


Friday, August 3, 2012

Droopy Earring Holder

Well men, this post isn't going to be as exciting for you today (unless you're looking for a gift to make for your lady). I've seen many different types of earring holders, but I haven't really liked the look of them. It's just hard to dress up plastic canvas, which is what I've seen a lot of. The earring holder we were sent can be made to be so cute and it can be done to look modern or vintage. Check it out. 

The Original Pin
http://hisforhandmade.blogspot.com/2010/08/lace-earring-holder-tutorial.html 
Isn't that great? And the tutorial on how to make it is excellent, take a look. Bridget found this, made it, blogged it, and then sent it our way. Here are her results:

The Pinstrosity
http://thoughtsofpockets.blogspot.com/2012/07/another-successful-pinterest-project.html
Not bad. But she did have a few hiccups. The original creator pulled thrift store finds and her project scraps together for this and was able to do the project for only $3, but if you don't have the scraps on hand, or if you have a specific look you're going for (as Bridget did), you can buy the supplies for around $8. Additionally, if you look at the two pictures, the original and Bridget's, you can see what I mean by being able to make it look vintage or modern. Bridget's black theme pulled together a more modern look while the original with the colors and styles of lace give a more vintage theme. 

The main hiccup Bridget had was that she didn't have the tape the instructions called for. She says, "I didn't have double-sided tape, any sort of glue, or even a stapler lying around my apartment.  And I was just too lazy and impatient to leave the apartment to find some.  Sooo I basically sewed the fabric to the cardboard (I should probably replace the needle in my machine now...) and called it good. The fabric isn't stretched as tight on the cardboard or in the frame as it could be." While the project still turned out usable and fine, she said it would definitely be better if the fabric was pulled nice and taut for looks and to help hold it all in place better. Using an adhesive, be it tape or glue, will definitely help to get your fabric nice and tight. 

She also gives a great suggestion for the types of lace to use: "Use a variety of laces and trims: the longer, thicker trims work really well for long, dangly earrings, while the billowy lacey trims seem to be most ideal for studs."


Thursday, August 2, 2012

Ivory Soap Experiment- A Total Wash Out

Em here. So we got this awesome entry from Trina, maybe you have seen it, turning Ivory Soap bars into moon sand. What the awesome, yes please!!! However it, as many crafts and DIY projects are, is a finicky mistress and cannot always be trusted. Check it out!

The Original

The blog explains that this is supposed to be a fun experiment with your kids. They call it a "Soap Cloud", you can play with it, smoosh it to a billion pieces, or smoosh it and then make it into tiny soap bars (complete with fun colors). This stuff really does rock! Anyway, Trina and her kids did this and had some disappointing results.

The Pinstrosity

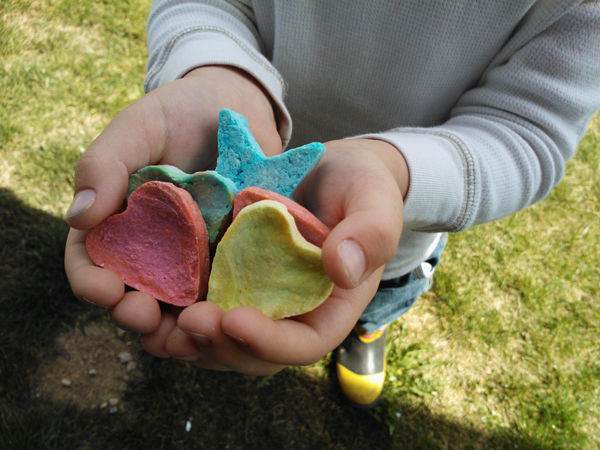
Trina tells her tale of everything going according to plan, they microwaved it for the appropriate time (see the original blog for full detailed instructions), took it out to play with and mold into shapes, and that is when everything literally fell apart. They pulled it out and smooshed it, but it didn't do anything but fall apart. Her kids played with it for maybe 2 minutes and had had their fill she said. Bummer city. The directions say to smoosh it, then put it into a food processor which makes it fine enough to be made into tiny bath soaps, seen here:

Trina missed that line, and ended up with lots of crumbly soap, a house that smelled oh so fresh, (and not necessarily in a good way, she said the smell lingered and was STRONG, headache STRONG).
However if done properly, these would make great tub crayons! With the simple adjustment of making sure that after it is microwaved it is put in the food processor, you can add color (food coloring), and then place them in cookie cutters and let them sit and dry in order to harden for just a few days, and voila!! Tub magic!!

Let us know how this one pans out. Did your kids like it? Was the smell worth the adventure? We love your feedback so tell us your tales! Happy Thursday!!

                                               -Emilee

T-Shirt Rug? More like T-Shirt Ugh!

Every now and then we get a Pinstrosity Submission that is quite well written and so we just let them do the talking. Today's is one of those. I give you Deirdre and the T-Shirt Ugh Rug. 

Like many pinners, when inspiration strikes, I must act. Crafting has been a big part of my life since I was a child; I haunt the DIY & Crafts category like most women my age spam pics from the Weddings category. I've made some great things thanks to Pinterest, like coasters out of paint swatches and a vest out of an extra-large T-shirt. But today, I'm going to talk about an abomination. Something that I thought would be super cute, but only ended up being really ugly. 

The craft was a circular rug made out of t-shirts using a hula hoop as a loom. Here's what I expected:


The Original Pin
http://familyfun.go.com/crafts/hula-hoop-rug-995304/

And this is what I got:

The Pinstrosity

The Chapstick is there to show the size relative to it. Does that look like a rug to you? More like a too tiny dinner table centerpiece or a too large potholder. The directions called for a 33" hula hoop. Upon inspection, the one that I had was only 22" (and it was the biggest one at Walmart. Go figure). I also used the bottom hems of the shirts which made parts of it look extra bulky. You can see in the picture that one of my central yellow pieces was a hem. The directions also said to use a dozen t-shirts, where I only had to use four (though this may be due to the small size of my hula hoop). So now I have eight old t-shirts, boys large from Goodwill that will probably go towards another craft or gather dust at the bottom of my closet. I'm banking on the latter.

I was hoping for this to be a birthday present for my mom. Her bathroom is all decorated in blues and greens-- but this looks way too shabby and looks like a child's craft from the 70s.

Also, to any pinners who have children (I'm 22 years old, a recent college graduate, and spend little time with children): What's up with hula hoops these days? All the ones at Walmart sounded like they had water in them. What happened to the ones with beans in them?

Hey, yeah! Where are the bean hula hoops? Oh well. Another thing to add to the "My childhood was awesome, these poor kids now are missing out" list. Anyway...let's take a look at what we can do to turn this from and Ugh to a Rug. 

  • This is one project where size does matter. You really do need a large hula hoop. The instructions at the end say to leave at least 8 inches between your rug and the hula hoop, and if you're already using the 33" hoop, that means your rug is only going to be 17" wide (because you're taking 8" off each side, not 8" off total). That's just under a foot and a half. Now I know the rug in the tutorial looks bigger than that, but you have to remember that the girl holding it is not very big, and she is sitting on a chair. I bet her rug is 2' wide. So this project doesn't make a very large rug to begin with, but then if you use a smaller hula hoop it is really going to start being tiny. 
  • Another thing to watch while making this is how tightly you weave the t-shirts. The tutorial says, "As you work, push the weft material toward the center of the hoop and keep it just snug. If you pull the weft tight, the rug will develop lumps or bends." So you want your t-shirt strips snug, but you don't want to pull them tight. The first time I tried anything like this as a kid I pulled them nice and tight and ended up with a lumpy bowl. So get the strips woven in the snugly, but don't pull them tight. 
                        

Wednesday, August 1, 2012

S'more Please

"You're killing me Smalls!" (Please tell me you can name that movie). 

Anyway, Marquette here with a great pin I know you'll want s'more of. GIANT S'more Stuffed Cookies!

The Original Pin
http://smells-like-home.com/2012/05/giant-smores-stuffed-chocolate-chip-cookies/
Who could resist? Betsy couldn't. Betsy tried this out and then sent it in to us. 

The Pinstrosity

Betsy did a self diagnoses and told us, "I think it failed because we used pre-made dough from the grocery store - also we let it sit out for like 15 min before we baked

them.....Major fail! Um...also I should have mentioned we had to use chocolate chips in

place of the chocolate bar inside the s'more because we didn't have any
chocolate bars & were too lazy to go to the store...lol."

Without going to the original pin I guessed right there what the problem was and how to fix it. 

1. Too often people try substituting and short-cutting on Pinterest projects. The best bet on your first run through of anything is to do it the way the instructions direct first, and then on a later try you can start tweaking the project and using different supplies/ingredients. Store bought Chocolate Cookie Dough is yummy, but I have noticed it does not tend to produce as thick of cookies and the baking time between perfect and hard as a brick is about 30 seconds different. The stuffed cookie recipes do better with a homemade thick dough. 

2. And, chocolate bars would have definitely worked better to get the full s'more effect, but I do understand the "I don't want to go to the store right now" feeling and I probably would have tried the same thing. With a thicker dough to hold everything in place the chocolate chips might have worked better.