Wednesday, September 21, 2016

DIY Phases of the Moon Shirts!

So if you haven't seen our DIY Geode Cake post, you can find that here! I mention it because while my cakes were cooking Manny (my New Mexico BFF) and I made shirts! They were quick, easy and SUPER CUTE!
The whole project cost me $7.88, what?!

I saw this pin a couple months ago and have been saving it for just this occasion!

Unfortunately for us the instructions were in Russian, and seeing as I don't speak Russian we just went off the picture, it seemed pretty straight forward. *Famous last words*

We had our shirts, our paint, some paper, scissors, tape, a pencil, plastic grocery bags, a circle to go off of, and little round sponge brushes.

The hardest part of this project was making the circles even in terms of how far apart they were from each other. We used two pieces of paper taped together and the bottom of a glass as the stencil.

We placed grocery bags inside the shirts to keep the paint from bleeding, we used straight white acrylic craft paint.  
After cutting out or circles we taped the stencil to the shirt and started to paint! We mostly went off of the picture, but there is a little bit of artisticness to it. It only took about 20-25 minutes in all and I seriously freaking love this shirt!
We did 4 circles down, 4 circles across. At one point in my life I knew all of the phases of the moon, but that "phase" in my life has come and gone obviously (I know Marquette would know this one!) I have no idea how many phases there are, but the 4x4 method is very aesthetically pleasing, so we went with that.


One thing I would suggest is to make sure you keep your paint within the parameters of your stencil or messy paint gets where it shouldn't. I missed and have two tiny white spots that aren't moon, but I just Sharpie markered over them and we're good to go.


We let them dry for about 2 hours and they were ready to wear!

Now we have BFF t-shirts and we are over the moon excited about them! Oh! I kid, I kid.


This would be a great idea for a birthday party, craft night or quick gift. Super super easy and they look really nice!

Happy Hump Day!!


Monday, September 19, 2016

DIY Geode Cake

Pinstrosipeeps! 
I literally have THE coolest friends. They are so good about sending me pictures that remind them of me, and most of the time they are funny and cute,but every once in a while they speak to my soul. Marquette sent me a Instagram a few weeks back that was like my soul in a cake. And I just HAD to have it. 
Fast forward to one of my other BFF's coming to visit, and we decide that we are going to tackle said project even though it may be way over our head. We fear no fail. 

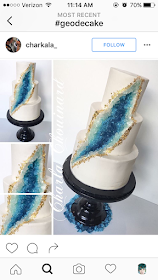
This is what we decided we wanted to recreate:
Photo and Cake Credit: Charla Chouinard Instgram handle: charkala_
 
Fun fact of the day...I didn't even realize until right this very instant that this was a girl I went to high school with?! What?! Small world! This isn't the first first picture we saw of Geode cakes, but it pulled up when I did a search and was similar colors and super pretty, this was just an idea Marquette had seen and showed me on google when she came to visit. When I did the search of images for this blog post a few days ago, this is one of the first ones that popped up and just happens to be made by someone I know!
 
 
Isn't that fantastic?! So beautiful!  So I went to work, I called around town looking for gold leafing, I went to Michael's and Hobby Lobby looking for edible gold leafing and  priced some of their baking tools, and I even called some places in Salt Lake.
Manny my New Mexico BFF came and we got to work! We went to all our stores to pick everything up, we even went to three different stores to get all the rock candy we needed for this!
As for the gold leafing...I called 5 stores and went to 3 different stores and only found ONE place that had edible gold leafing. Here's the kicker...it was $75.00 for 3 ounces!! WHAT?! So...we went with a gold luster dust and gold faux leafing alternative that we found at Hobby Lobby for about $3 a piece instead. Apparently gold leafing is really only for super fancy occasions...because at my house Thursdays just aren't good enough for $75 cake décor.
 
Here's our stash:


We bought rock candy in light blue, dark blue, white and purple. They were SO yummy, of course we sneaked some during the process!
 
We also had blue and white fondant, generic frosting and rainbow chip cake, and then some of the supplies for the cake itself.
 
The fondant was probably the hardest part, we followed the directions and rolled it out, kneaded it and then we roped the two colors together to create a marbled affect when it is all rolled out.
We baked the cakes beforehand and crumb coated them and then put them in the freezer so they would be easier to work with and not crumble-y. When we had the fondant where we wanted it, we pulled the cakes out of the freezer and threw it on there! Getting a smooth coat on the cake was really difficult. Did I mention this is both of our first foray's into fondant?! Because it was.

 
We used powdered sugar to keep the fondant manageable, you can also use corn starch.
 
Then came the really fun part, decorating!
 
We pulled all the rock candy off the sticks and put them in ziplock baggies and then used the rolling pin to crush them to a more manageable size. The air smelled sweet during the beating part lol
 
We cut out our desired geode cave shape with a small knife, and then covered it in frosting before placing our rock candy.


Lastly we put our "gold leafing" on the cake and threw some luster dust on there for good measure.


Here is our final result!


Not too shabby for our first fondant cake EVER. It's not perfect by any means, and the more I look at it, the more I tend to find faults, but it's a cake not a Saint, so who cares if it isn't perfect?! It was REALLY sweet, but it was good and it was just really fun getting to do this project with a friend!
Are any of you mavericks with fondant?! What are your secrets?! Share below!
 
Happy Monday all!


Wednesday, September 14, 2016

Prickly Pear Cupcakes

In my plan for the week, I actually didn't intend to make Prickly Pear cupcakes, or much by way of desserts. But things change. 

For a few weeks I'd casually mention to Darrow that if he'd use the toilet I'd make him any treat he wanted. He'd say "Nope!" or "No, thank you." and we'd leave it at that. Well yesterday it happened and he promptly remembered the promise of treats and cupcakes were the prize of choice. So I got to looking for Prickly Pear cupcakes (because he doesn't have a preference yet). 

I almost just did a substitute in a cake mix like I did for the waffles, but wanted to find something that might have a stronger Prickly Pear flavor. Through Pinterest I found a great recipe by Cupcake Project. It looked like it'd have good flavor and would be very doable. And it was! It was easy to put together and baked up beautifully. I got 23 cupcakes out of my batch. Weird. But oh well. 

But then it came time for the frosting. I didn't wan to make the prickly pear lemon bars to blend into the frosting that she had, and it sounded like there wouldn't be much prickly pear flavor, so I went on the hunt for a frosting that would do the flavor justice. 

In my searching, I remembered reading about a flour frosting, so I searched it and found an easy recipe quickly. It involved combining flour and milk, and cooking until you get a thick batter before adding vanilla, butter, and sugar. With the recipe calling for 2 cups of milk, I got curious if I could substitute the prickly pear juice for the milk in the recipe. I wanted to use as much juice as possible in the recipe, and this one fit that bill. I figured it was worth a try!

And it worked!! That was the best frosting I've ever had. Light, but so totally yummy! The substitution worked perfectly! I only did a half batch because a full batch covered 3 dozen cupcakes and I didn't need that much frosting.

Now, I'm not an expert frosting applicator. So my frosting looks meh...but we weren't going for pretty, we were going for yummy! Taste before beauty!


So they baked fine, and the frosting held together. But if it doesn't taste good, what's the point?


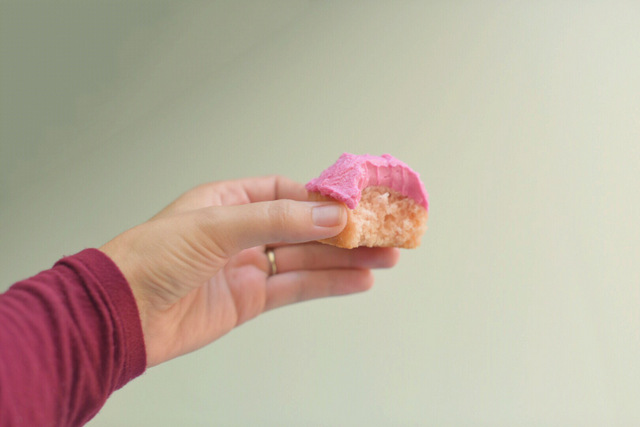
Luckily these taste great! There is a subtle fruity flavor without being truly fruity. Great description there, huh? The frosting was light, fluffy, and had the perfect flavor without tasting like sugar! It was sweet, but not overwhelmingly so like many frostings. The cupcake was moist and yummy while being fluffy and cohesive. These are definitely some new favorites!!

So there it is! Prickly Pear recipe test #2 done! And it was a success! 


Tuesday, September 13, 2016

Prickly Pear Waffles

The first food I decided to try out for Prickly Pear week was Prickly Pear Waffles! I did a quick search online for a recipe and didn't see one come up, so I decided to just go for it and see how it came out! 

I thought about going completely from scratch, but then I decided with the lazy and easy route. Krusteaz mix for the win!! We actually really like the Krusteaz mix pretty good. It's yummy on its own and easy to tweak if you want something more. 

So I did the basic recipe, just substituting Prickly Pear juice for the water. 


It mixed up nicely and looked like normal batter, only prettier because of the natural color of the prickly pear!

But we all know that something can look good and taste bad. And we still had the cooking to do. I was worried that somehow the juice would change the consistency and that it'd crumble or stick to the waffle iron bad.

It was a slightly thicker batter than normal but not by much so I left it thicker, scooped some onto the waffled iron, and crossed my fingers.

This is where I left you all off on the Instagram Story. What's your guess...fail or yummy goodness?


Did you guess? 


Okay...here were the results:


Beautiful pink waffles that held together perfectly (better than normal waffles in fact)! They were a little more dense than a normal waffle, but I like that. I served Darrow's to him with regular maple syrup and that tasted good. The waffles sucked up all the syrup faster than normal. If you've had a whole wheat pancake or waffle, think of that syrup suction action! It was the same.

The flavor of the waffle wasn't as strong as I'd hoped, but it was definitely different from a normal waffle. It had a slightly sweet after flavor, and an almost watermelony taste to it. That's the closest I can describe it. But it was good! After that bite of Darrow's I knew I needed to get me a plate made up!

But then I got to thinking. This needed a different flavor of syrup to complement it better. Something less sweet and more subtle. So I found a vanilla pudding sauce by This Grandma is Fun on Pinterest (where else!) and whipped that up. I discovered I didn't have any corn starch though, so took a risk and substituted flour. It worked! And it was the PERFECT flavor combination with the prickly pear waffle. Yummy yummy!!

Prickly Pear Recipe #1: Success!! We will be having these again! P


Monday, September 12, 2016

How to Juice Prickly Pear Cactus Fruit

If you saw our Instagram story today, you know that this week is devoted to Prickly Pears! All across the Southwest the Prickly Pear cactus fruit are either ripe or very rapidly getting there and it's time to harvest and enjoy!

I have quite a few jars of prickly pear juice that I am going to use to make meals with this week. I have sweet recipes, savory recipes, and experiments I want to try out. Prickly Pear is one of my very favorite flavors and my favorite cactus. We've read different processes to getting prickly pear juice from the fruit, worked at it and combined ideas, and have come up with our process that we feel yields the best juice. What makes this the best juice? The intense color and the AMAZING flavor!

Too often we get prickly pear products from restaurants or stores that leave us feeling a little disappointed. It's basically just the prickly pear coloring with a smidgen of flavor. But nothing true to the fruit really. If we're going to eat Prickly Pear, we want it to taste like prickly pear! Because the flavor is like nothing else!

Our process is more labor intensive, but we like the end results much better and find it well worth the effort. So here is what we do!

This is a post I wrote up last year with our process when I went to visit my parents and to restock our Prickly Pear supply.

Bountiful Baskets in their area was offering a 12lb box of red prickly pear fruit that week. I put in an order, but I wasn't really sure that 12lbs would be enough. So my parents went up to the family ranch in the mountains and picked me a bucketful the week before I came down. Now, when I saw a bucketful I really should saw a Bucket Full. This was a 5 gallon bucket packed to the gills, along with a 1/2 gallon bag that wouldn't fit. They called and asked if one bucket was enough. We thought it might be, but if not we could go pick more. I didn't realize how packed they got that bucket though. We definitely didn't need more! 

Prickly Pear Cactus Fruit


They put the whole bucket in their freezer to keep these perfectly ripe fruit all ready for me. It took forever to thaw those out, but they sure were pretty!

But then it came time to juice these babies. We've used electric and commercial juicers before, but they gave a watered down juice, and we like ours to be nice and concentrated. Cameron read different techniques and ideas online and we've come up with our own method to get the juice as concentrated as we like it without having to spend hours boiling off water and ending up with minimal juice.

Once I finally got the prickly pears thawed enough, I put some in the big pot and added about 2-3 inches of water. I figured out later in the day that smaller batches worked better than big batches, but by then I was on a roll and didn't take more pictures...so these are pictures of the first big batch. I steamed these until they were completely soft and mash-able.

Juicing Prickly Pear Cactus Fruit

Next comes the straining, mashing, and more straining. We tried using cheesecloth at first but it let through more fibers than we wanted in our juice, so we use a clean pillowcase (of course I had to use an orange one). After washing and sanitizing a five gallon bucket, we put the pillow case in and slip the edge over the lip of the bucket to hold it on. Well, that's what I did. When there are two of us at home I can help hold the bag while Cameron pours or vice-versa but I was all alone this day and this is the method I came up with to do this flying solo.


Once the pillow case is in place I pour off the juice in the bottom of the pot, trying to not pour off any of the fruit or pulp. Once the juice is out of the way it is really easy to mash the fruit. We just use a potato masher.


You want these as mashed as you can get them. The skins won't mash down too much, but the insides should be pretty much pulp. 
Juicing Prickly Pear Cactus Fruit

From there carefully (this is very hot prickly pear pulp!!) pour the prickly pear pulp into the pillow cased bucket.
Juicing Prickly Pear Cactus Fruit
Mmmm, doesn't that look appetizing. 
Now it's time to squeeze. Again, I realized I couldn't do this like we normally do. With two of us one can hold the bag while the other twists and squeezes. With only two hands, I couldn't really do that, and you do need both hands to squeeze the juice out.

So if you're flying solo on this, here's how I figured this out. I went and found a good sturdy broom and tied the bag to the top. This was a little tricky to do without splattering all over the place, but I finally got it. I put the bucket up on a little chair (regular dining room chairs were too tall, but I found a little kids chair and that was the perfect height for the bucket. With the bucket on the floor there were too many splatters going on; having the bucket higher caught more juice and made less of a mess (but you will still get some splatters). I propped the broom up on the corner of the cupboards so that the bag hung into the bucket on it's own.
Juicing Prickly Pear Cactus Fruit
The prickly pear juice doesn't stain cloth (at least not easy at all...I used a white washcloth to wipe the counter and there's not a speck of color on it after rinsing it out), but I didn't know if it would stain wood and didn't want to find out, so I was careful to quickly wipe up splashes on Mom's nice hickory cupboard doors and protected the chair with an old towel.

From there I needed all hands on deck and the pictures had to stop, but it's pretty easy to explain from here. You will want some gloves on (I just used regular cleaning gloves, but you can go thicker if you want). The spines and glochids get soft in the steaming process and most of them don't make it through the bag, but a few will. The gloves will help protect your fingers from stickers (not 100%, but much better than bare hands). The gloves will also help protect your hands a little from the heat. I wore a pair of gloves and then used another pair out loose as "hot pads".

Once your gloves are on start twisting the bag slowly and squeeze out the air until you get the bag tight around the pulp. From there then just keep the pillowcase twisted up tight and squeeze that pulp as much as you can. You may have to loosen the pillowcase a little and move the pulp around some here and there. You want to get as much of this pulp juice out as you can as it's the concentrated good stuff.

And that's the juicing process! Once I had every single prickly pear juiced I ended up with nearly 5 gallons of juice!! We definitely didn't need to go pick more fruit.

Having two different varieties of prickly pear fruit was fun to try out. The one has a much deeper and more vivid color, and has a stronger flavor, but the other is more naturally sweet and has a mild flavor. I personally prefer the wild prickly pear (the stronger flavor and color), but the cultivated prickly pear was yummy too.
Juicing Prickly Pear Cactus Fruit

I spent the rest of the evening making 28 half-pint jars of jelly (recipe at the end of this post) before I decided to call it quits for the night and put everything away for the next day. I had one batch set up really good, one batch set up okay, and one batch stayed syrup. Prickly pear jelly seems super temperamental, but luckily if it doesn't set up the syrup is super yummy anyway!

Prickly Pear Jelly Recipe: 

Ingredients

  • 2 1/2 c. cactus juice
  • 1/2 c. lemon juice
  • 1 pkg pectin (we like Surejell)
  • 4 c. sugar

Directions:

  1. Dissolve the pectin in the lemon juice. 
  2. After the pectin is dissolved in lemon juice, stir in the cactus juice. 
  3. Bring to a rolling boil. 
  4. Add sugar. 
  5. When it comes to a rolling boil (stirring occasionally), cook for exactly 3 minutes. 
  6. Pour into jars and seal. (You can get sealing instructions here). 

This will fill 5 half pint jars. A single batch sets up really well usually. A double batch is iffy. The chemistry gets off when you double this. I need to work on tweaking this and figuring out the correct proportions for a double batch so that this doesn't have to be made in single batch quantities.

I'm so excited to try out all these new Prickly Pear recipes this week! Stay tuned for fun new recipes!