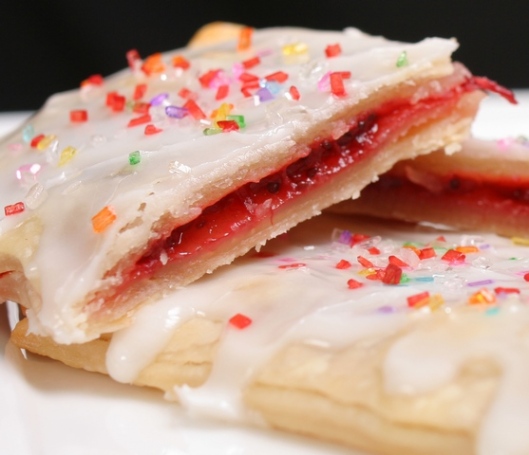
Saturday, March 31, 2012

Pop Tart Pains

Homemade Pop Tarts

I can't see Pop Tarts without thinking of Brian Regan. "Yeah, my doctor told me to eat more fruit, so, what better source than a thin layer in a strawberry frosted Pop-Tart....You can microwave a Pop-Tart that just blew me away, that you could do that. How long does it take to toast a Pop-Tart? A minute-and-a-half if you want it dark? People don't have that kind of time? Listen, if you need to zap fry your Pop-Tarts before you head out the door, you might wanna loosen up your schedule."

If you haven't heard his whole pop tart routine, you should go check it out. It's funny stuff. 

Anyway, I loved pop tarts as a kid and I still love pop tarts as an "adult" (I still feel weird calling myself an adult, I don't know why). I'd never even thought about making my own though. Christina emailed in her Pinstrosity when she followed a recipe she found for homemade Pop Tarts. 
The Original Pin
http://bakememore.com/2009/02/15/sorry-kelloggs-these-pop-tarts-will-make-you-crumble/
Christina says, "Simple enough, right? Pie crust, jelly, fold over and bake. WRONG."

The Pinstrosity


Christina tells us, "I followed the directions! I swear! My glaze tasted like SOAP. I felt bad for making my kids try it. ha! It was better after being ON the pop tart. But all the goods oozed out of them.:/ The kids still liked them but they sure weren't pretty and only had a slight taste of jelly. Yes, my kids love dough." 

I'm so glad to see there are other kids that love dough. I grew up on dough. I love dough. 

Just from reading the original blog post and looking at these pictures I have a few ideas for improvements, but I haven't had the chance to try them yet. I'll repost when I do test them out. But here's what I'll do in my first test: 
  1. I love my pie crust recipe (ok, so it's really my mother's recipe), so I'd use it rather than a store bought refrigerated crust (some of them are good, but some of those taste like cardboard).
  2. I've just had better luck with pies and such when I roll the dough out a little thicker than the recipe normally calls for. It makes the crust stronger and gives more substance. Maybe it'd help hold in the jelly better? 
  3. I'd probably crimp/pinch the dough edges together rather than use the fork method, just in an effort to seal the edges better. I don't know if that'd make a difference or not. I'll have to report back on that. 
  4. I'd probably stick with the 1 tsp of jelly/jam to start out with, but by Christina's results, that may be too much. That's just going to have to be trial and error. 
  5. Then for the glaze: I'd add a little bit of vanilla extract to help with the flavor. Then I'd make the glaze really thick, so that as it baked and spread out, it wouldn't all run off the tart. 
So...without testing it yet, those are my first thoughts. Perhaps I can test this out tomorrow and report back, but today my time is way over booked. If any of you have any suggestions or tried and true methods, let us know! 

Thursday, March 29, 2012

Popsicle Stick "Snap" Bracelet

Marquette here! We received a Pinstrosity from Amanda about making bracelets out of popsicle sticks. Genius right?

The Original Pin
http://www.thepinkandblueblog.com/2011/06/be-your-own-designer-diy-popsicle.html
Boil the sticks for 15 min., shape in a cup and "Wah Lah!" "Voila" a bracelet! (Wah Lah is bit of a family joke...I know it's voila, but we've been getting a lot of comments and messages about that, so I thought I'd "fix" it). Awesome, no? Amanda, along with her mother-in-law and niece, decided to try these out, but they ran into problems when the popsicle sticks kept snapping and breaking instead of bending to fit the cup (there's the snap part of these popsicle stick snap bracelets...hahahaha, I'm so funny. Ok, not really...today I'm not feeling so witty). They even tried soaking the sticks longer, and that didn't work either. Then the cups they had on hand had to large of a circumference to make a bracelet that would fit well. Amanda said "I don't see these curling around my wrist." 

The Pinstrosity

I couldn't pass the chance up to test this out and see what I could come up with. I love testing pins and projects. Anyway...here's how mine came out:


I decided to do my testing in stages to see if I could figure out how to get these bracelets made. I stuck one popsicle stick in a jar of room temperature water, then I put 3 other sticks in a pot of boiling water. After 15 minutes I pulled one stick out of the pot and I pulled the stick out of the room temperature water. The stick in the room temp. water bent into the glass beautifully, no problems at all. The stick that was in the boiling water for 15 minutes snapped in half really easily. I pulled the next stick out of the boiling water after 25 minutes of total boiling time, and that stick bent to the shape of the cup, but it was hard to get it in the cup and it wanted to snap. It didn't form to the cup completely, it's still kinda stiff. The third stick I pulled out after 35 min. of total boiling time and that stick bent to the form of the cup beautiful and easily. They are all still drying (the directions on the blog say to let them dry overnight, so they are still drying), so I don't know the final finished results, but I imagine they'll dry just fine. I used the smallest cup I have and, like Amanda, I think these are going to be too big for my wrist.

So, either let the sticks soak in room temp. water and immediately shape to the cup, or let the sticks boil for 35 min. and let it cool before forming them to the cup.

Now I just have to decide how I want to paint or decoupage them. Hmmm....


Wednesday, March 28, 2012

Peepster Holiday Peril

Easter Peeps Centerpiece

  Em here, I am back! After a fabulous week in the Caribbean (tough life right?), I am back to Blog! A lovely thank you to our wonderful Marquette for blogging full time while I was gone, I owe ya one!
 So St. Patty's Day is far over, and now to a much sweeter holiday, Easter! We received an email from reader Kim about a cute (and yummy) centerpiece for spring, her attempt while honorable, didn't quite turn out the way she hoped, check it out:

The Original Pin

The Pinstrosity

  Lets take a second to look at some differences that may have contributed to this not quite being what she was looking for:
  • The vase in the original seems to be slightly larger, allowing for three peeps to fit, instead of two, the original doesn't look quite so cramped.
  • Kim said she didn't have flowers, so she wanted to try eggs, the problem with that is the eggs didn't quite fill in all the spaces she was hoping it would.
  • The Jelly Beans are more of a Valentines color scheme, the green in the original is very Springy ( although the red Jellys I  really don't mind, I probably would have used leftover Jelly Bellys too, if you have em' waste not!)
  • When looking at the original pin, after some investigation, I found that the flowers were placed in a cup filled with water, that was placed in the middle of the vase, this helped to keep everything in place, because there wasn't was much room for everything to jostle around.
   So the other issue here are those pesky marks from having to separate the peeps, I have a few ideas on how to solve this.
  •  I do believe they sell individual peeps now days, so if you are willing to spend more, that could work.
  • Another idea is to use the peeps on the end of the rows in the packaging for the corners, place the non torn peeps on both corners, and any ole' peep in the middle, you might have to buy more packages to do this, but hey, you wanted to eat a few anyways right?
  • And I haven't tried it, but the thought came to me( and Kim mentioned this also) to color the white marshmallow part with a pink highlighter, (or yellow, or green, what have you) the peeps might just match the color perfect, worth a shot. Then you can eat them later  might not want to eat them after all that.
All in all very cute, easy fixes, and maybe even a tasty treat ;) Happy Peepster Holiday everyone!

                                    -Emilee

Tuesday, March 27, 2012

Pretzel Roll Buns

It wasn't until middle school that I discovered there was such a thing as a soft pretzel...I was instantly hooked. I don't like the small crunchy ones, unless their coated in chocolate or flavored yogurt. Mmmmm. One of the great things about doing this blog is that we are being introduced to some fun and funky new food ideas that may not ever have come our way before, and this past week we got a great food Pinstrosity from Leanne that I'm dying to try out now. Pretzel Rolls!

The Original Pin
http://une-bonne-vie.blogspot.com/2010/08/pretzel-rolls.html
Leanne tells us, "I was thrilled to find this recipe and it looked so good. I followed the recipe, although I used my kitchen aid to mix and I used whole wheat flour instead of white." 

And here are her results:
The Pinstrosity


They don't look exactly like the picture, but hey...what project hardly ever does, right? Leanne say that this recipe "made 15 HUGE buns. Like small loaves of bread. If I had made them for a picnic lunch for 15 people it would have been great. Piling cheese and veggies on them would have been lovely."


Her other problem...getting the salt to stick to the pretzel roll/buns, but that was, as she pointed out in the email, probably because they didn't have coarse sea salt on hand to use (I'm assuming that means she used regular table salt?). 


So not a complete disaster, but this didn't quite turn out how Leanne had hoped. She sent along her own recommendations for the future: 

  • Make 30 buns instead of 15. Freeze some for later. 
  • Next time I'll make some pretzels out of the dough as well. Just because.
  • And one I'm adding, grab you some coarse sea salt for this, because what is a pretzel without the salt?
                                                                                                

Monday, March 26, 2012

Everlasting Green Onion

My sister e-mailed in a Pinstrosity that she just couldn't get to work...The Everlasting Green Onion pin that took the web by storm.
The Original Pin
http://homemadeserenity.blogspot.com/2011/03/putting-food-by-beef-onions-and-vanilla.html 
Just put the white ends in a jar of water, put it in the sun, and in a few days time you'll see growth!

Well, this didn't quite work out for my little sister. She said, "a couple weeks ago I got a bunch of green onions. I decided to try out this tip for having almost continual green onions. I saved the white end, put them in a glass of water, and put them on the windowsill. After a week and a half there was no new growth, and my kitchen smelled like strong onions starting to go bad, so I dumped out the failure of this pin. I don't know if I cut too close to the roots for it to grow again, or if I needed to change out the water, or if it was too cold out side so the cup was exposed to too cool temperatures, or what. If it has worked for anyone else let me know what to do!"

Now I had great success with this, and I didn't even have a sunny window to put the onion ends in. I saw growth on the 2nd day. So when she and I got together over this past weekend for family photos we talked about this to try and figure out what went wrong. Luckily it just took one question..."How much of the white end did you leave?" In our family we use just about the entire green onion, and so she had cut down pretty close to the root and then put that little end in the water. That there was the problem. When I tried it I left at least an inch or an inch and a half of the white end above the root. There needs to be enough of the actual onion to be able to grow and to get both water and air. So if you're wanting to do this, you'll have to think ahead and remember to not use as much of the onion as maybe you're used to (if you're like our family). 


Saturday, March 24, 2012

Cookie Bowl Mayhem

My mind was blown when I was first introduced the dessert of all desserts...Pizookie. Ice cream over a half baked cookie...um, yes! I had a friend decide to make pizookie bowls, as she had seen her daughter do, and let's just say it didn't work so well. The cookie dough went all over the pan instead of forming bowls. But, not willing to let good cookie dough go to waste, we just plopped the ice cream on top and scraped bites off with a spoon. It still tasted heavenly. Since then I have seen many disasters and many successes with the idea of a pizookie bowl as people find there's more to it than just glopping some cookie down on an upside down pan. Along with many of us, Tessa discovered this the hard way.

The Original Pin:
http://www.wilton.com/recipe/Sugar-Cookie-Bowls 
Now, I don't know why this recipe is called Sugar Cookie Bowls and they show Chocolate Chip Cookie Bowls...but I'll address that later.

Anyway, this looks pretty easy. Put cookie dough over pan, put in oven, pull out perfect cookie bowls. Tessa set out one night to put these scrumptious bowls together for her husband. She says, "I whipped up the batter in no time and even made a cake to go along with our cookie bowl treats. I thought I'd get creative and make a cake bowl too, just for good measure. As my cookie and cake bowls baked I thought about what could possibly go inside them, as we're still a pretty low carb family (obviously). I made some Jello pudding (sugar free, very low carb!) and got so excited when I found chocolate chips to go on top. Oh how delighted my husband will be to come home to a pudding filled cookie bowl with chocolate chips. What a great wife I am... "

The Pinstrosity:
http://tessatauschek.blogspot.com/2011/12/i-hate-you-pinterest-i-hate-you.html 
Well...things didn't turn out quite as expected. This is about how the pan looked the first time I had these too. The only thing to do now is to just dump the ice cream (or pudding) on top and eat it anyway.

After reading Tessa's email and looking at the original pin, I had my theories about what went wrong and how to make a Pin win out of this, but I wanted to do some tests first. I whipped up the Sugar Cookie recipe given on the site, following their directions exactly. I wasn't sure how it'd turn out so I decided to start by just baking one. I put it on the cupcake pan (I don't have one of the fancy cookie bowl pans, so I just used my cupcake pan) and pressed the dough snugly over the upturned cup, and put it in the oven. It worked okay-ish. I shouldn't have smooshed the dough down over the pan...as it cooked it tore and left gaping holes. So I quickly ate that one and decided to try again, this time just gently draping the dough circle over the cup, letting it fall however it did naturally. This time...success! The cookie cup was perfect. I quickly gobbled that one too, then realized I needed pictures. Oops. So on to the next tests. The recipe given on the site was for Sugar Cookies, but the picture shows what appears to be chocolate chip cookies. So I decided to try adding chocolate chips to the dough to see how it worked. I couldn't roll the dough as thin as the recipe called for, but it was close-ish. I then also wanted to see how these cookie bowls worked with silicone shaped pans. So I pulled out my new spring pan and put the dough circle over the bee shape and threw both pans in the oven. Here's what I got:


 It doesn't look like a bee from the top...and it tore a little, but not badly. And then when I dropped it on it's head while turning it over I had a near decapitation. So don't drop your cookie bowls. But the bowl does look more like a bee from the bottom of the cup.


And then this is how my chocolate chip bowl turned out. My only boo-boo there is one of the chips slid while cooking making a small hole, but that was it. I'd definitely say Pin Win!


So now that I was done testing and done reading various website postings about cookie cups, here's what I learned:

What Went Wrong?
  • A lot of people just assume you can put any cookie dough or batter on an upturned pan and it'll come out right. As many of us have learned, that's not quite the case. All doughs and batters expand, but some do so differently than others. Generally, Chocolate Chip Cookie dough is very sticky, it expands and spreads a lot when cooking, and it's quite greasy. Sugar Cookies on the other hand are usually less sticky, less greasy, and they more or less keep their shape.
  • The amount of cookie dough placed on the pan makes a difference too. I know my first thought would have been "I want a good thick bowl, I'll put a lot of dough." Well, that doesn't really work. All the extra dough just "melts" and slides off and goes all around the pan. Here the old adage "Less is More" really rings true. 

How to fix this and get a Pin Win:
  • Choose your dough wisely. If you can roll the dough with a rolling pin (and not have all the dough stick to the counter and the pin), it'll probably work. Cookie recipes where the instructions say to "drop by rounded teaspoons" generally won't work, the dough is too soft and will melt all over your pan. You can try adding extra flour to the sticky doughs, but be careful there as too much flour will make your cookie taste...floury. 
  • Limit the amount of dough you place on the pan. This recipe said to roll the dough out to 1/8" thickness. That seems really thin, but it lets the dough cook thoroughly all the way through at the same time so there was no running. 
  • If you want chocolate chips in the sugar cookie recipe, you either have to roll the dough a little bit thicker (mine was about 1/4" thick) or you need to use mini chocolate chips (and then you'd be able to roll the dough more thin). 
  • Let the bowls cool for at least 5 minutes before trying to get them off the pan. Once they had cooled some, I slid a paring knife under the bottom edge and gently lifted up. The bowls came right off the pan, no problem. Other things that helped make the bowls easy to get off the pan was spraying the pan with cooking spray before cooking, and then the dough was fairly well floured from rolling it out. 
So go forth and conquer the cookie bowl world...and if you end up with cookie smears instead, just laugh and dump the ice cream right on top. No sense in wasting a good cookie. 


Friday, March 23, 2012

Gummed Up Roll Up Crayons

I am constantly amazed at people's creativity and ingeniousness. The thing I hated most about 1st grade was that we had to dump our crayons into a communal bowl. I knew my beautiful sticks of colored magic were going to get mutilated...and they did. It was not long before the communal bowl of crayons because a bowl of teeny broken bits of dead crayons. There were some kids that broke them on purpose, just to be stinkers, but then we all broke crayons every now and then...I mean come on, we were 6. But I hated using broken crayons. Hated hated hated it. Wow...I was a crayon snob, bahahaha. Anyway...Holly found a pin that had a solution to these broken crayons and how to prevent the breaking and the non-use of the broken crayons. Roll up crayons in an old glue stick tube!!
The Original Pin
http://www.infarrantlycreative.net/2007/12/wanna-be-silkies-holder.html 

Melt crayons, pour in the empty glue stick tube. Genius, no? Holly said "I haven't done too many Pinterest crafts, but I did attempt one, and it took 2 tries to get it right!"

The Pinstrosity
Holly didn't have pictures of her Pinstrosity, but she said that "it looks easy enough, and it was, but the thing that seemed to matter was the type of glue stick I used! The purple Elmer's disappearing glue stick wouldn't scroll the crayon up! But the cheap Roseart ones, which were 3 for a dollar at the dollar store, worked like a charm!"

I'm a picture-oholic, so I decided to pull out my bag of test subjects and give this a try to see what I could come up with. I decided to test two different types of Crayons in this too, so I used Crayola and I have no idea what the other brand was...it didn't have a name other than Crayons on the box. And all I had at home was the Elmer's Purple Disappearing Glue Sticks, so I decided to see if I could figure out how to make them work. I feel like a MythBuster for Pinterest, hahaha.

The green tube is the off brand crayon, and the pink is the Crayola crayon.  
Here's what I found:
  • The only difference I found between the brands of crayons is that the off brand crayons took 3 minutes to melt in the microwave. The Crayola crayons took 45 seconds. I don't know why that is, but there you go. 
  • As Holly found, the rollers didn't really want to roll up very well. Mine did, but I really had to crank hard on it, and that's just annoying. 
    • I made the green stick first, and when it didn't want to roll up I put it in the freezer for 10 minutes then tried again; it rolled up and down beautifully after that. 
    • I made the pink stick second and didn't wait until it was completely set up to roll it up and that seemed to do the trick too. 
  • I think that the problem is that the crayon wax gets into the "gears" of the glue stick and freezing the wax, or turning it before it has a chance to set up completely helps to keep everything moving. 

So this one just takes some fiddling with to get it to work just right, but it's a keeper I'd say. Between Holly's discovery and our tests, hopefully this will work for you now. Thanks so much Holly!


Thursday, March 22, 2012

Scrub a Dub Dub

Let's face it...we all pretty much hate cleaning. I know there are a  few of you out there who like it...but I'm definitely not a part of that club. Although it would make keeping my house clean much easier probably. I know if I hear or see an idea that's supposed to make cleaning easier or quicker, I'm all over that. So I was a little disappointed to see that this wasn't a magic cleaner...but it wasn't a total flop either. 

The Original Pin
http://lifehackery.com/2008/07/22/home-4/ 
Pinner Carolyn says "So the original pin says to 'add a cup of baking soda to the toilet & let it soak for an hour than flush. It will clean the toilet & absorb the odor.'" Sounds pretty simple to me, I would have tried it too!
The Pinstrosity
Ok...we all know what a dirty toilet looks like. Carolyn says "No picture of my toilet because, well, let's face it...no one is going to take a picture of their toilet unless
a) their kid flushed a weird object down the toilet and they think it is funny
b) your toilet is really clean, and your trying to show how a cleaning technique works
or c) you are trying to sell a toilet.
Since I am not doing any of the above I am not going to share a picture of a dirty toilet."

So my first thought was, "I will!" but then I decided I didn't really want to broadcast my lack of cleaning skills and motivation across to the whole world. So I googled dirty toilets and that was a mistake...man I 'bout lost my lunch. So no dirty toilet picture. I'm sure we've all seen a dirty toilet.

Anyway, Carolyn reported back to us and said that this cleaning technique "did absorb the smell well, but my toilet is not any cleaner than it started out. Even though it didn't clean the toilet, the baking powder did work well to make scrubbing it super dooper easy!"

What Went Wrong?
I'm no expert here (especially when it comes to cleaning), but I can give you a few good guesses as to why this didn't quite work as Carolyn had hoped it would. Baking Soda will definitely help neutralize odors...that's one of the things it's known for. But it's not really abrasive enough to do much scrubbing by itself. For those people who clean their toilets every other day, baking soda might do the trick to keep the bowl clean, but for those of us who unfortunately are not as tidy and on the ball, the baking soda just can't do the job to scrub the gunk off. But, as Carolyn mentioned, it would help to change the pH and break the gunk down a big to make scrubbing the toilet easier. But by the time you've let your toilet sit for an hour, you might have well just spent the 5 minutes scrubbing it normally anyway. 


Wednesday, March 21, 2012

Cluttered Mobile

Hey there, it's Marquette. A while back Emilee and I were planning a baby shower for my sister (party planning...another love of ours!) and I came across this awesome idea for decorations:

The Original Pin:
http://www.marthastewart.com/265650/the-modern-baby-shower 
Aren't those cute?! I love how clean cut and simple they are, but they still add such fun color and pizazz to the room. I read the tutorial and decided to jump on the idea, making a few changes that I thought would work better. First wrong step, right there.

  • The largest embroidery hoop I could find in town wasn't all that big, and I didn't have time to order one online, and I didn't figure 1 hoop was worth the 2 hour drive to the "big city" to a Hobby Lobby. So I went with the 12" hoop. I was grateful though that I could find this hoop at least. 
  • I decided to make 2 mobiles, but I only had one hoop, so I used the two pieces of the hoop individually. But then I wanted to try and hide the places where I tied the string on, so I hot glued ribbon around the edge. It sorta worked, but I think the look of the plain hoop would've been better. 
  • I decided to try using foam craft circles instead of paper for the circles. I thought they'd be more durable and look a little better. The foam circles only came in one size though, so I started hacking away with my scissors. I drew lines to follow, but a lot of the circles still came out wonky. 
  • Then, I tried painting the circles to match the shower colors. That went okay...but it was a huge pain in the neck. I had to do multiple coatings on some to hide the color below and finally on some I just gave up, so the paint isn't completely uniform...it's kinda splotchy in spots. 
  • I didn't cut the strings long enough. In the tutorial it says, "Remember, you want the mobile to have various lengths of circles to make it visually interesting." I thought I was making my string lengths different enough, but they still all kinda hang in a clump together. 

How to Fix It:
  • Use a larger hoop if at all possible. It will look so much better. 
  • If a larger hoop isn't available, make the circles smaller and maker sure to have a more dramatic difference in the string lengths. 
  • I really should have bought that circle cutter from the scrapbook section...then my circles wouldn't be so wonky. 
  • Paper circles rather than foam circles would have been better. The foam circles were heavy enough that they didn't spin around much. They just kinda hung there. 
                                                                                               

Tuesday, March 20, 2012

Mt. Dew Dud

I've seen this going around and around on a bunch of different sites. I know how it turns out, but because of its continuing popularity, we decided to do an official test and post it up.
The Original Pin
http://www.maniacworld.com/How-To-Make-Glow-In-The-Dark-Mountain-Dew.html  
How to make Mt. Dew glow. The video looks convincing. Looks like fun. But this is the result:
The Pinstrosity

"There's nothing in that picture!" you say. Wrong...my husband is in that picture holding the "glowing" bottle of Mt. Dew. Seriously. As you can see...it doesn't glow! Just look at the Cam-man's disappointed and disgusted face below when the flash was used.


Every time one of my friends posts it I tell them, "Don't bother, it's a hoax. It doesn't work." Slowly the word is getting out. Mt. Dew does not glow when you add baking soda and hydrogen peroxide. According to snopes.com, "The results claimed in the original video were likely created by the surreptitious introduction of a glow solution into the Mountain Dew bottle, either through off-screen manipulation or via a substitution covered by editing."

We were finally able to make it glow by cutting open a glow stick and pouring the liquid in the bottle. The exuberance lasted about 10.2 seconds. Then it just wasn't cool anymore.


Monday, March 19, 2012

It Burst my Glowing Bubble

Glowing bubbles would most definitely be the coolest thing since sliced bread. I'm an "adult" (by age only) and I still love bubbles, so glowing bubbles would just be even more awesome, right?!

The Original Pin:

The directions said to break the glow stick, add the glow stick liquid to the bubble solution, and Voila! glowing bubbles! 

I pinned this one on my "To Test" board because I was already a little skeptical. My first thought was "Won't the glow-in-the-dark liquid change the consistency of the bubble solution too much to work?" I decided that I wanted to test it out, because if this worked it was going to be awesome. 

I went to the store and they either had HUGE bottles of bubble solution (and I mean huge) or packs of small bottles. It took me forever to find just a single bottle of bubble solution that didn't come with a bubble gun or something of the sort. Of course of all the different characters/movies I was offered through my bubble selection, I had to go with Toy Story. 
My bubble and glow stick selections. 

Before I dumped in the glow-in-the-dark liquid, I wanted to know how well this bubble solution worked first. It was awesome! Lots of bubbles, all sizes of bubbles...definitely To Infinity and Beyond Bubbles. So I knew the bubble solution was working perfectly...now to see how the glow-stick stuff affected it. 

The Pinstrosity:

Cool glowing bubble solution...but no bubbles! I couldn't get a single bubble to form once I added the glow-stick liquid. I tried light breaths, hard breaths, sideways breaths, etc. No bubbles. The consistency just did not work at all. So I then had a glowing bottle of bubble-less solution.

Perhaps this would work with the huge bottle of solution as it wouldn't get as diluted down...but I don't know. That's an experiment for another day.


Saturday, March 17, 2012

Disappointment Filled Cupcakes

I tried a recipe for filled cupcakes a while back that failed miserably. Well, they tasted great, but they weren't filled at all. When I happened on this it seemed so simple and so perfect!

The Original Pin


Just put a kiss in the middle 5 min. into the baking...that's it?! Sounded too good to be true. And in a way, it was. 

The Pinstrosity


I'm not a huge fan of just plain kisses, so I decided to try both plain kisses and the caramel filled ones to see if they both worked (I was of course hoping the caramel ones would work best). I used half plain kisses and half caramel kisses in the pan to see how they worked.

I also didn't have cup cake papers on hand (I never do), so I did what I always do with cupcakes and floured the pan (you know, that thing we all did before Pam?).

The caramel kisses sunk all the way to the bottom and stuck to the pan. We couldn't get a single caramel kiss cupcake out of the pan with the bottom intact (the cupcake on the right in my picture is the caramel kiss cupcake). And it looked like the chocolate just melted into the cupcake leaving the caramel mess. The plain kiss worked better. It stayed intact and most of them didn't sink all the way to the bottom (the one in the picture is about how all of them were roughly). But...it tasted normal. When you finally reached the center and bit into the kiss, it wasn't all that exciting. It tasted like you took a bite of a cupcake and then put a kiss in your mouth. Now I know this makes it slightly more exciting than the regular cupcake, but it wasn't all that exciting. 


Friday, March 16, 2012

I do not believe in Fairies

Quick...start clapping your hands! Louder!

Anyway....

I saw this pin and I have to admit...I was skeptical from the beginning:

The Original Pin
http://organisedchaoswahm.wordpress.com/2012/02/09/fairies-in-a-jar/ 

I followed the directions and this is what I got:

The Pinstrosity

No pretty sparkles, no fun colors, no floating look. It looks like some glow in the dark creature sneezed. With the lights on, it just looked like a jar with weird yellowish stuff in it. Poor dead fairies.

Has anyone had success with this project? If it is possible, we'd love to hear some feedback on how to make it work.


Thursday, March 15, 2012

Cake Plops

Marquette signing in. I first saw cake pops at my cousin's cookie shop in Hershey, PA, and I thought they were genius. All that next year I saw cake pops popping up all over and I still just loved the idea. I'm not a big cake fan, but these...I could eat them all day. So when it came time for our Halloween party, I knew that I wanted to try my hand at them. They looked pretty simple. I looked at pictures and jumped into the project.

Some Pinspirations
http://www.lovefromtheoven.com/2012/02/15/how-to-make-cake-pops-with-the-babycakes-cake-pop-maker-tips-tricks-resources/ 
http://www.cupcakecrazyincincinnati.com/index.php?main_page=page&id=11 
http://www.ontobaby.com/2011/03/handmade-bird-themed-baby-shower/ 
Don't they just look pretty! I thought so. Well, mine tasted good, but they definitely were plops rather than pops.   

The Pinstrosity
And those were the best ones...

What Went Wrong?
Coating the cake pops didn't go so well. They fell off the sticks into the melted chocolate, they crumbled, the chocolate stayed soft too long (and my house wasn't too warm, that's never an issue in the fall/winter), and I couldn't get the coating smooth on the pops. Here's a few ideas of why I think this all might have happened: 
  • I got impatient and pulled the cake pops out of the freezer before they were frozen solid. 
  • I used wooden craft sticks instead of the candy sticks.
    • The wooden sticks were way cheaper
    • There was only one package of the candy sticks left. 
  • I don't know if this made a difference or not, but I used different melting chocolate than I normally do. I usually use Almond Bark, but this time I got the little colored chips from the cake decorating aisle in wally world. 
How to fix this:
  • Let the cake pops freeze all the way. That will reduce crumbling and (I think) falling of the stick. 
  • Use candy sticks. The wood craft sticks didn't work well I think because of their shape (flat and skinny) and maybe cake just adheres to paper better. 
  • In the future, I'm going to just stick to the chocolate coating I know and love...Almond Bark. If I want different colors, I'll buy the candy coloring. 
                                                                                            

Wednesday, March 14, 2012

I've Lost My Marbles!

Marbled Finger Nail Polish
     Em here, so we got an email from Ashley about fingernail polish marbling, we did it a few times in beauty school back in the day, and we'll there is a reason that everyone isn't wearing it. It.Is.Messy. The look itself is great, and can make for a fun fashion statement, however, it is messy, time consuming, and takes some practice. So here we are to break it down.

The Original Pin


Curtesy of Tumblr


The Pinstrosity

   We didn't quite get a full explanation of what happened here, but seeing as I have had these EXACT results I think I can explain what happened what went down...this is the general tutorial you will find on Pinterest...


     Looks simple enough is what you are thinking, well I can tell you this RIGHT NOW, this gal had HELP, Help I tell you, HELP! This is not a one person job, and they left out one VERY important supply, scotch tape. For this little project you will need a small dish filled with water, the different colored polish you like, and a safety pin, a pencil or something to create your marbled effect, a top and base coat and something like an orange wood stick to clean up the nails and nail polish remover.

Create your marbled affect by dripping one drop at a time of the different polish in your dish of water, the smaller the dish the better...drip the drops just like shown in the picture above, one inside another, in any shape, pattern, or various colors.

Then using your pointed object (pin, pen, pencil, orange wood stick what have you) drag through the water starting at the center and working your way out creating your marbled-ness.

 Then start by doing a base coat of polish on your nails because it makes the polish go on easier.

 Next doing one finger at a time(then dipping it in the marbled water) tape all around the nail, creating a tape "border" so that when you dip the finger, the extra polish comes off easy when you peel the tape off.

Next dip the finger by placing the nail bed parallel to the water so that it just grazes the top of the water. Take the nail out, slowly and with the tip of the finger raising from a 90 degree angle (with the water), to a 45 degree angle, pointing away from you(like you are shooing someone away).

 Let the polish settle just enough so that it becomes slightly tacky, then peel the tape off gently. This should allow for easy cleanup with your orange wood stick dipped in nail polish remover.

You should have an awesome marbled affect-ed-ness with little mess, and the tape should make ALL the difference. Another pointer is to use actual nail polish because it tends to be the right consistency to stick to the nail, rather than acrylic paint which usually ends up being too runny.

All in all you COULD do this by yourself ( coo dos (spelling?) to you ) but it would prove much easier if you had a friend to help you with the taping, and cleaning, seeing as most people aren't ambidextrous.


Try this out for yourself and let us know how it goes, from my experience it usually takes a few tries before it turns out, but once you get in the groove it becomes much easier. Happy Marbling!

                                        -Emilee